Passport Prime Troubleshooting
QR Scanning
My phone/computer camera can't read the QR codes on Prime
When Prime is displaying the signed transaction as a QR code series, pressing up/down on the screen will increase/decrease the screen brightness. Equally, pressing left/right will increase/decrease the QR code density.
A combination of both of these adjustments is usually enough to cure most scanning issues from Prime's screen. If you are still struggling after this, try dimming the screen brightness of your laptop. Sometimes super bright laptop screens can cause glare on the Prime screen which makes it difficult for some lower quality webcams to pick up the QR codes Prime is displaying.
Prime can't scan a QR code
Dense QR codes like those used in multisignature wallets or larger transactions can sometimes take slightly longer to scan. As long as you see the % progress slowly increasing on Prime's screen, this means Prime is scanning and processing the information within the QR codes. If Prime fails to register any % progress at all, or completely stalls after making some progress, here is a list of adjustments to try:
- Ensure you are running the latest firmware version
- Adjust the brightness of the screen being scanned (your phone or laptop)
- Ensure there is no glare from direct sunlight on the screen being scanned
- Adjust the density of the QR codes being displayed (only possible where the wallet software allows. If you take this approach, you'll need to start the scan process again due to the way the information is split among different QR densities)
- Slowly adjust the distance between Prime and the screen being scanned
Address Validation
Address validation is failing
When using the address validation scan feature on Prime, these are the main possible reasons for failure:
- The address being verified is outside of the initial search window. To minimize search times, Prime searches 50 addresses at a time. When scanning an address with an index number outside of 0-49, you'll need to tap 'Continue Searching' to widen the search area and successfully verify your address.
- The verification attempt is being made from the wrong account. Ensure you navigate to the correct account on Prime before pressing Verify Address.
- The verification attempt is being made for the wrong wallet type. E.g., you have a multisig configuration imported to Prime, but this was not selected when choosing 'Verify Address'.
- The address being scanned is from a passphrase protected wallet, but there is no passphrase applied to Prime at the time of scanning. The opposite is also true.
NFC Read/Write Issues
Prime won't read or write to an NFC KeyCard
Passport Prime uses short-range NFC to communicate with the provided KeyCards. If Prime fails to read from or write to a KeyCard, try the following:
- Check card positioning - Center the KeyCard horizontally over the camera area on the back of Passport Prime to form a "T" shape. The card should sit across the top of the device.
- Hold the card correctly - Hold the KeyCard between your thumb and index finger, off to the side of the card. Do not cup the card in your hand or place your hand behind it — skin contact behind the card can cause NFC interference.
- Hold completely still - Reading and writing data takes a few seconds. Do not move the card until Passport Prime confirms the operation is complete on screen.
- Remove the Faraday sleeve - Ensure the KeyCard has been removed from its protective Faraday sleeve before tapping.
- Remove the Passport Prime case - If you are using a Passport Prime case, remove it before attempting to tap a KeyCard. The case can add distance between the card and the NFC antenna, preventing a reliable connection.
- Try a flat surface - Place the KeyCard on a flat surface, then lay Passport Prime on top with the back of the device (camera area) resting on the card in the correct "T" position. This helps maintain consistent contact.
- Remove nearby metal objects - Other devices, metal objects, or magnetic accessories near Passport Prime can interfere with the NFC signal.
- Try another KeyCard - If one KeyCard consistently fails, try one of the other two provided cards to rule out a defective card.
- Restart Passport Prime - Power cycle the device and retry the NFC operation. If the issue persists across all three KeyCards, please contact support.
PIN
Prime does not recognize my PIN
Prime is unable to change your PIN without you. There is no possible way to change your Prime PIN without knowledge of the current one. Take your time and think carefully about the PIN you set. You have 10 attempts to enter a correct PIN. After the final attempt Prime will erase the Master Key and you must recover using 2 parts of your Master Key backup.
Envoy Pairing
QuantumLink pairing is failing or stuck on the static QR code
When you first power on Passport Prime and accept the welcome terms, you should see a static QR code. Scanning this QR code with your phone's camera opens Envoy and starts the QuantumLink pairing flow. After you tap Connect with QuantumLink in Envoy and grant Bluetooth permission, Passport Prime should switch from the static QR code to an animated QR code series for Envoy to scan back.
If Passport Prime never switches to the animated QR code series, or Envoy reports the connection has been added but Passport Prime does not advance, work through the steps below in order. Most cases are resolved by Step 5.
Confirm Bluetooth is enabled on your phone in your phone's system settings.
Confirm Envoy has Bluetooth permission in your phone's system settings under Envoy's app permissions. If Envoy does not have permission, the animated QR code series will not appear on Passport Prime.
Keep Passport Prime and your phone close together, ideally within arm's reach, throughout the pairing process.
Confirm you have tapped Connect with QuantumLink inside Envoy after scanning the initial static QR code. The animated QR code series only appears after this step, not before.
Forget any existing Passport Prime pairing in your phone's Bluetooth settings. This is the most common cause of QuantumLink failing partway through. If a previous pairing attempt was interrupted, your phone may believe Passport Prime is already paired and block QuantumLink from re-establishing the connection. Toggling Bluetooth off and on alone will not clear this.
iOS:
- Open the Settings app.
- Tap Bluetooth.
- Find Passport Prime in the list of paired devices.
- Tap the info (i) button next to it.
- Tap Forget This Device, then confirm.
Android:
- Open the Settings app.
- Tap Connected devices (or Bluetooth depending on your device).
- Tap Previously connected devices if Passport Prime is not shown in the main list.
- Find Passport Prime and tap the gear/settings icon next to it.
- Tap Forget (or Unpair), then confirm.
Force-quit Envoy by swiping it away from your phone's app switcher. Do not just background it.
Toggle Bluetooth off and on in your phone's system settings.
Reopen Envoy and restart the QuantumLink flow from the beginning by tapping Connect with QuantumLink again.
If Passport Prime still does not advance past the static QR code after completing all of the steps above, perform a hard reset and begin the onboarding process from a clean state. If the issue persists after a hard reset, please contact support.
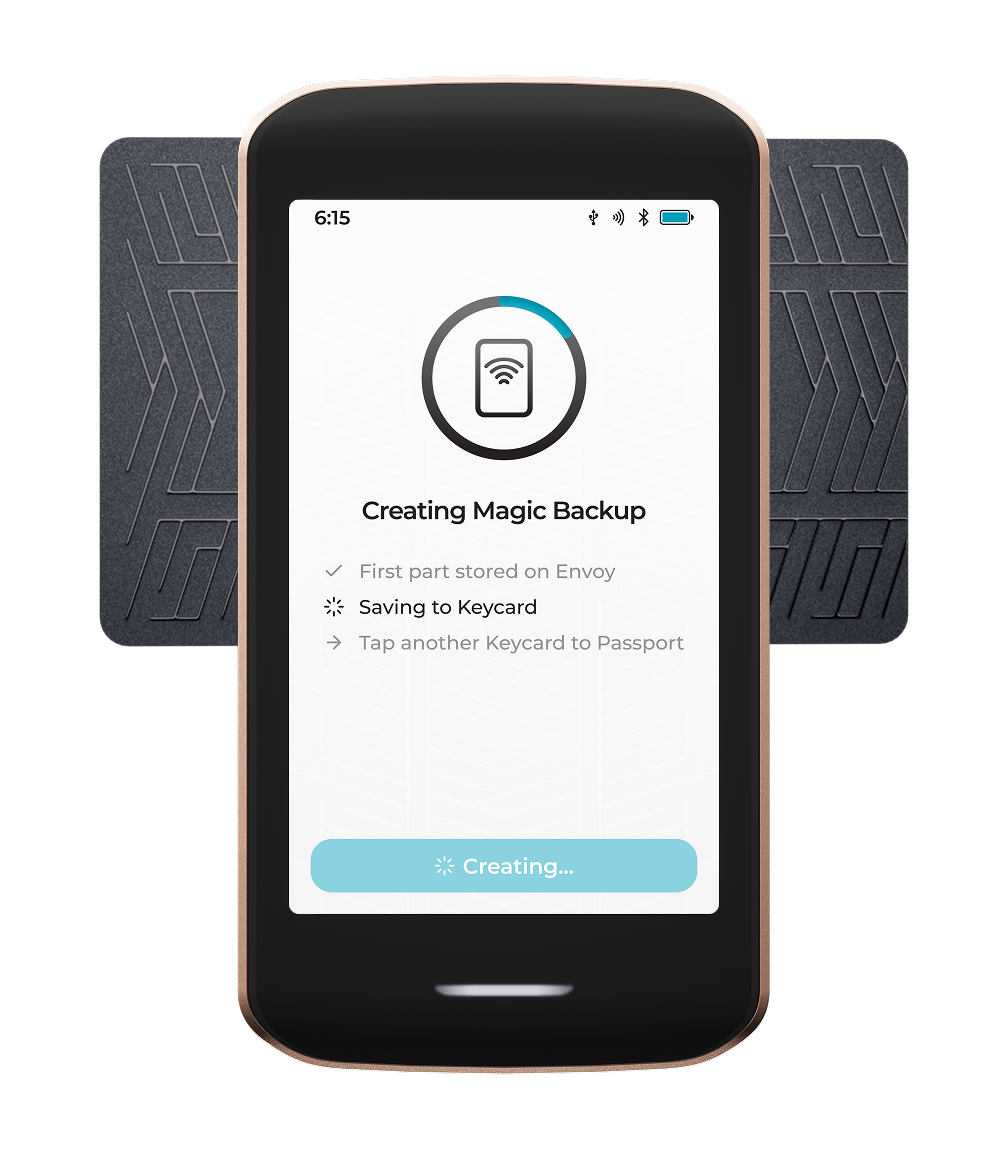
"Error Saving to Envoy. Passport was unable to successfully save to Envoy."

If you encounter this error during setup, it indicates that the initial pairing between Passport Prime and Envoy was interrupted or only partially completed. When this happens, incomplete pairing data can prevent successful Magic Backup creation during onboarding.
How to resolve
The most reliable way to resolve this is to perform a hard reset and restart setup from a clean state. This process will:
- Reset Passport Prime to a factory state
- Clear any incomplete pairing data
- Ensure Envoy and Bluetooth connections are properly reset before retrying
Once completed, begin the onboarding process again.
Hard Reset
I'm stuck during onboarding and need to start again
If you encounter an issue during the onboarding process and need to return Passport Prime to a factory state, you can perform a hard reset via the boot menu. Before doing so, ensure you remove any existing Passport Prime pairing from both Envoy and your phone's Bluetooth settings.
Step 1 - Access the boot menu
- Power off Passport Prime by pressing and holding the power button until the device shuts down.
- Power the device back on with a single tap of the power button.
- When you see the loading screen (shown below), quickly double tap the power button to enter the boot menu.
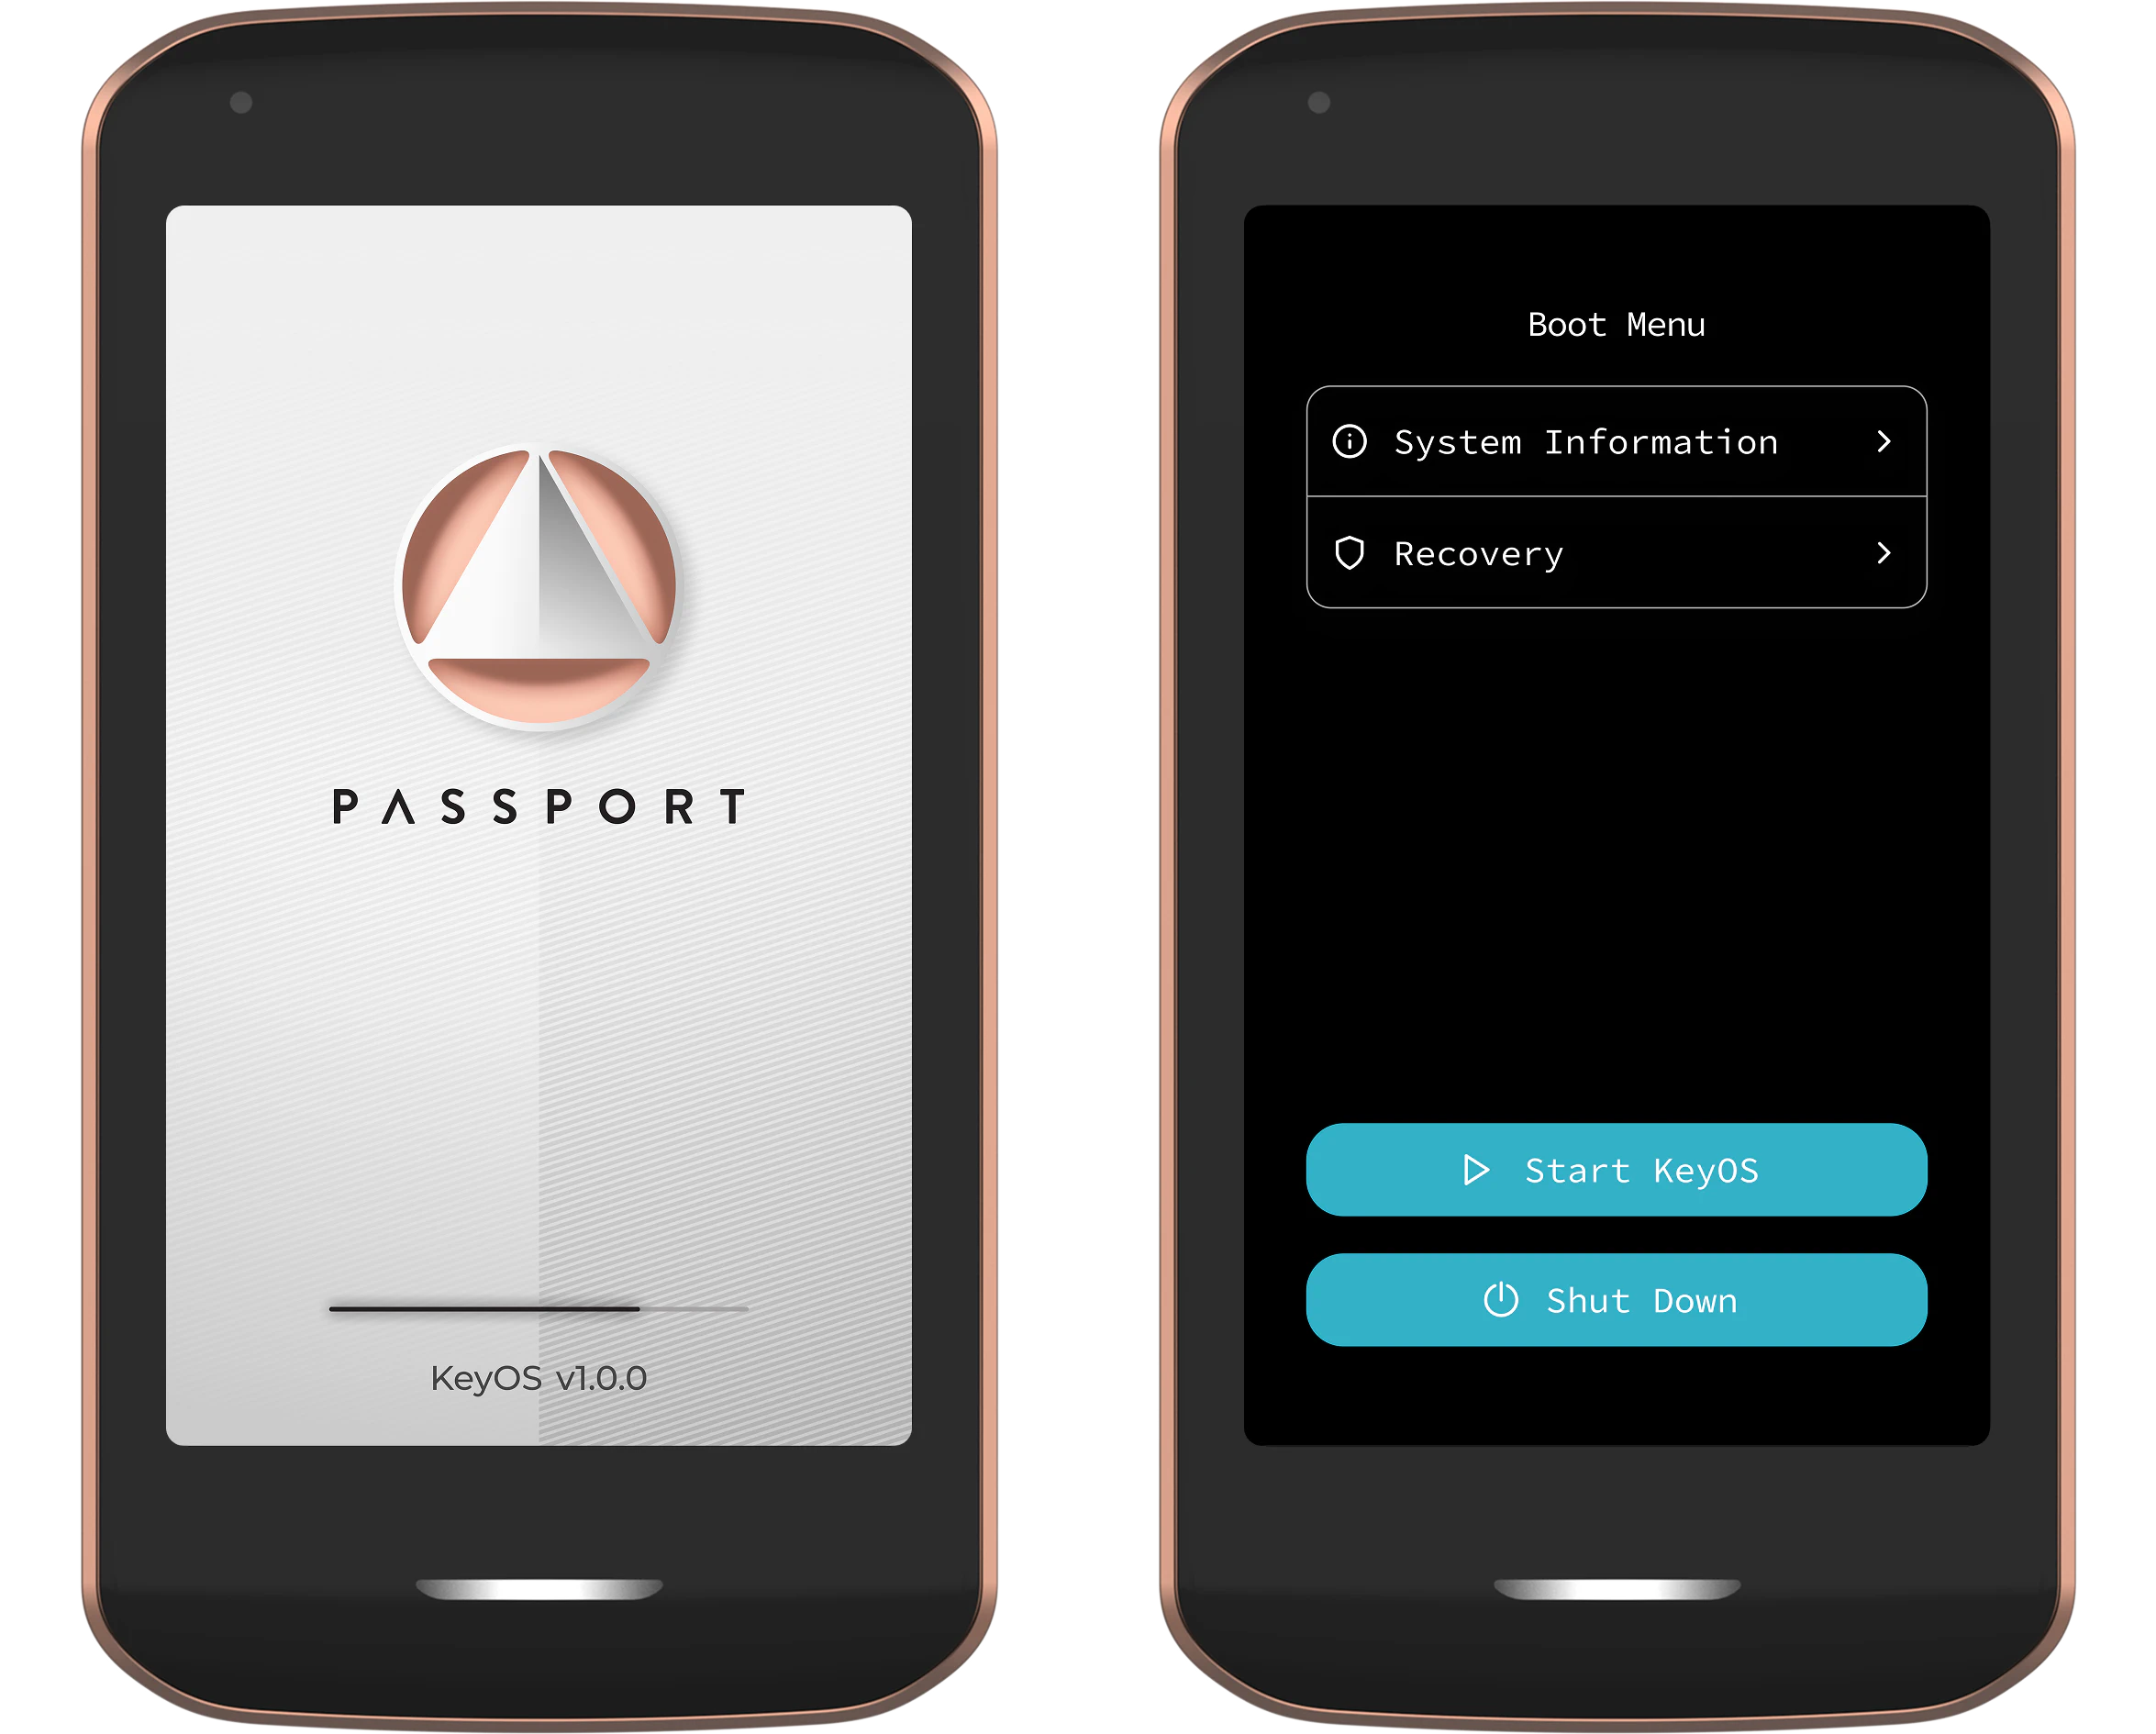
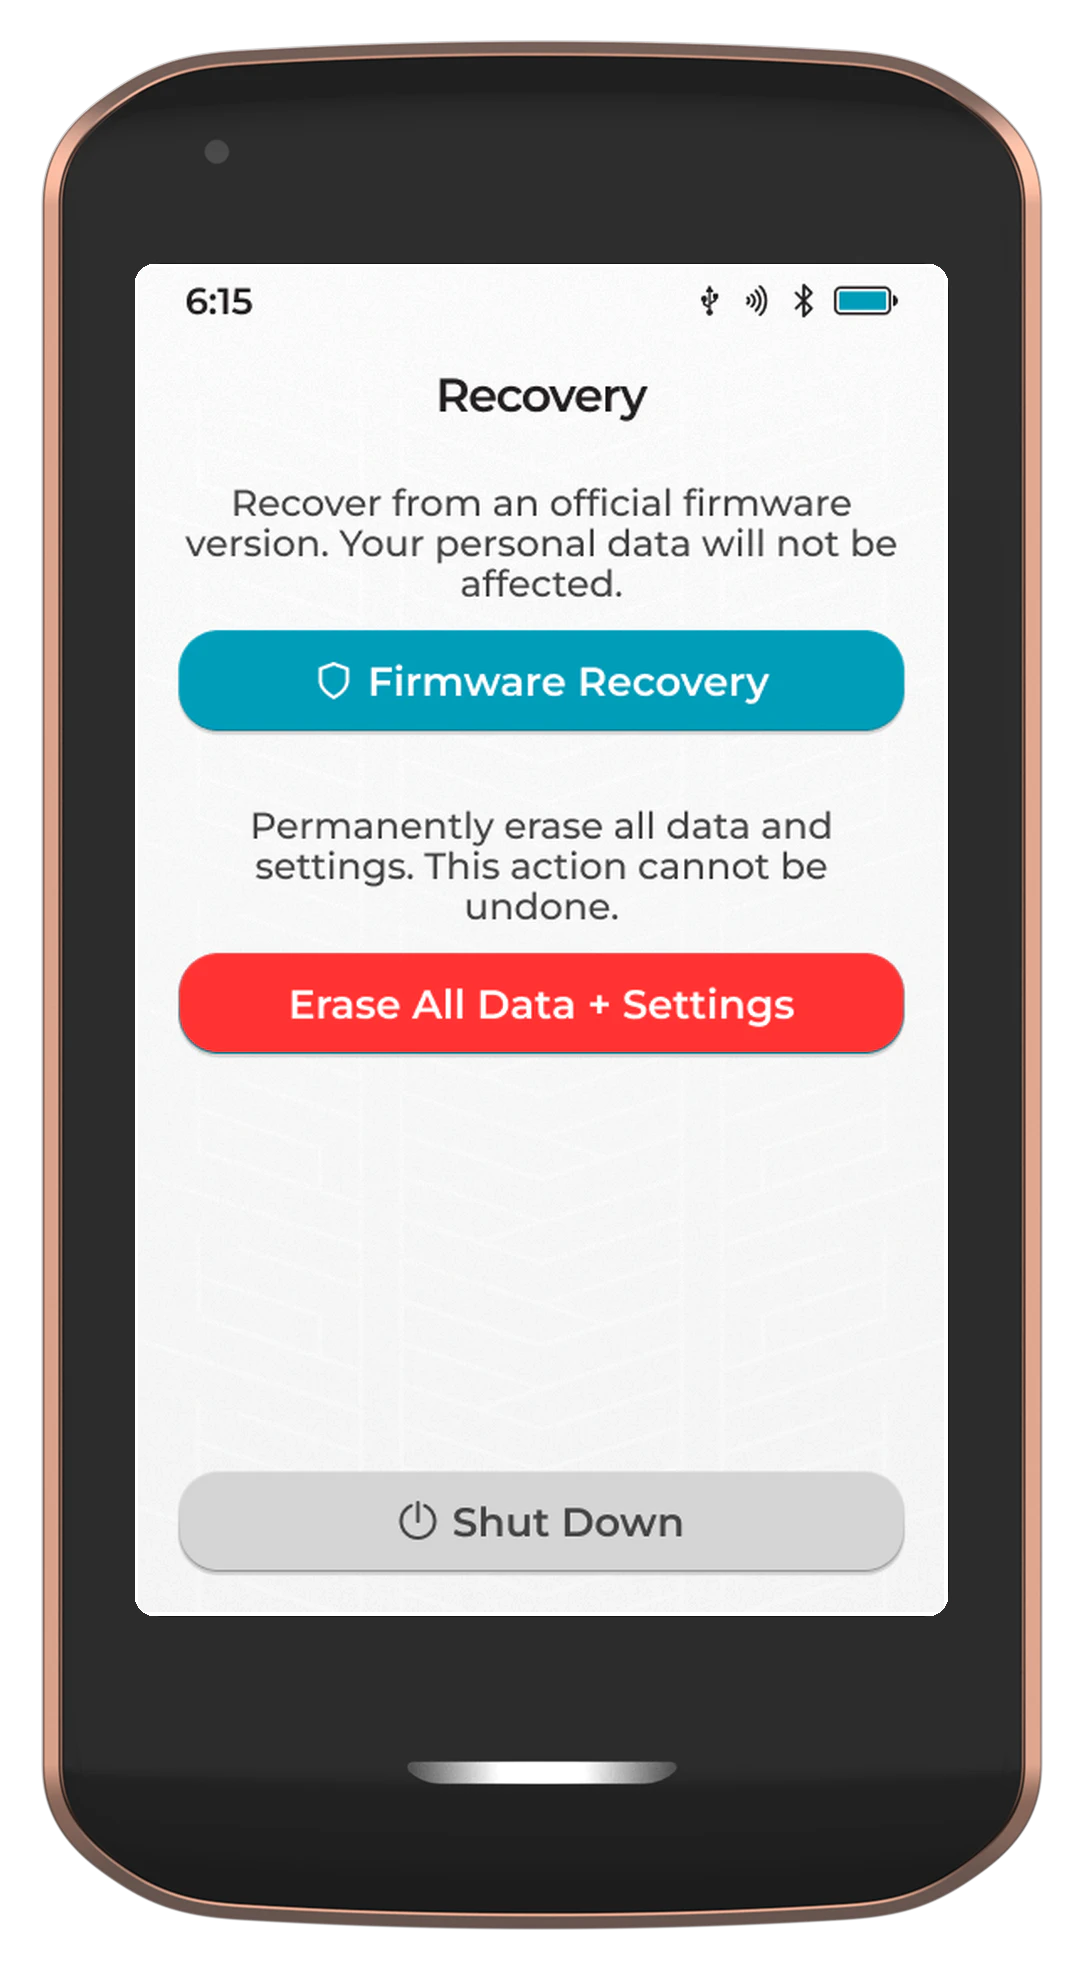
Step 2 - Erase all data and settings
- From the boot menu, tap Recovery.
- On the Recovery screen, tap Erase All Data + Settings. This will permanently erase all data and return Passport Prime to a factory state.
Step 3 - Remove Passport Prime from Envoy
Before starting the onboarding process again, ensure there is no existing Passport Prime connection in Envoy.
- Open Envoy on your phone.
- Navigate to the devices screen.
- If a Passport Prime is listed, remove it.
Step 4 - Remove Passport Prime from your phone's Bluetooth settings
You must also remove the previous Passport Prime Bluetooth pairing from your phone's operating system settings.
iOS:
- Open the Settings app.
- Tap Bluetooth.
- Find Passport Prime in the list of paired devices.
- Tap the info (i) button next to it.
- Tap Forget This Device, then confirm.
Android:
- Open the Settings app.
- Tap Connected devices (or Bluetooth depending on your device).
- Tap Previously connected devices if Passport Prime is not shown in the main list.
- Find Passport Prime and tap the gear/settings icon next to it.
- Tap Forget (or Unpair), then confirm.
Once both Envoy and your phone's Bluetooth settings are clear, power on Passport Prime and begin the onboarding process again.
Bootloader Errors
In some error states Passport Prime may display a black screen at boot, with one of the following bootloader messages. Under each error message you can find an explainer along with the required steps to rectify.
Recovery Error
"Unable to verify the signature of the Recovery firmware. Contact support using the button below."
Explanation: The provided recovery file does not contain a valid Foundation signature and cannot be installed.
Steps to rectify: Contact support for assistance, providing context and the location from which you obtained the file that cannot be installed.
System Error
"KeyOS restarted due to an unexpected system error. thread 'main' panicked a t apps/gui-app-system-actions/src/main.rs:72:9: This application has crashed with a test panic message."
Explanation: This is a generic error displayed when the system has an unexpected request or operation result, but is able to detect the location of the error.
Steps to rectify: Contact support with details of the error on screen and the steps you were taking that led to the message being shown.
Firmware Error
"KeyOS is unable to verify the signature of the installed firmware. Use Recovery mode to install Foundation-signed firmware."
Explanation: This can occur if the firmware update process is interrupted by the user power cycling the device, causing the update to fail to complete.
Steps to rectify: Tap 'Begin Firmware Recovery' and connect an external storage medium containing a copy of the latest official KeyOS firmware, available from our GitHub .
Error
"KeyOS restarted due to a system error. It is safe to continue using Passport. Your data remains secure."
Explanation: This is a generic error displayed when the system has an unexpected request or operation result.
Steps to rectify: Continue using Passport as normal, but if the error repeats, please contact support with details of the steps you were taking that led to the message being shown.
Tamper Error
"KeyOS has detected a tamper event. For security, the master key has been erased from the device. To proceed, restore a backup or perform a factory reset."
Explanation: A tamper event occurs when Prime detects unusual physical behavior. This includes screen removal, JTAG protections, environmental monitors for temperature, voltage, frequency and active die shield.
Steps to rectify: Check your device for signs of any physical tampering. Contact support if you require further advice. The master key can be restored onto the device via Keycards or any other available backup method. After doing so, all encrypted app and settings data will be decrypted and restored. Alternative a factory reset can be complete to permanently erase all encrypted data.