The Bitcoin wallet app on Passport Prime functions similarly to other hardware wallets. The main aim is to keep your Bitcoin private keys offline and secure. Paired with companion software, Passport Prime can verify addresses, sign transactions, manage accounts, and handle passphrases, all while your private keys never leave the device.
Companion software
Passport Prime works with two kinds of companion software, and the choice depends on whether you want a single-signature or multisignature wallet:
- Envoy , Foundation's mobile companion app. Designed for single-signature wallets with Passport Prime, paired over QuantumLink Bluetooth or QR code. Envoy does not support multisig wallet setup or coordination.
- Multisig-capable wallet coordinators, for multisignature wallets with Passport Prime as a cosigner. Foundation does not ship a multisig coordinator; instead Passport Prime interoperates with established third-party tools across desktop and mobile, such as Sparrow , Nunchuk , Specter , Electrum , or Blue Wallet . You create and coordinate the multisig wallet in one of those tools, then import the configuration to Passport Prime (see Import Multisig below) so it can verify addresses and sign transactions as one of the cosigners.
A common point of confusion: customers sometimes ask whether they can build a multisig wallet using Envoy + Passport Prime alone. The answer is no, Envoy is single-sig only. Multisig setup happens in a multisig-capable coordinator like Sparrow, Nunchuk, or Blue Wallet (available on desktop, mobile, or both depending on the tool); Passport Prime then participates by signing transactions and verifying addresses.
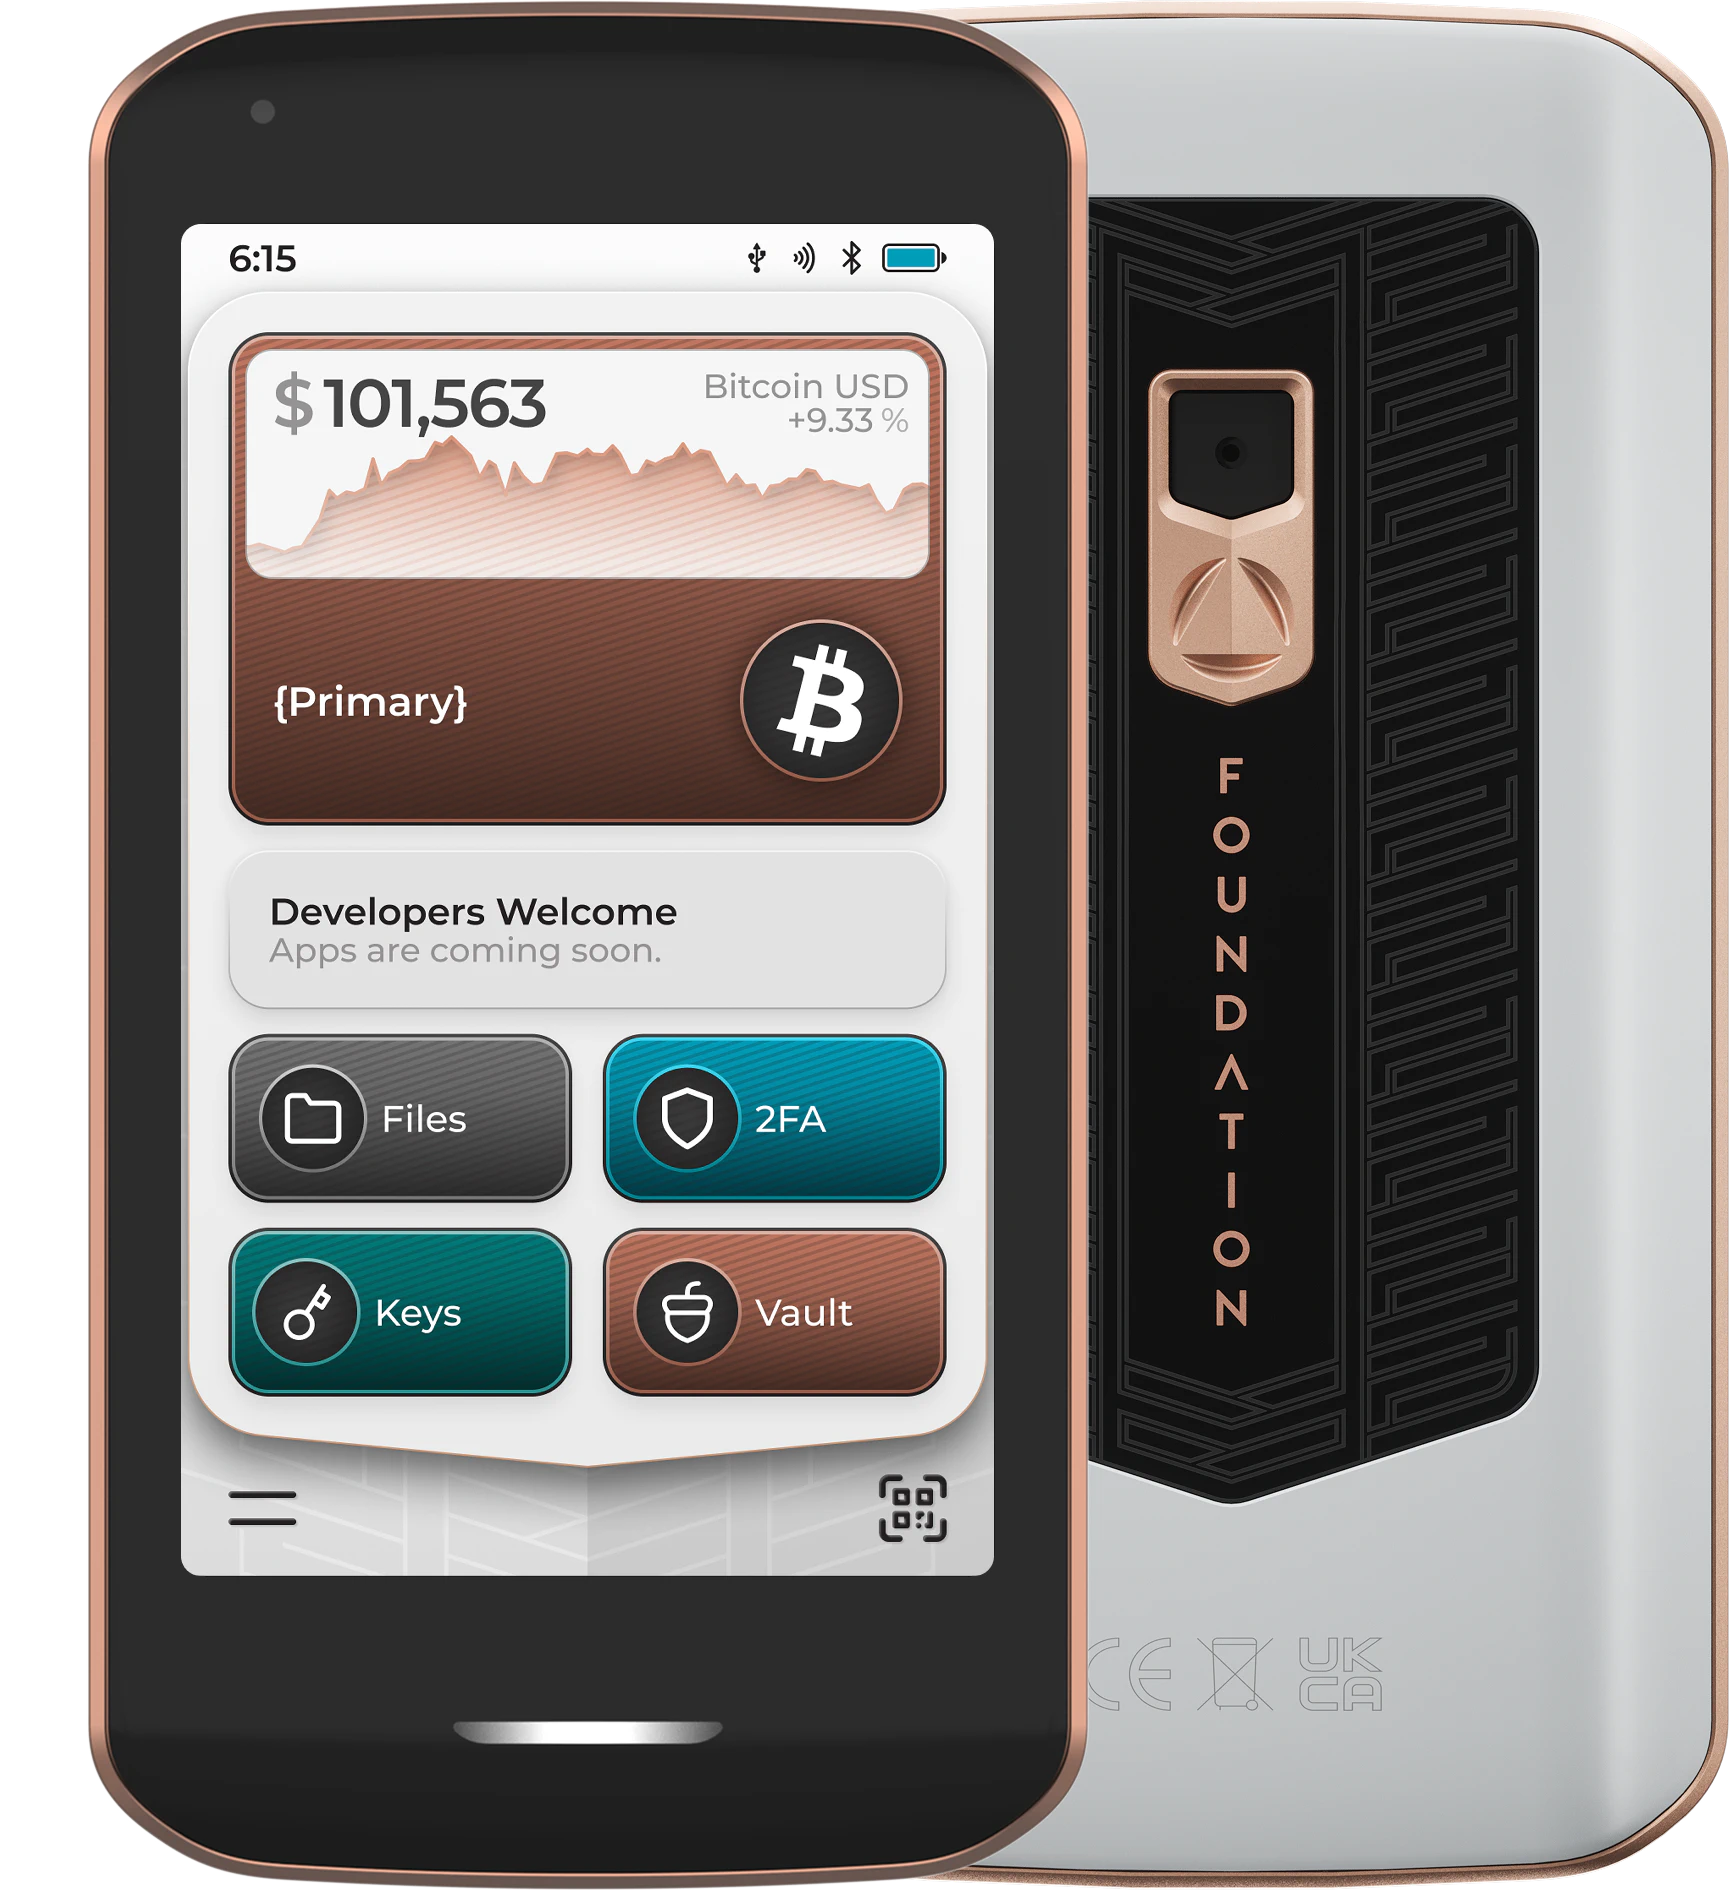
To open the Bitcoin Wallet app, simply tap on the wallet tile near the top of the home screen.
Accounts
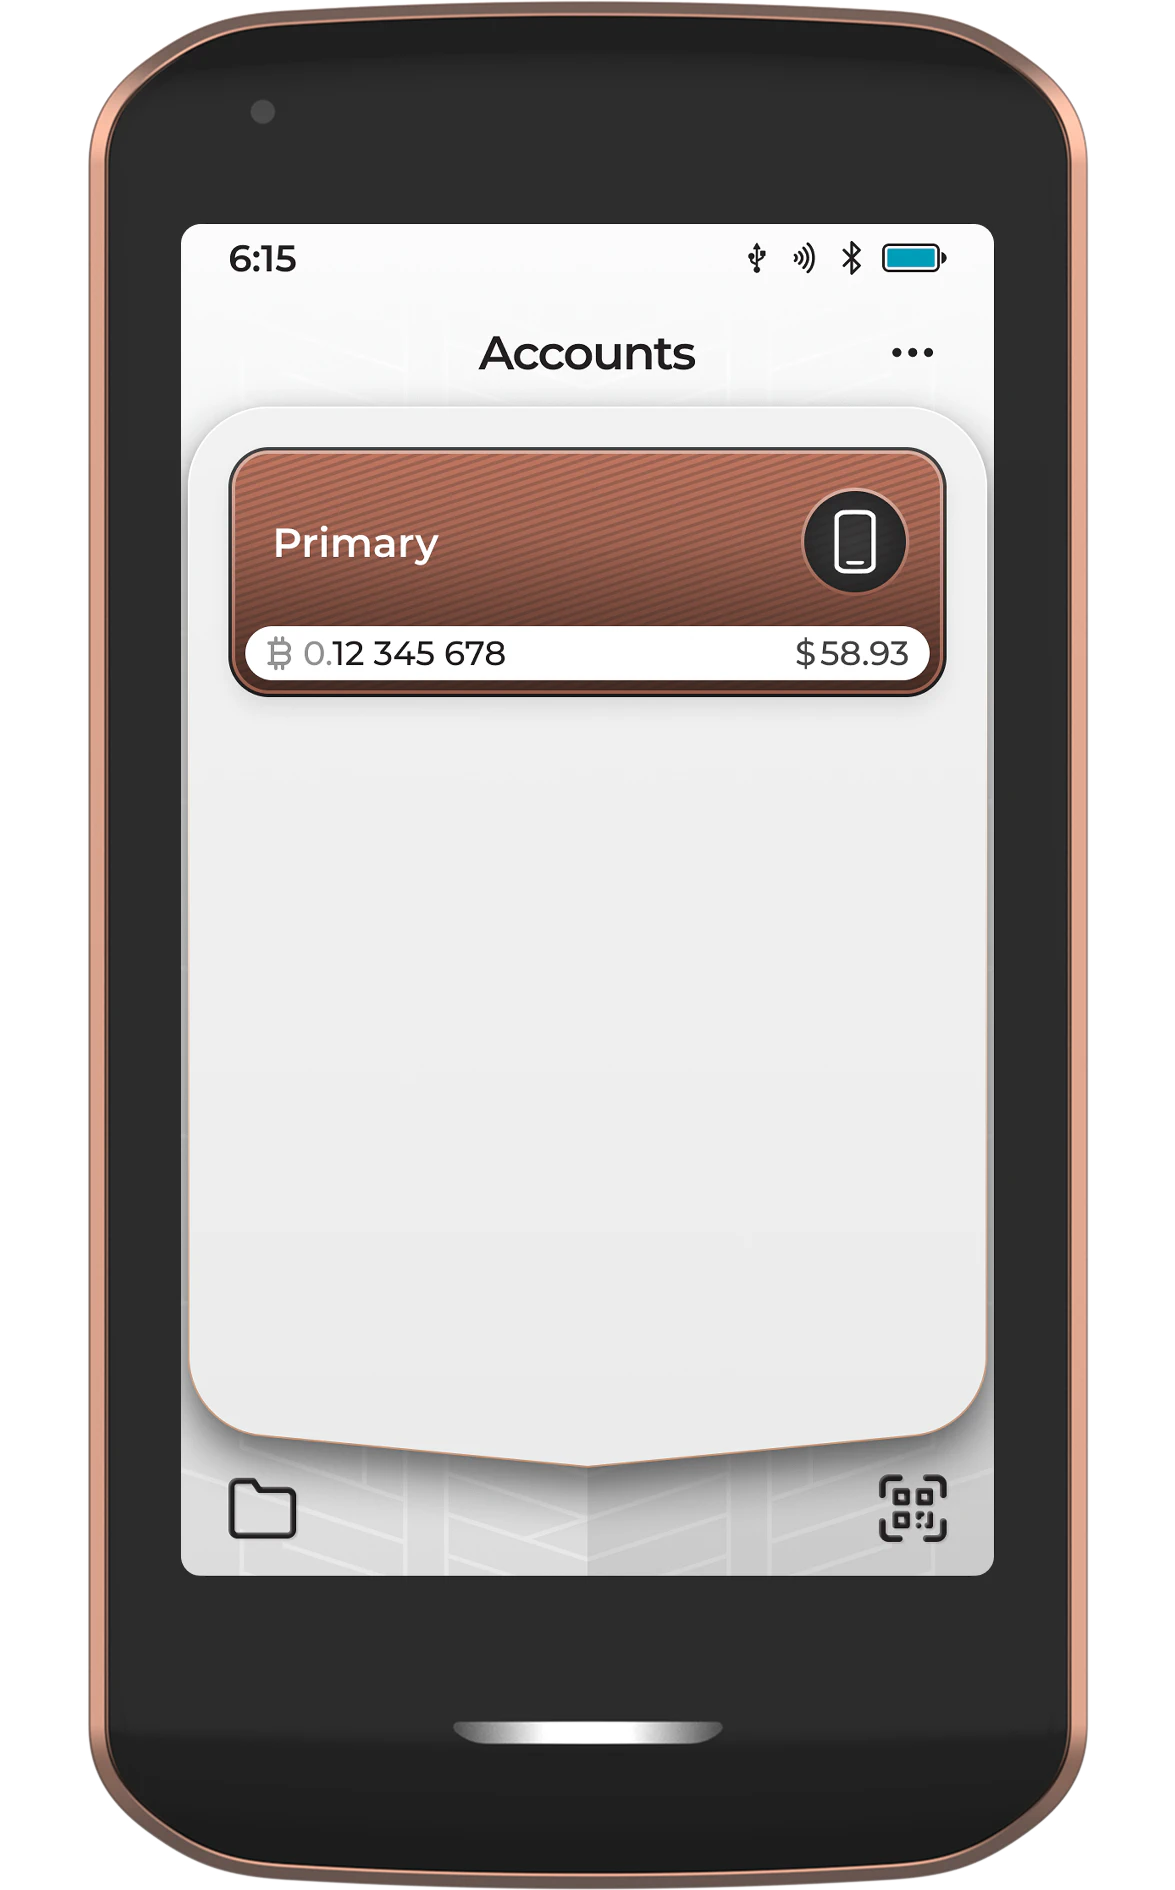
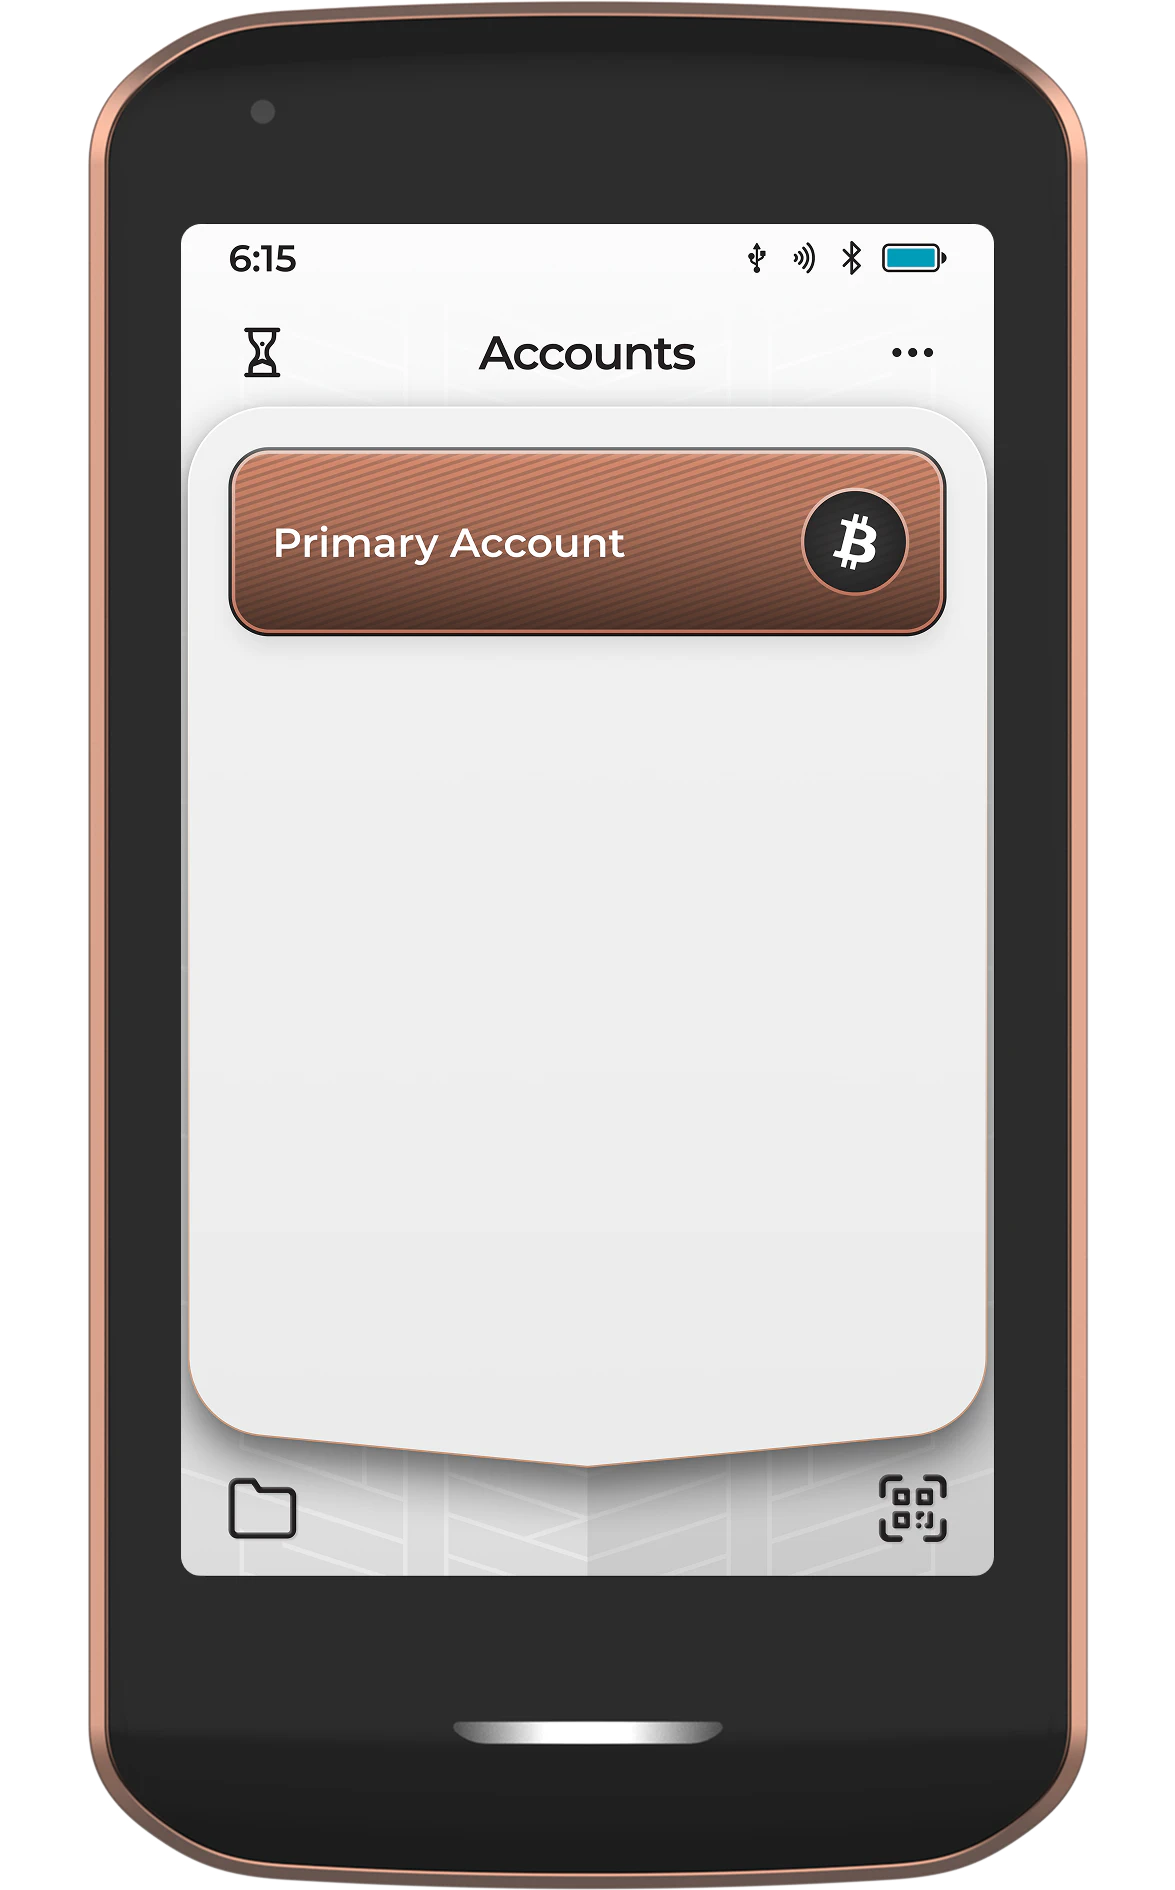
Once the wallet is open, all active accounts will be shown. If you have any multisig configurations added to Passport Prime, those will also be listed here.
Account Menu
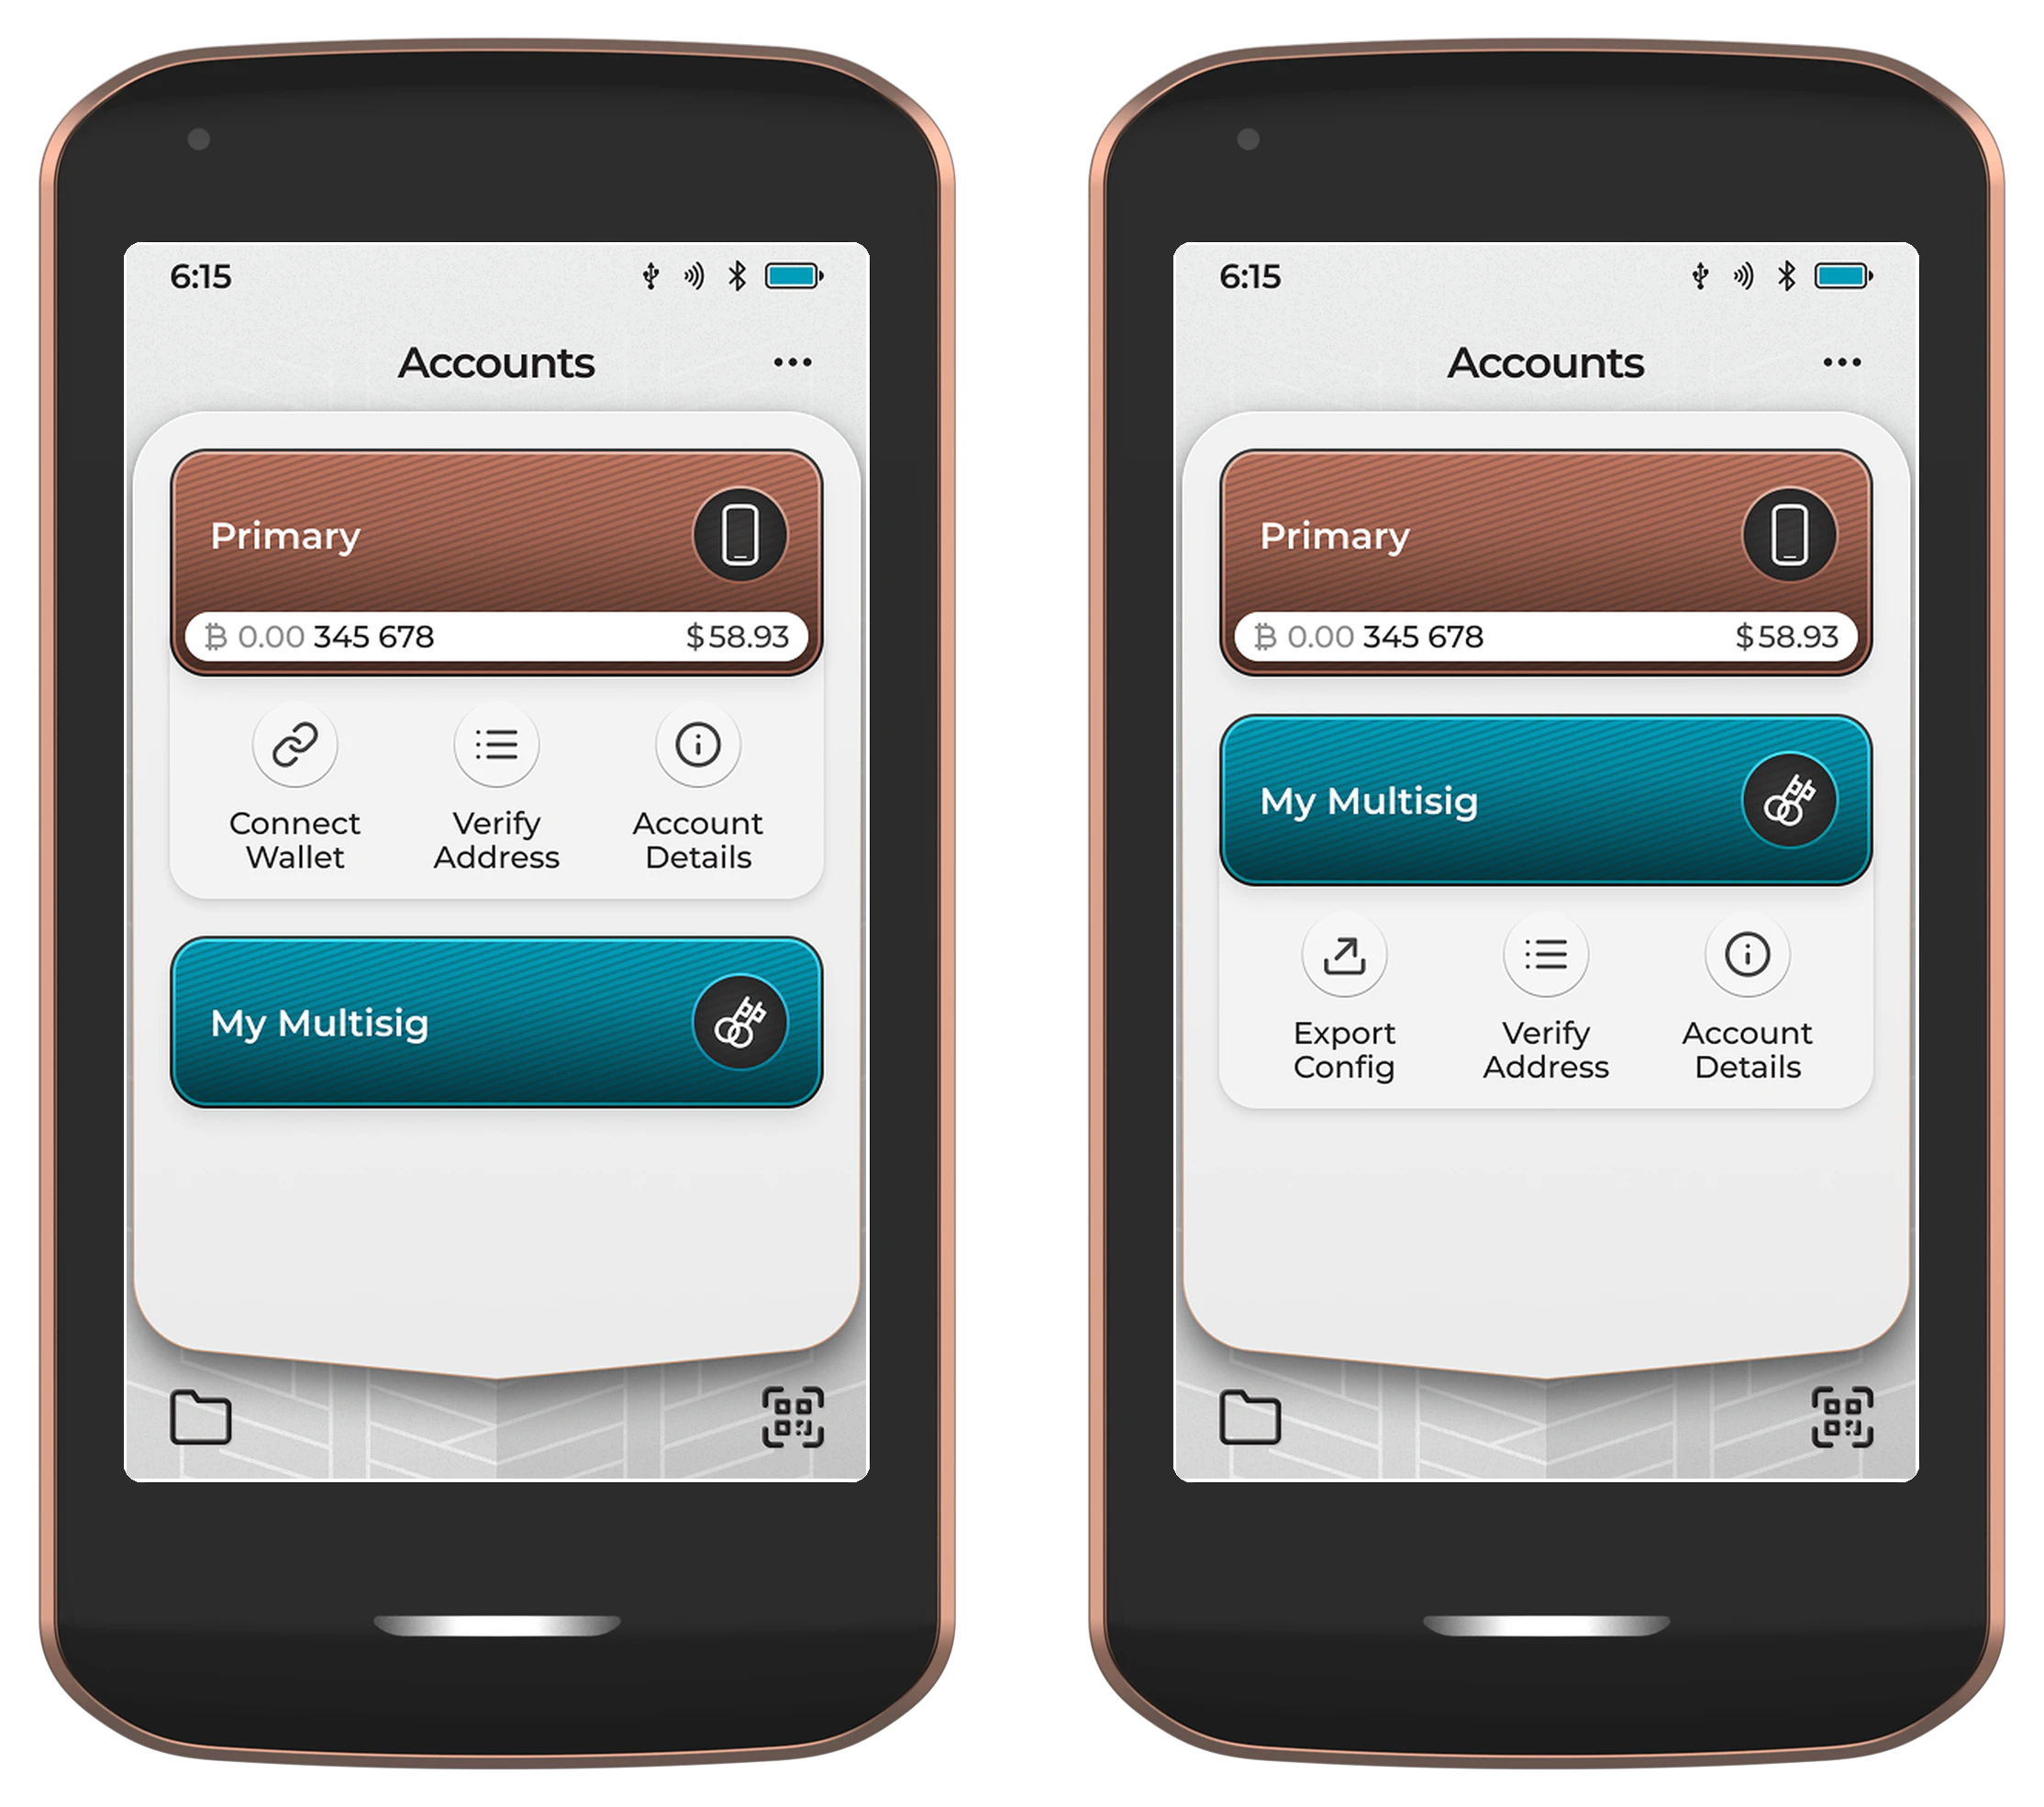
Tapping on any account or multisig configuration provides an additional sub-menu that allows for connecting to an external wallet, verifying addresses, and viewing more details.
Connect Wallet
Use Connect Wallet with a documented Passport Prime integration. If your firmware shows wallet choices, select the companion wallet you are actually using and follow its supported transfer format. Where the integration supports Prime's animated descriptor QR, the companion wallet can scan it to import the public account or add Prime as a cosigner. QR or JSON support alone does not prove compatibility, and not every companion wallet has a QR reader. See Connect Passport Prime for the workflow and compatibility limits; do not select another wallet to bypass a missing integration.
For multisig configurations, use the Export Config button instead to share the full multisig setup with the other cosigners.
Verify Address
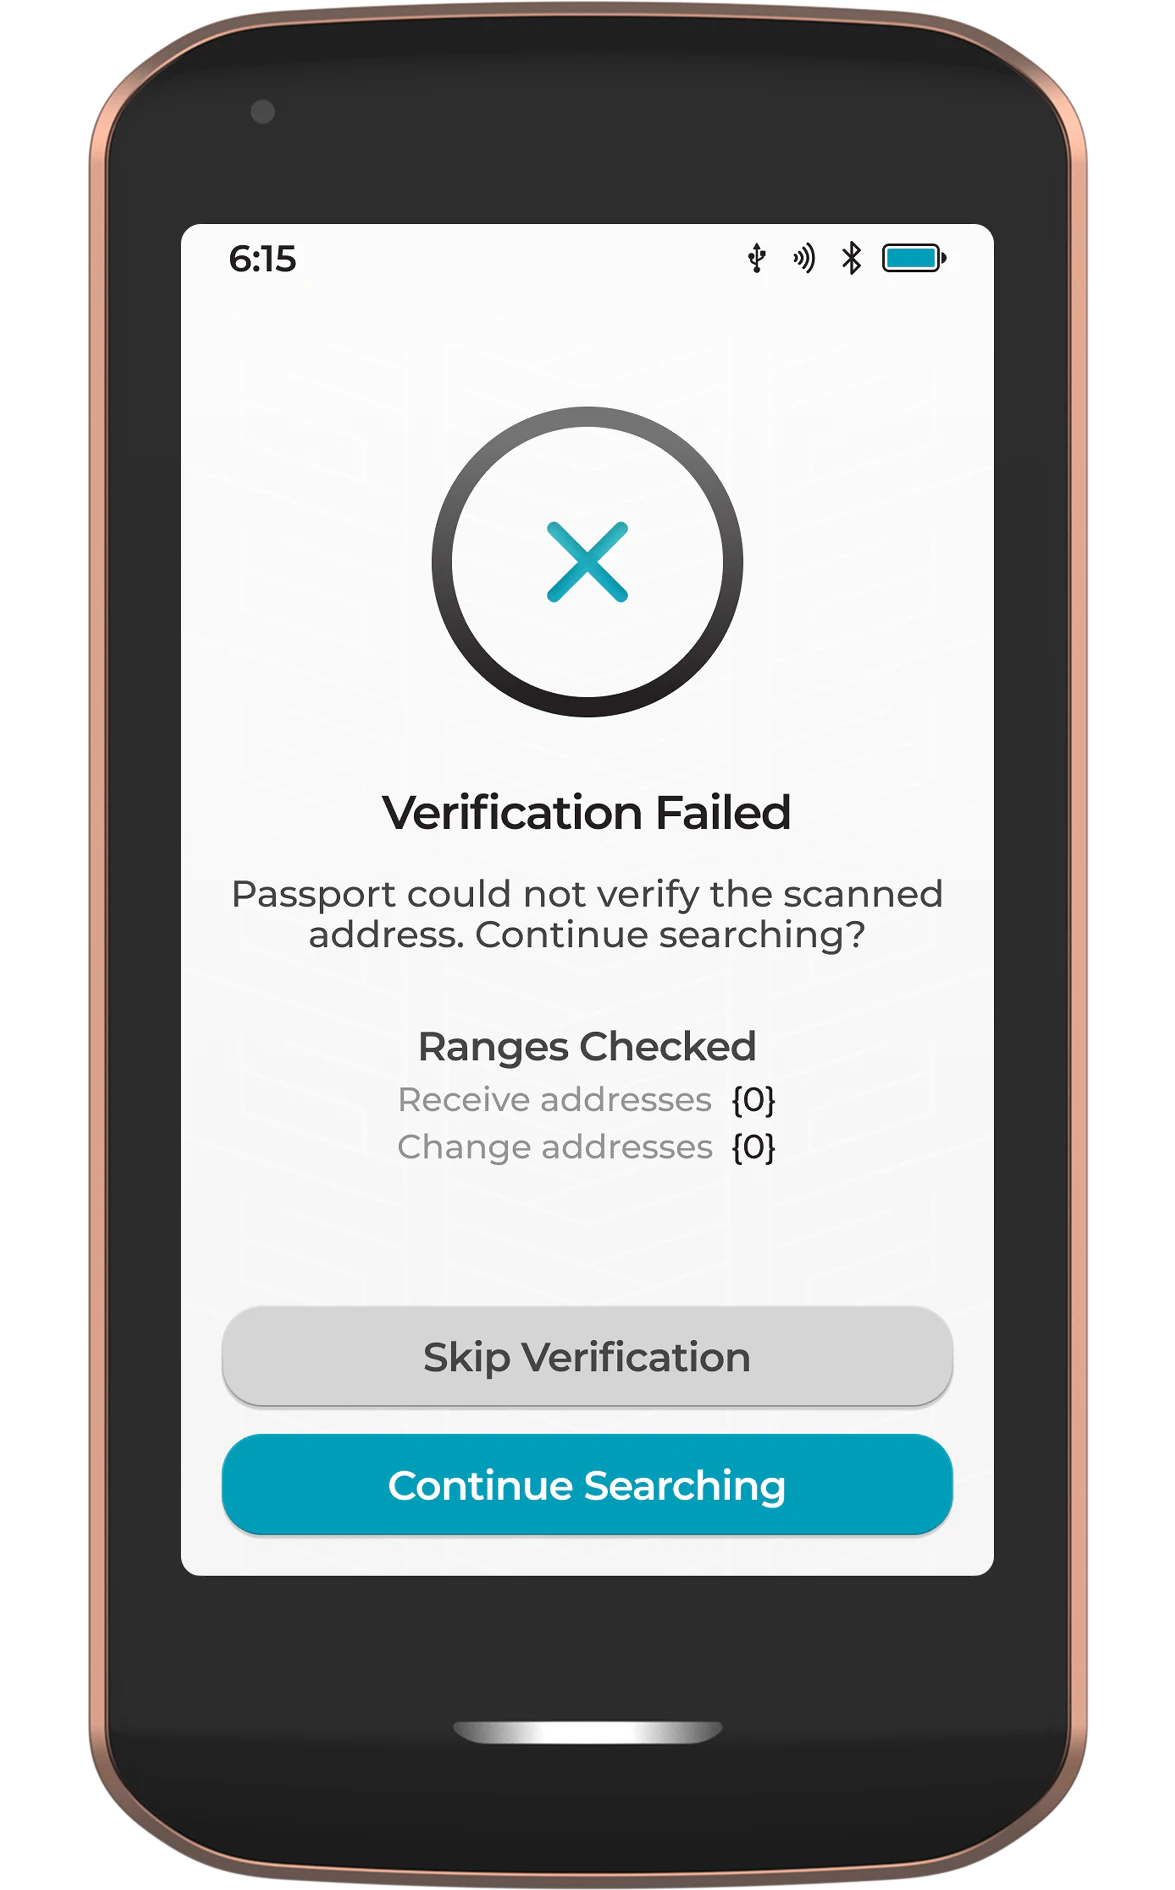
Passport Prime's 'Verify Address' feature allows you to verify that a receive address being displayed by your chosen wallet software actually belongs to your Passport Prime. Passport Prime starts its search from index #0 and moves outwards in increments of 50 addresses.
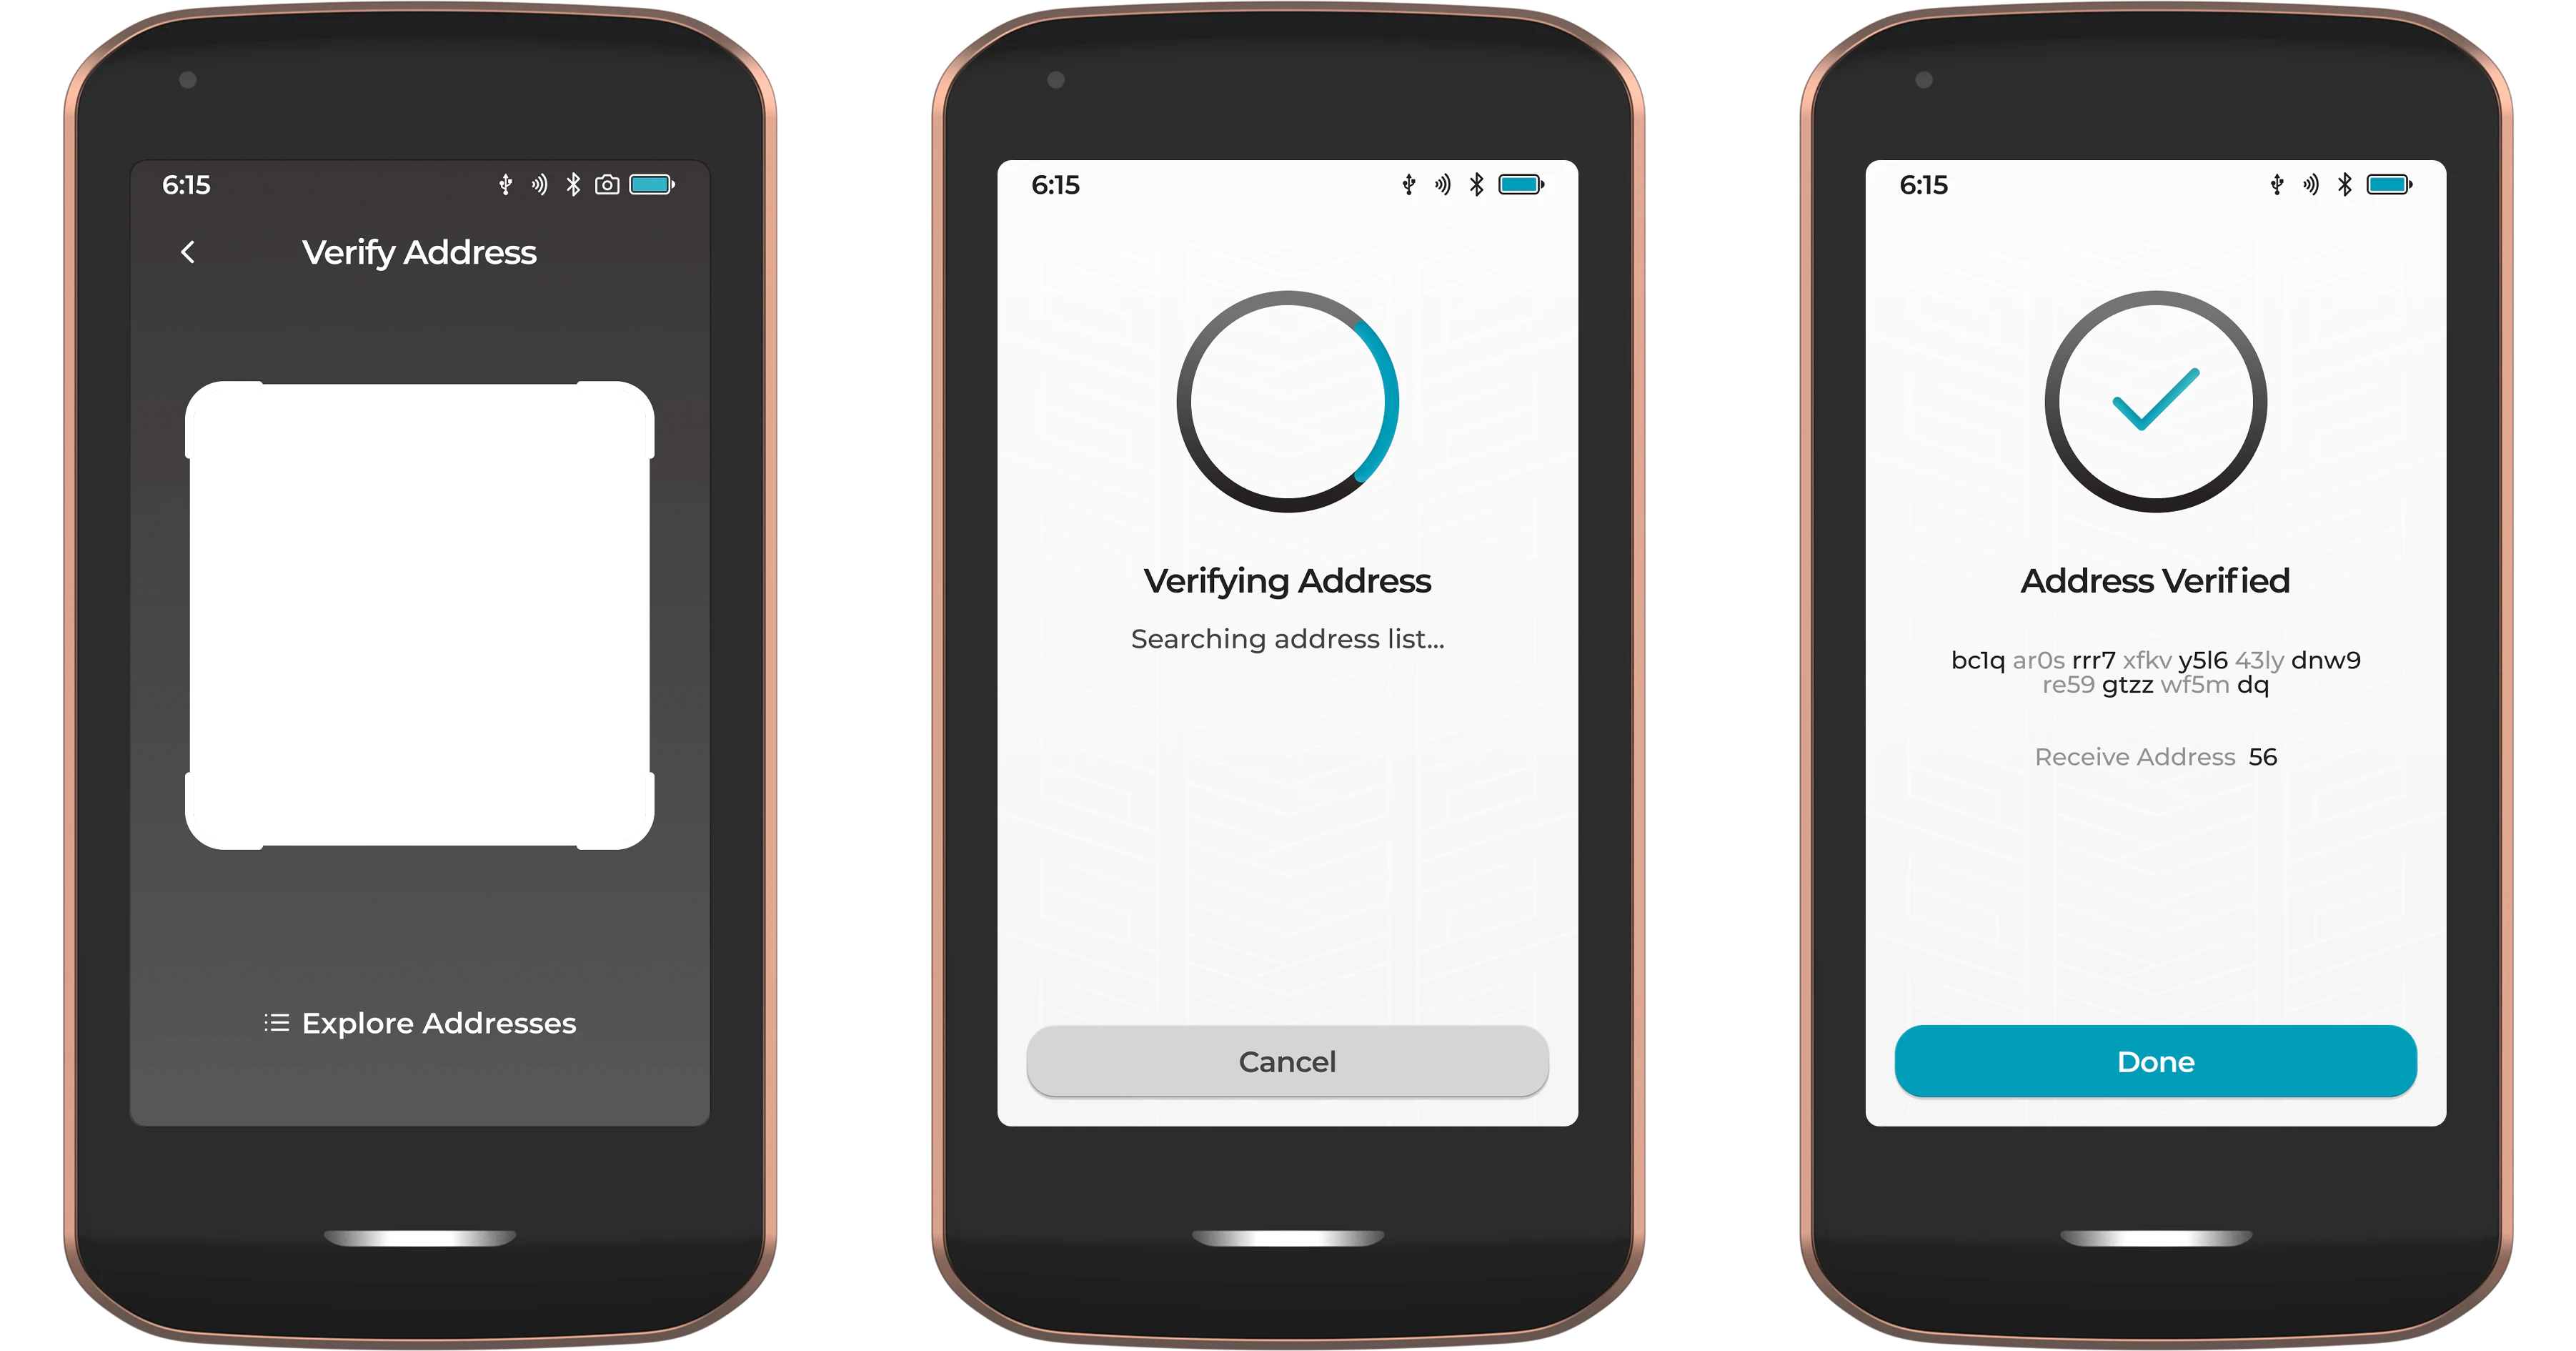
If at first Passport Prime cannot find the scanned address, please continue searching. This is particularly relevant for users who have completed many transactions with their wallet or for users importing an existing seed from a heavily used wallet.
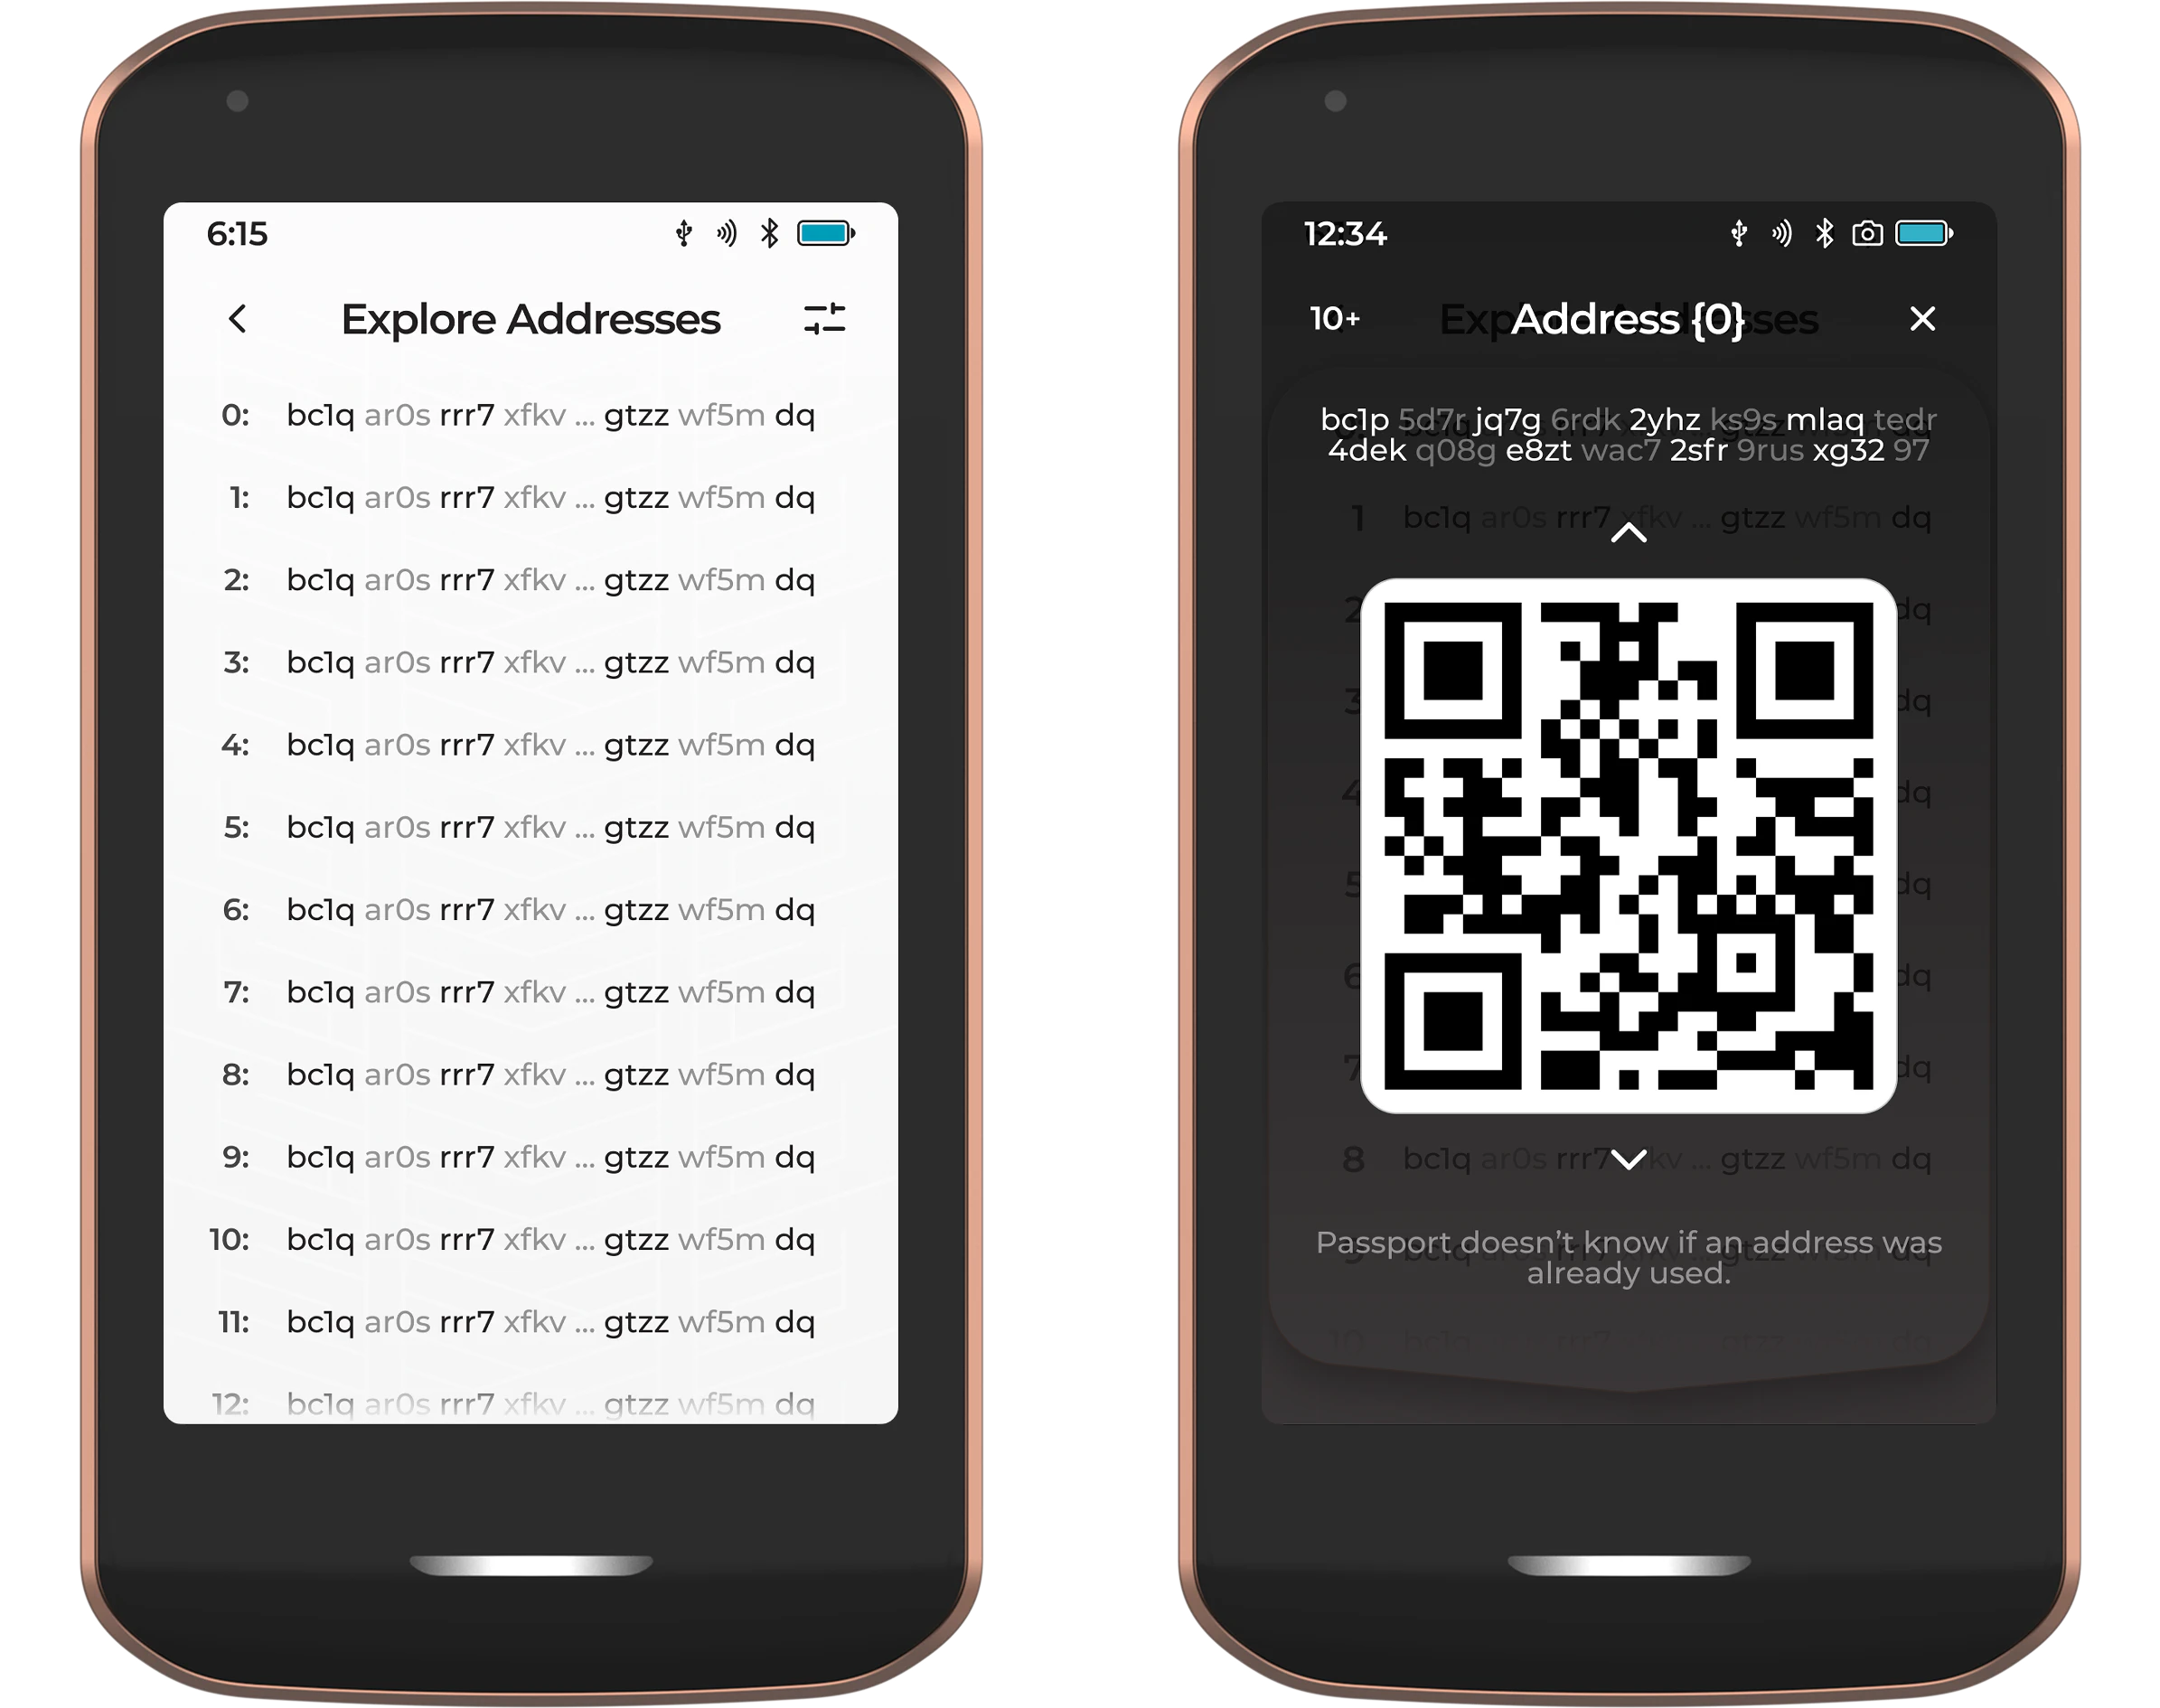
You can also view an address list for your wallet by tapping Explore Addresses from the camera viewfinder screen. Passport Prime allows you to browse by script type and receive or change address indexes by using the filter button in the top right corner. The active address can be displayed as a QR code simply by tapping.
Account Details
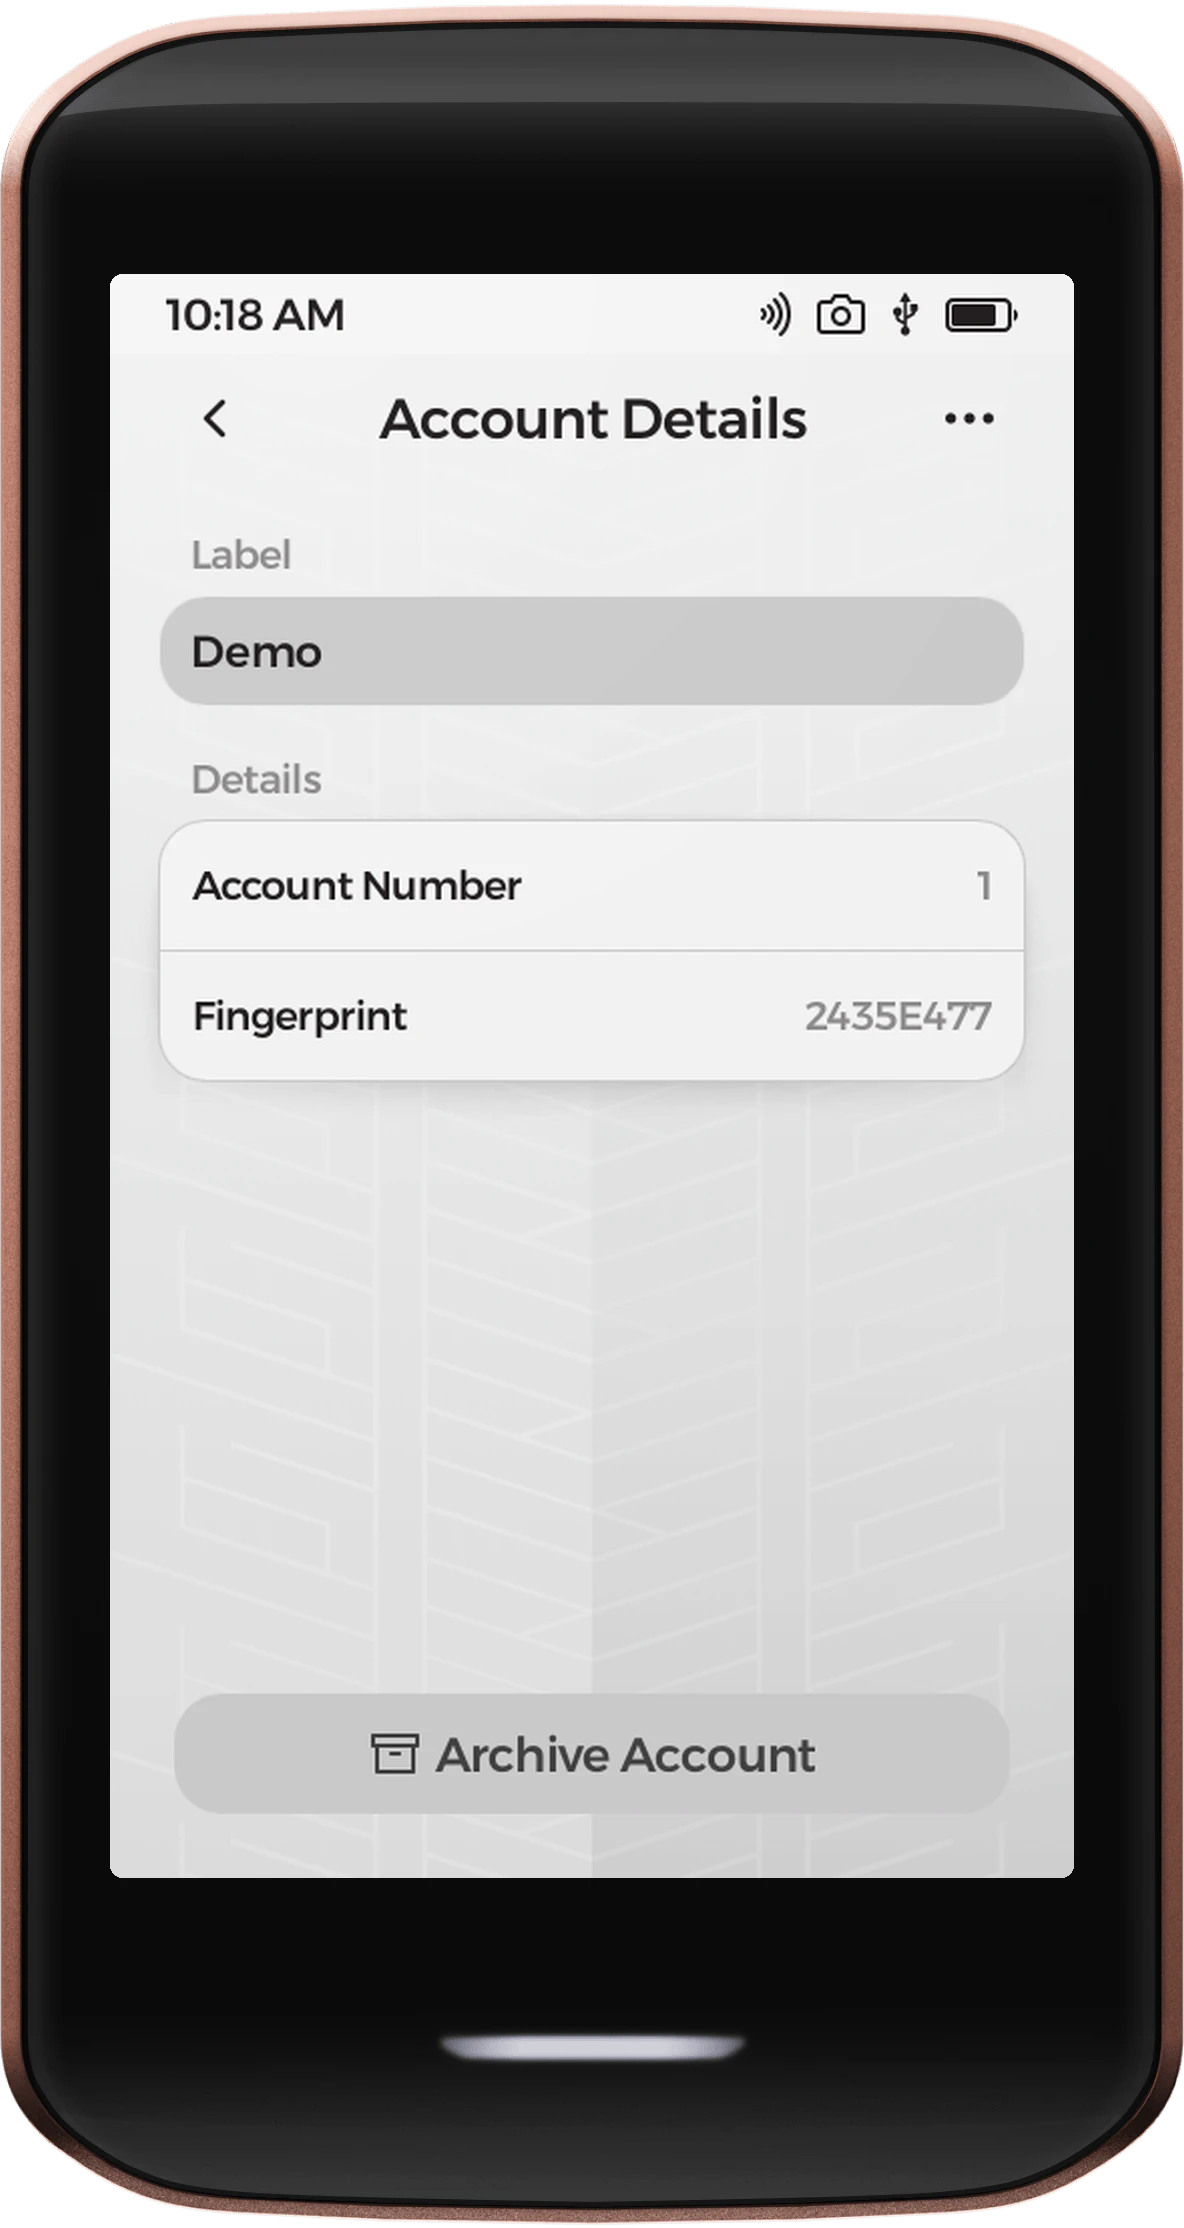
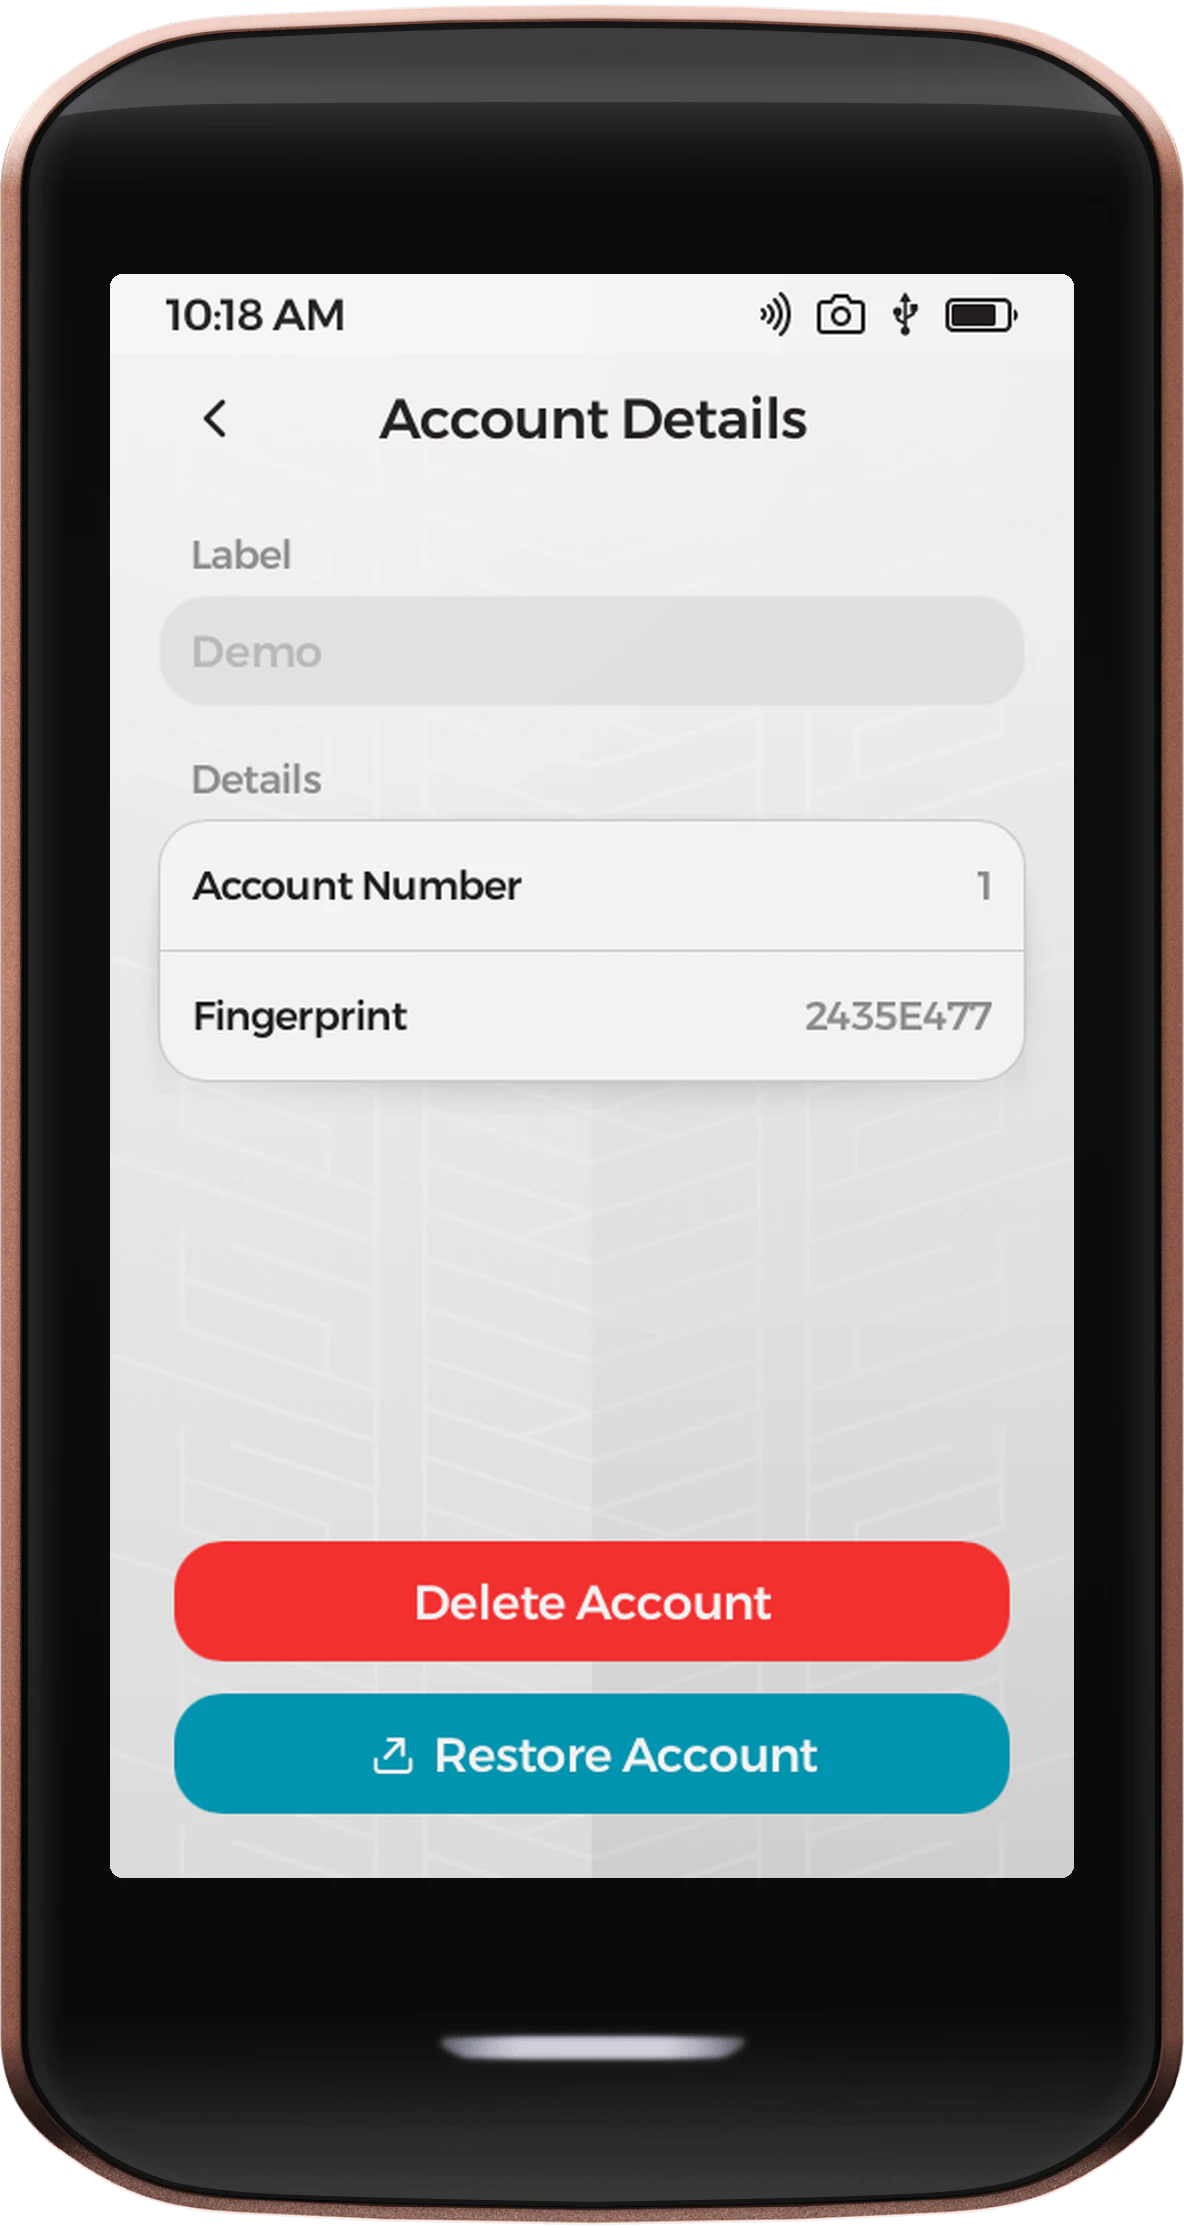
View the details of the selected account. These details will include:
- Account label
- Account number
- Fingerprint
Tapping the three-dot menu on this screen will enable you to:
- Sign a message with an address from this account
- Archive the account
Sign a Message
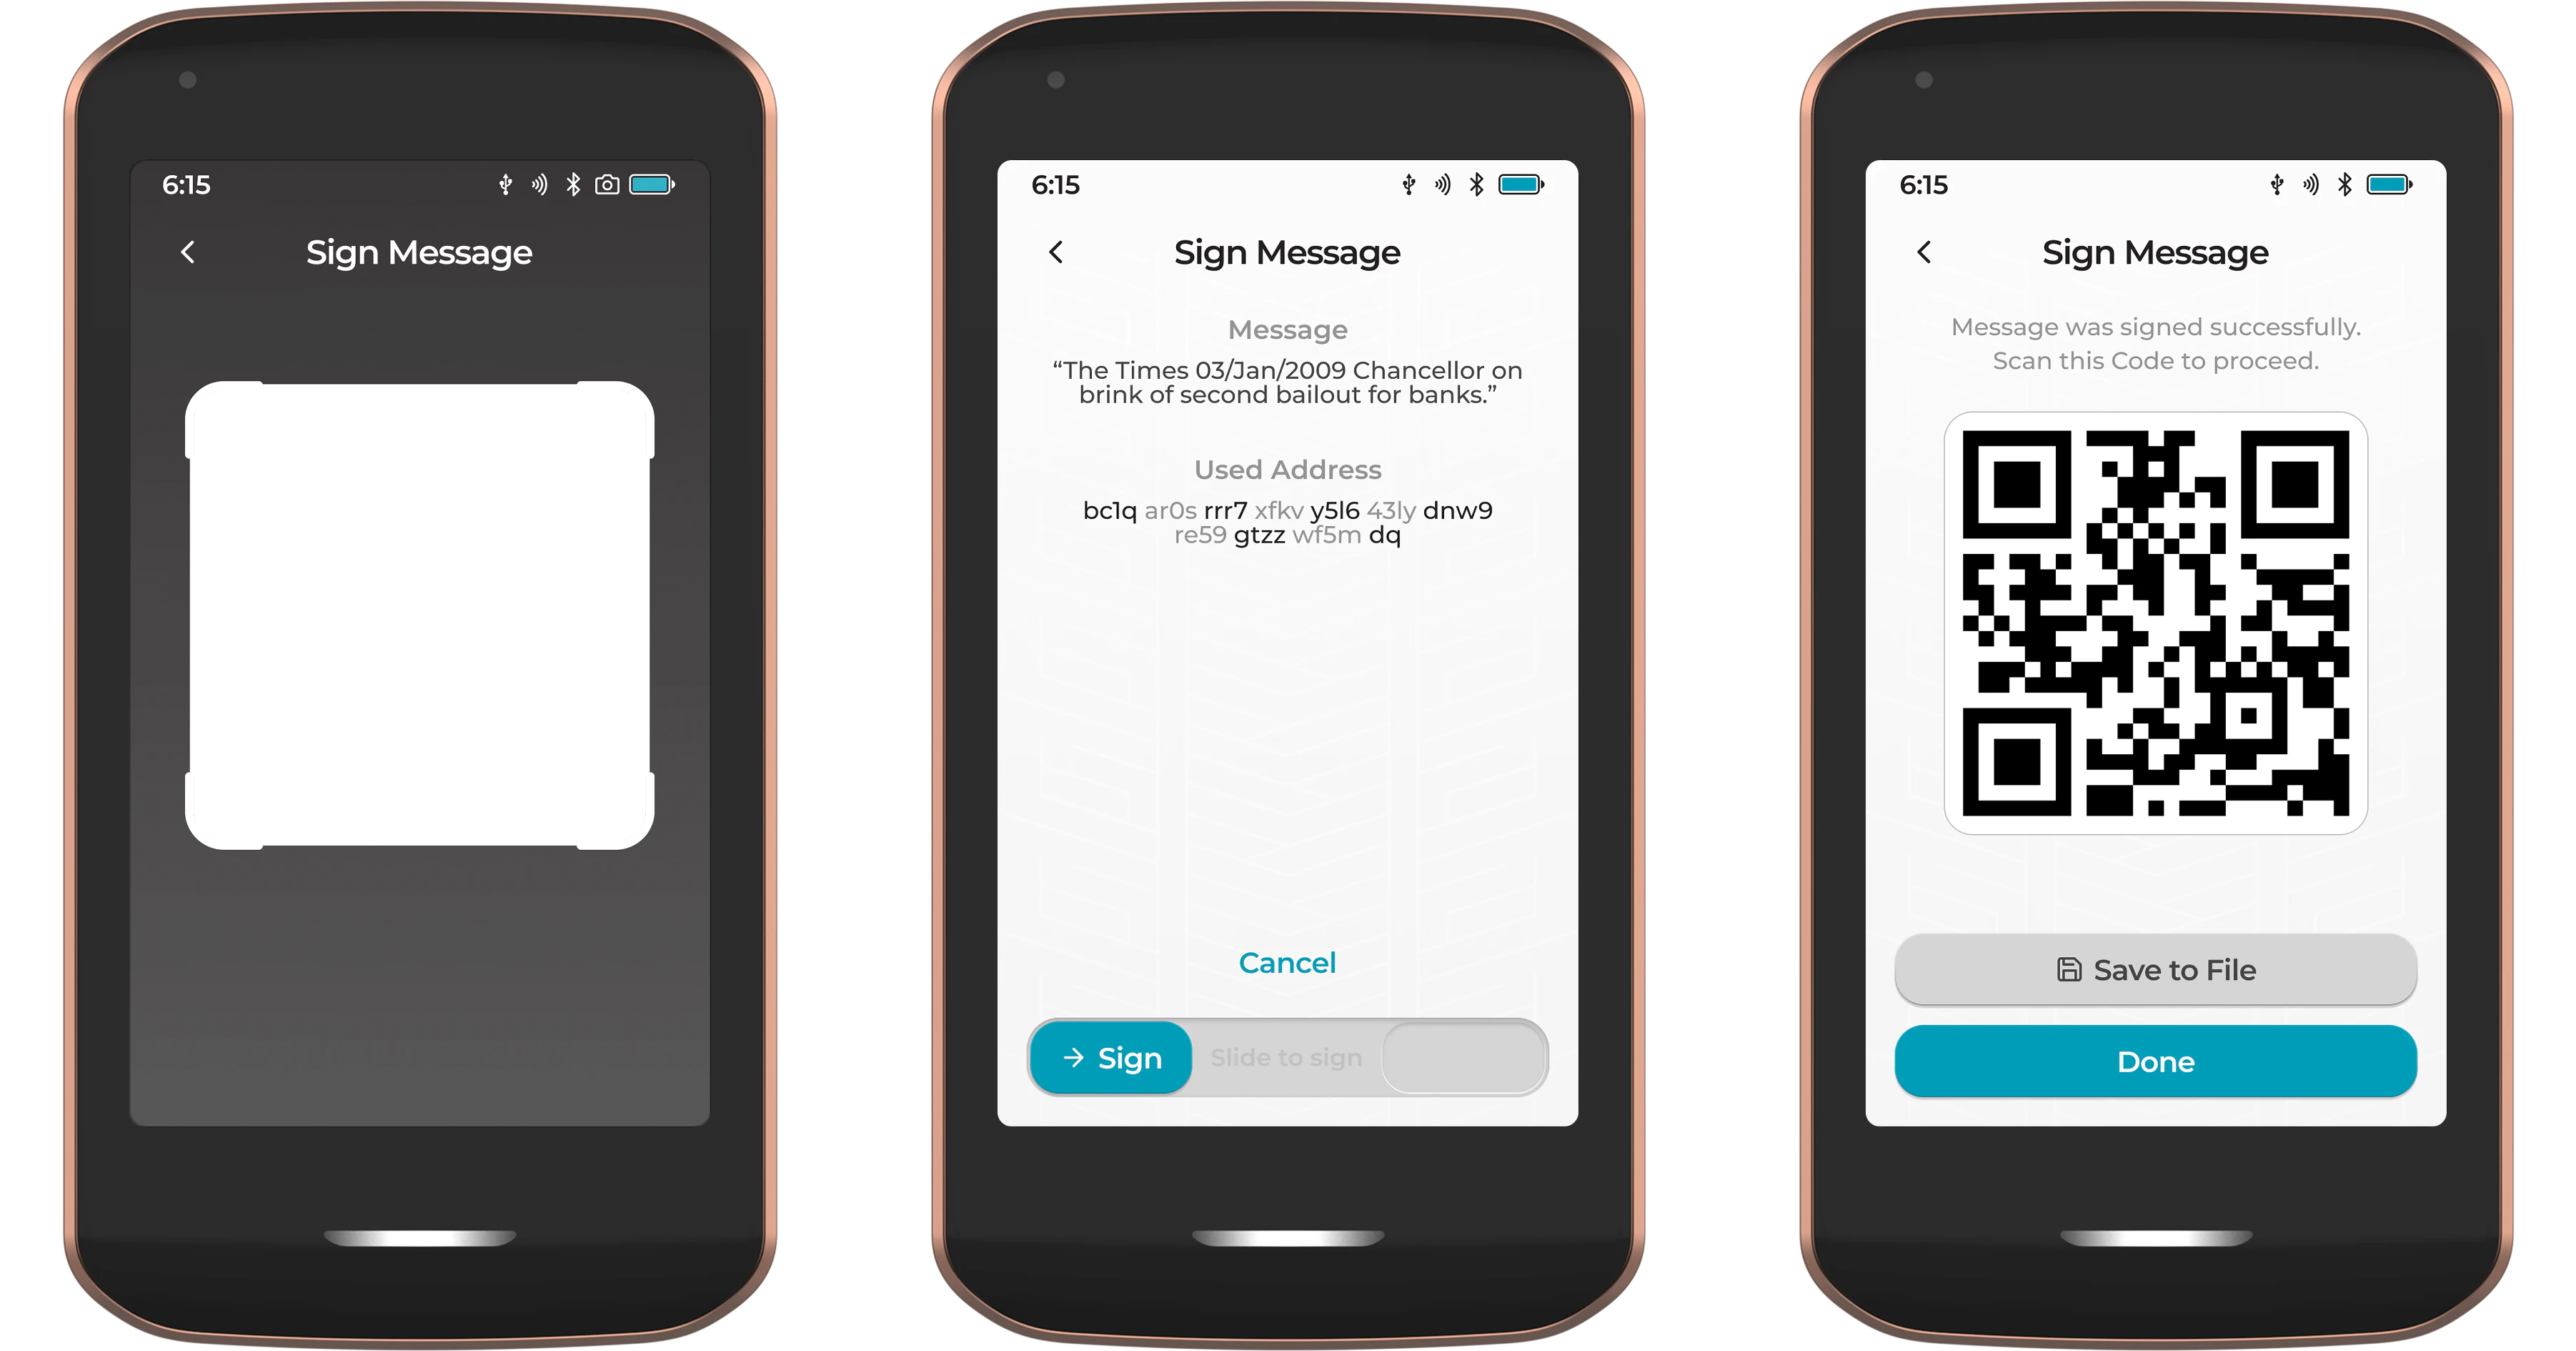
Sign a message via a simple QR code scan. This feature can be useful when withdrawing from exchanges that require you to prove that you are in control of the provided withdrawal address.
Tap Sign Message from the Account Details three-dot menu. Passport Prime's camera will open. Scan the message provided by the service you're interacting with. Passport Prime will then display the message and corresponding address. Swipe the bar from left to right to sign. Passport Prime will then show the signed message in QR code format to be received by the service being interacted with.
Alternatively, you can save the signed message to a file and share it with external storage media that can be plugged into the bottom of the device.
Message signing via other methods such as USB and NFC will be added in a future firmware update.
Archive Account
Accounts you no longer use can be archived to keep the Accounts page tidy. From the Account Details three-dot menu, choose Archive Account. Passport Prime asks you to confirm, and reassures you that the account will not be deleted and can be restored at any time.
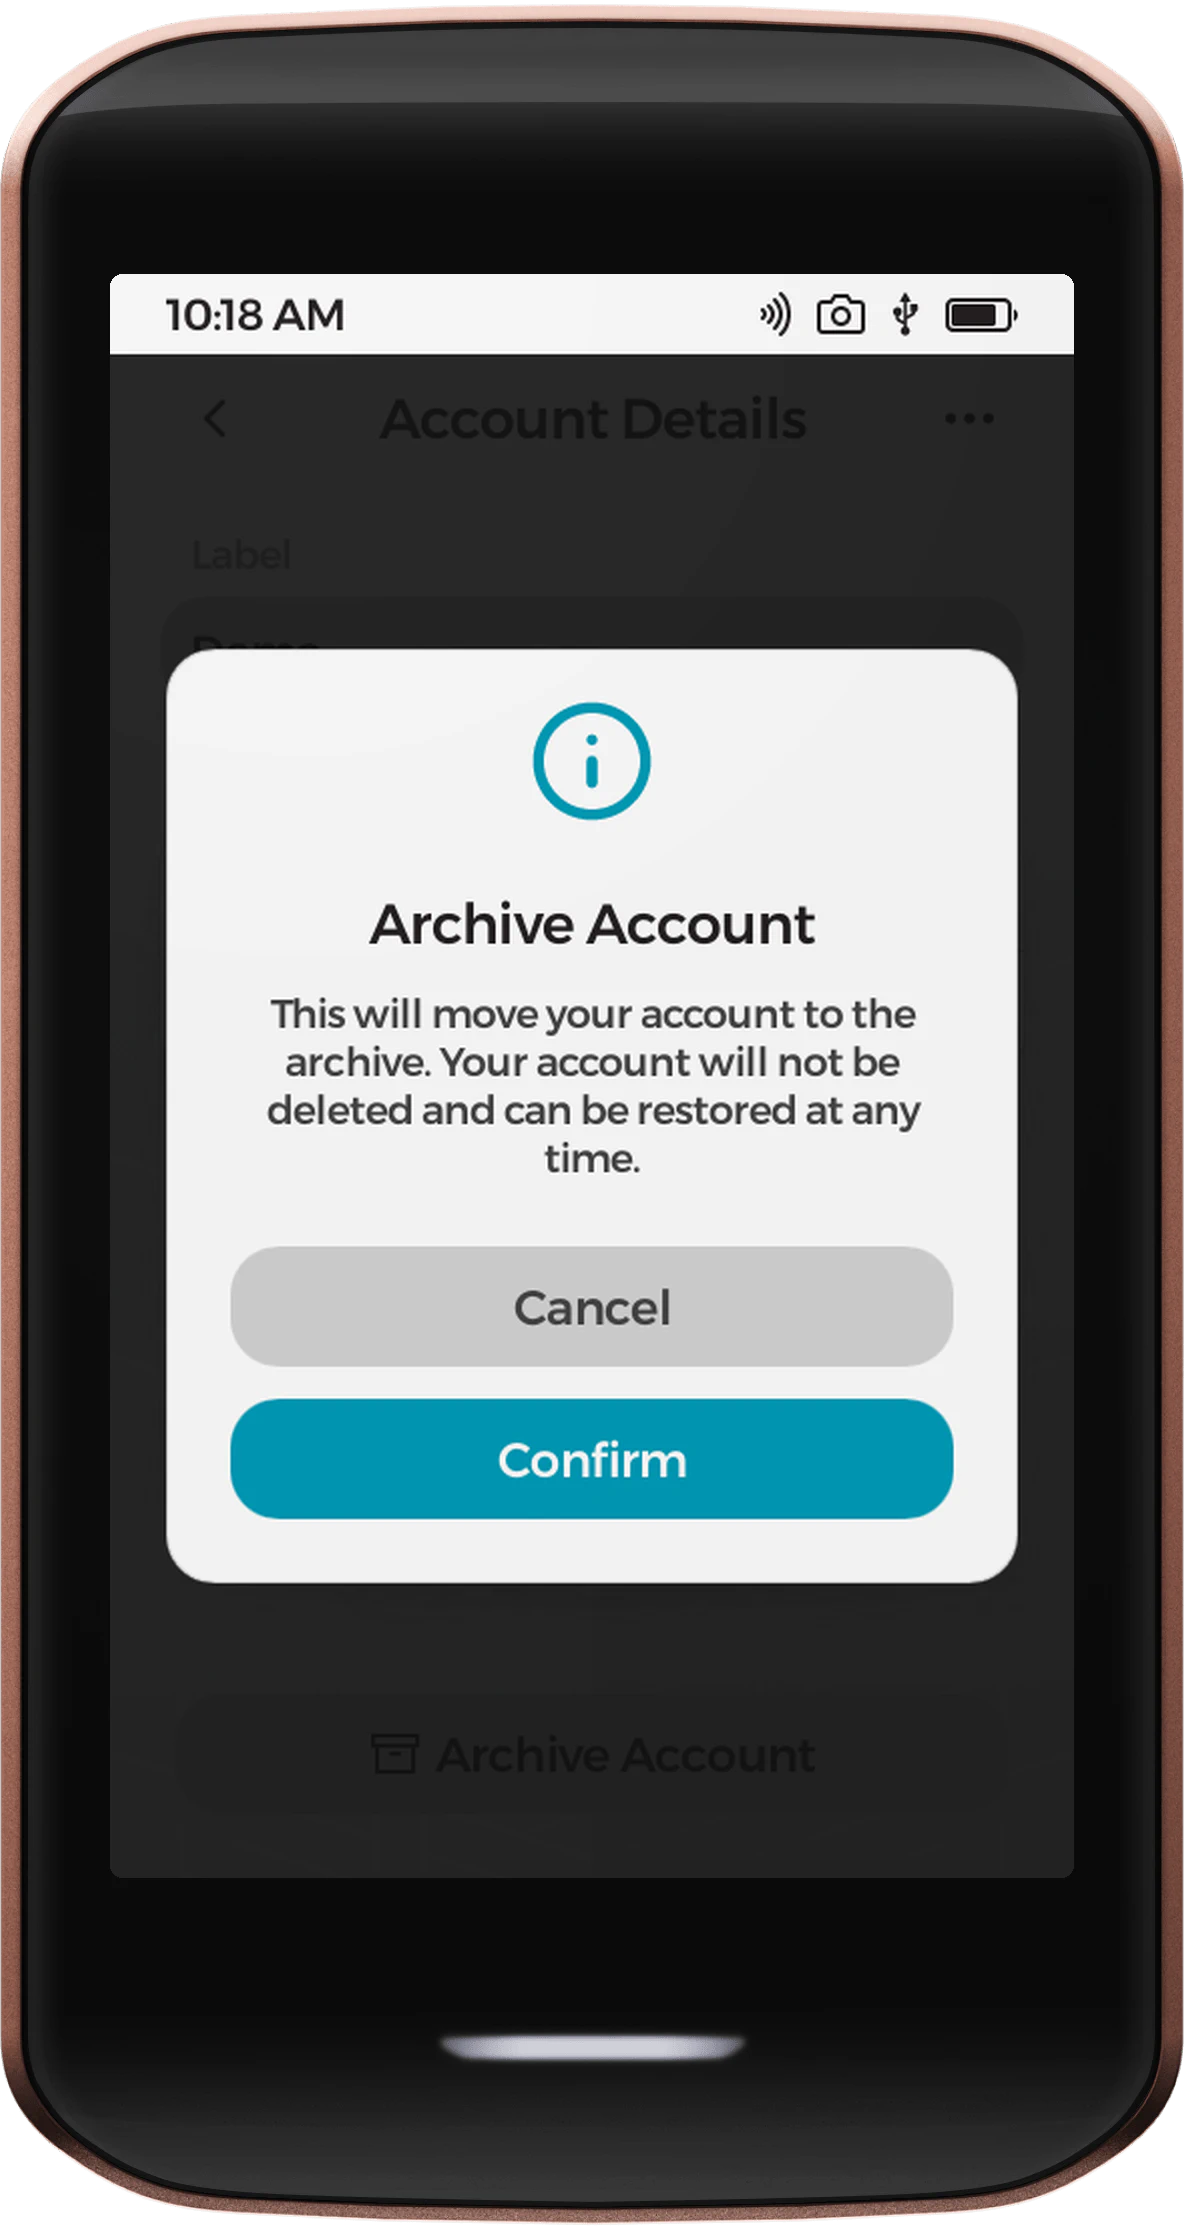
To find archived accounts, tap the three-dot menu on the Accounts page and choose View Archive. From there you can Restore an account to bring it back, or Delete it to remove it permanently. If Passport Prime is later asked to sign a transaction from an archived account, it will prompt you to restore that account first.
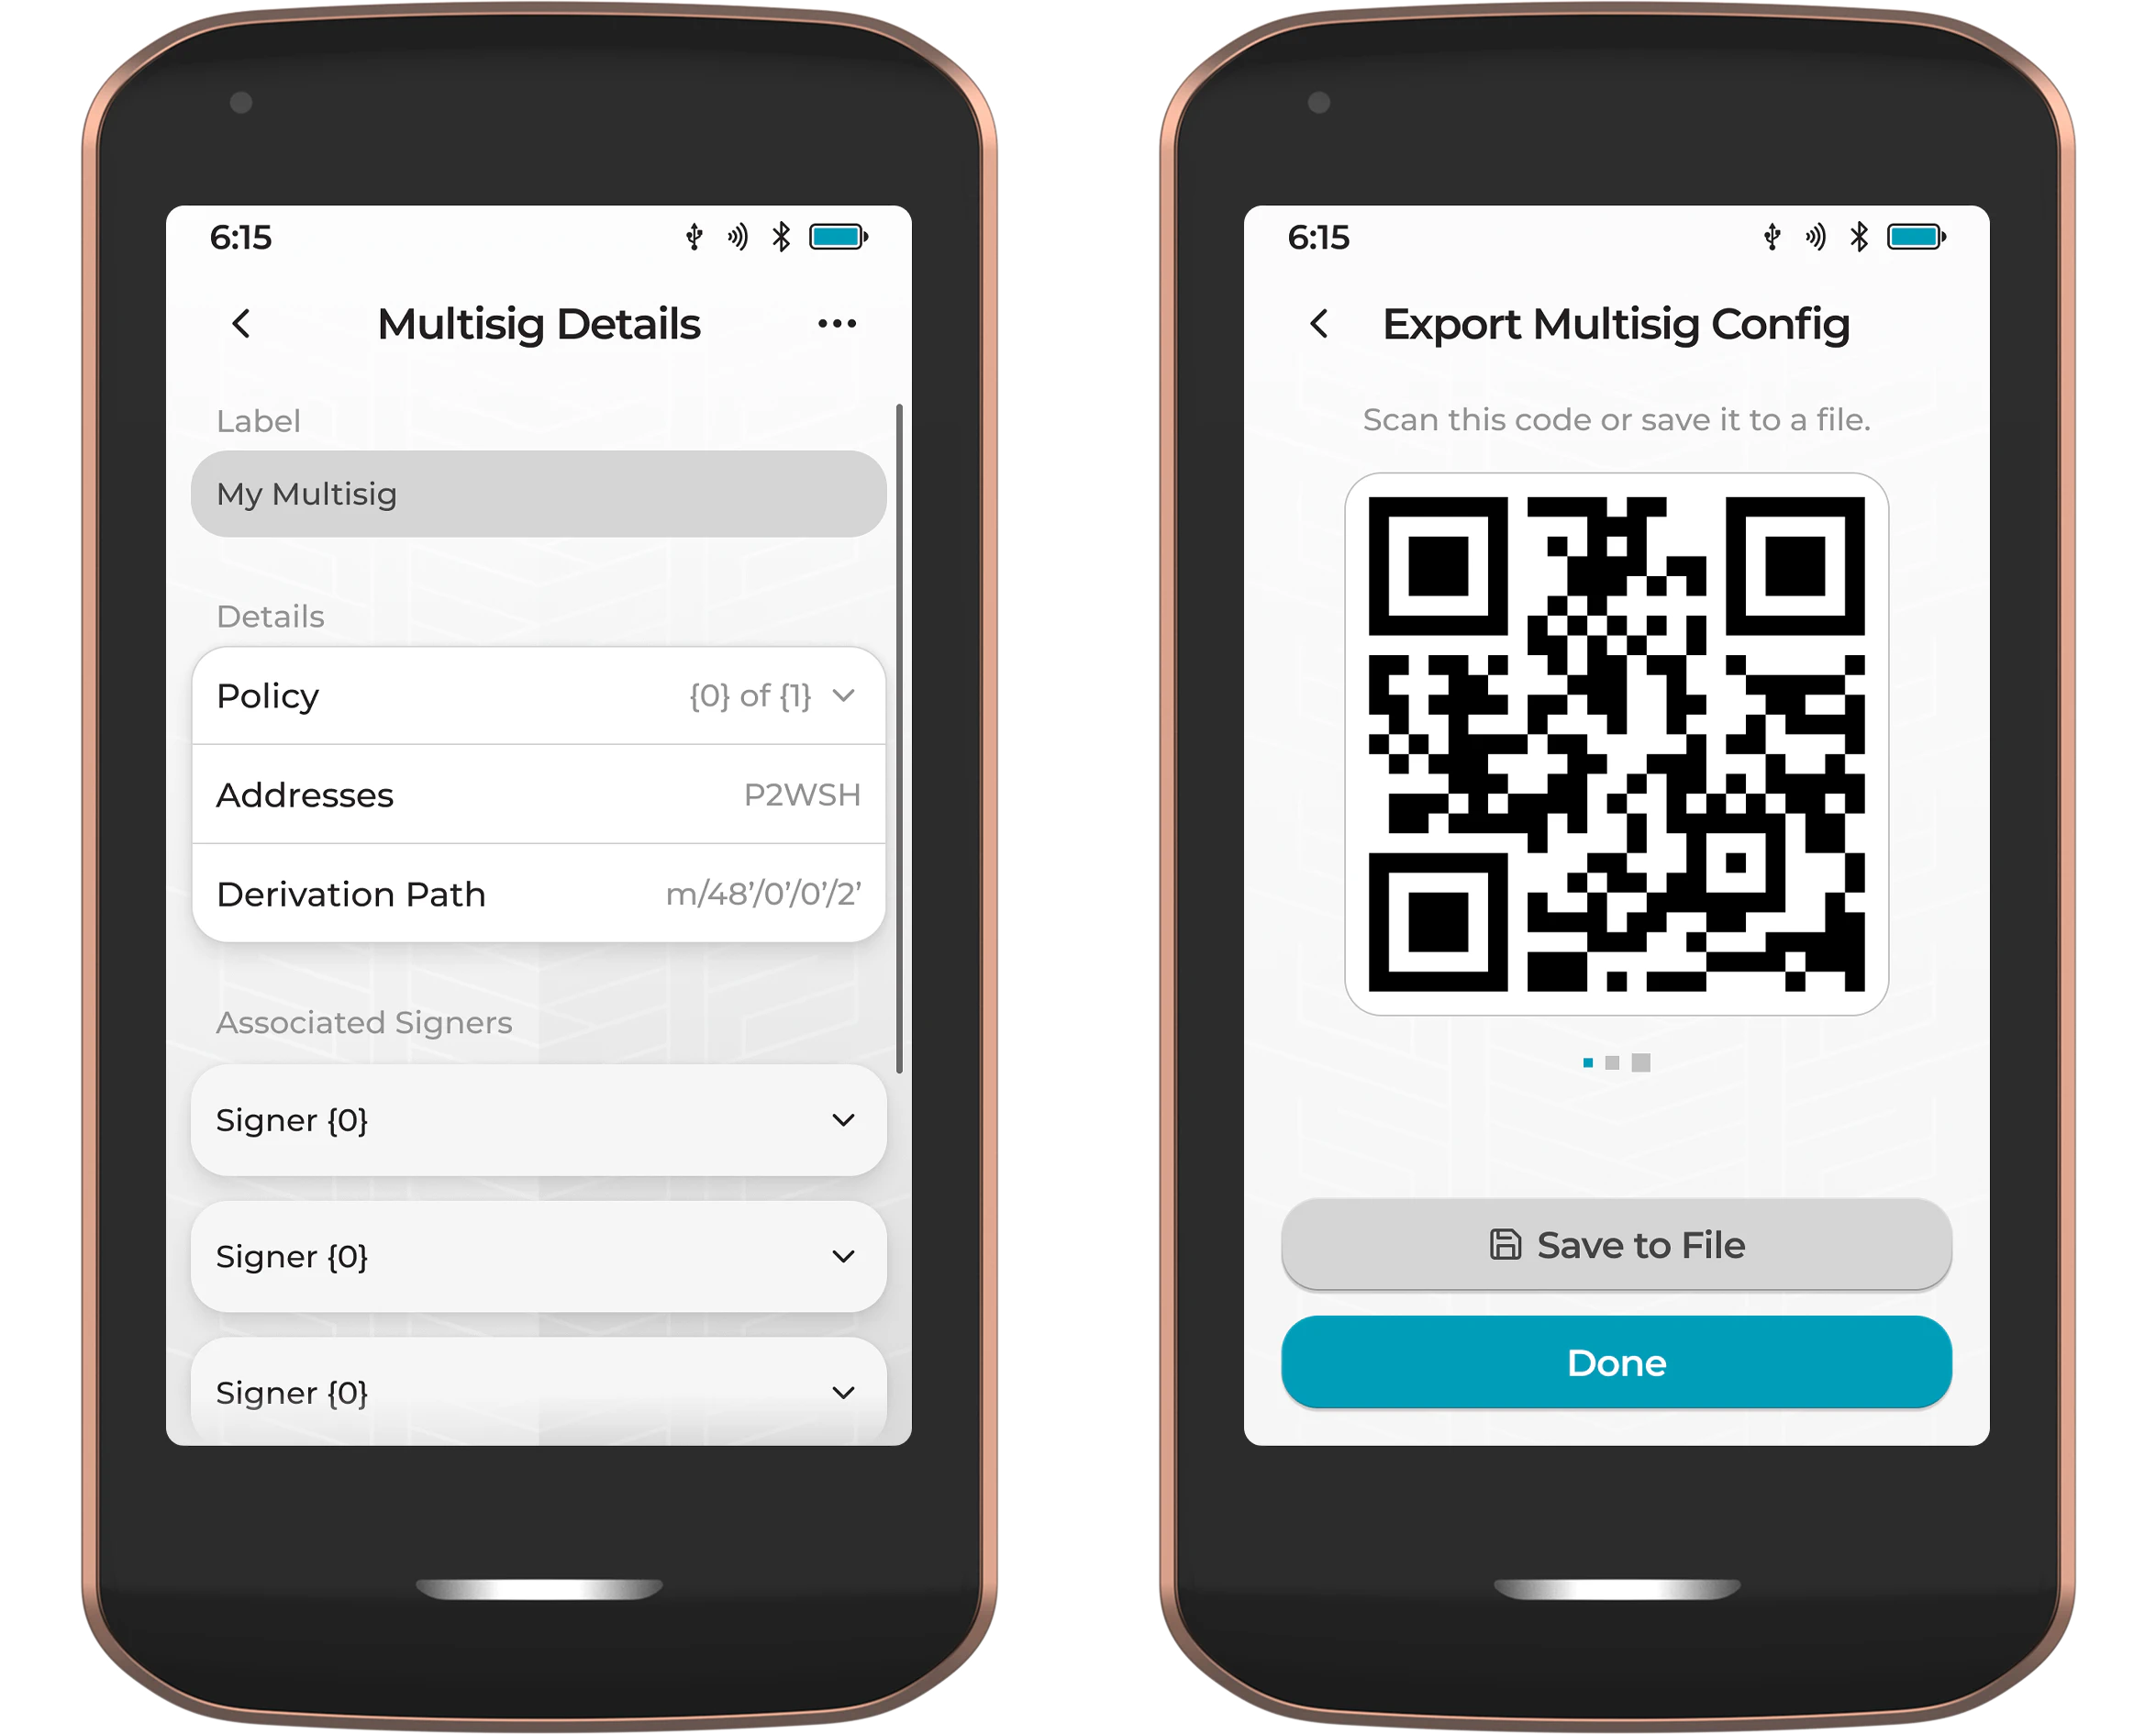
For any multisignature configurations imported to Passport Prime, tapping Account Details here will show the configuration info, including all cosigners, and give you the opportunity to export the configuration as a QR code or a file.
Signing Transactions
Passport Prime supports three methods for signing transactions: via QuantumLink (automatic with Envoy), via QR code, or via file.
Via QuantumLink
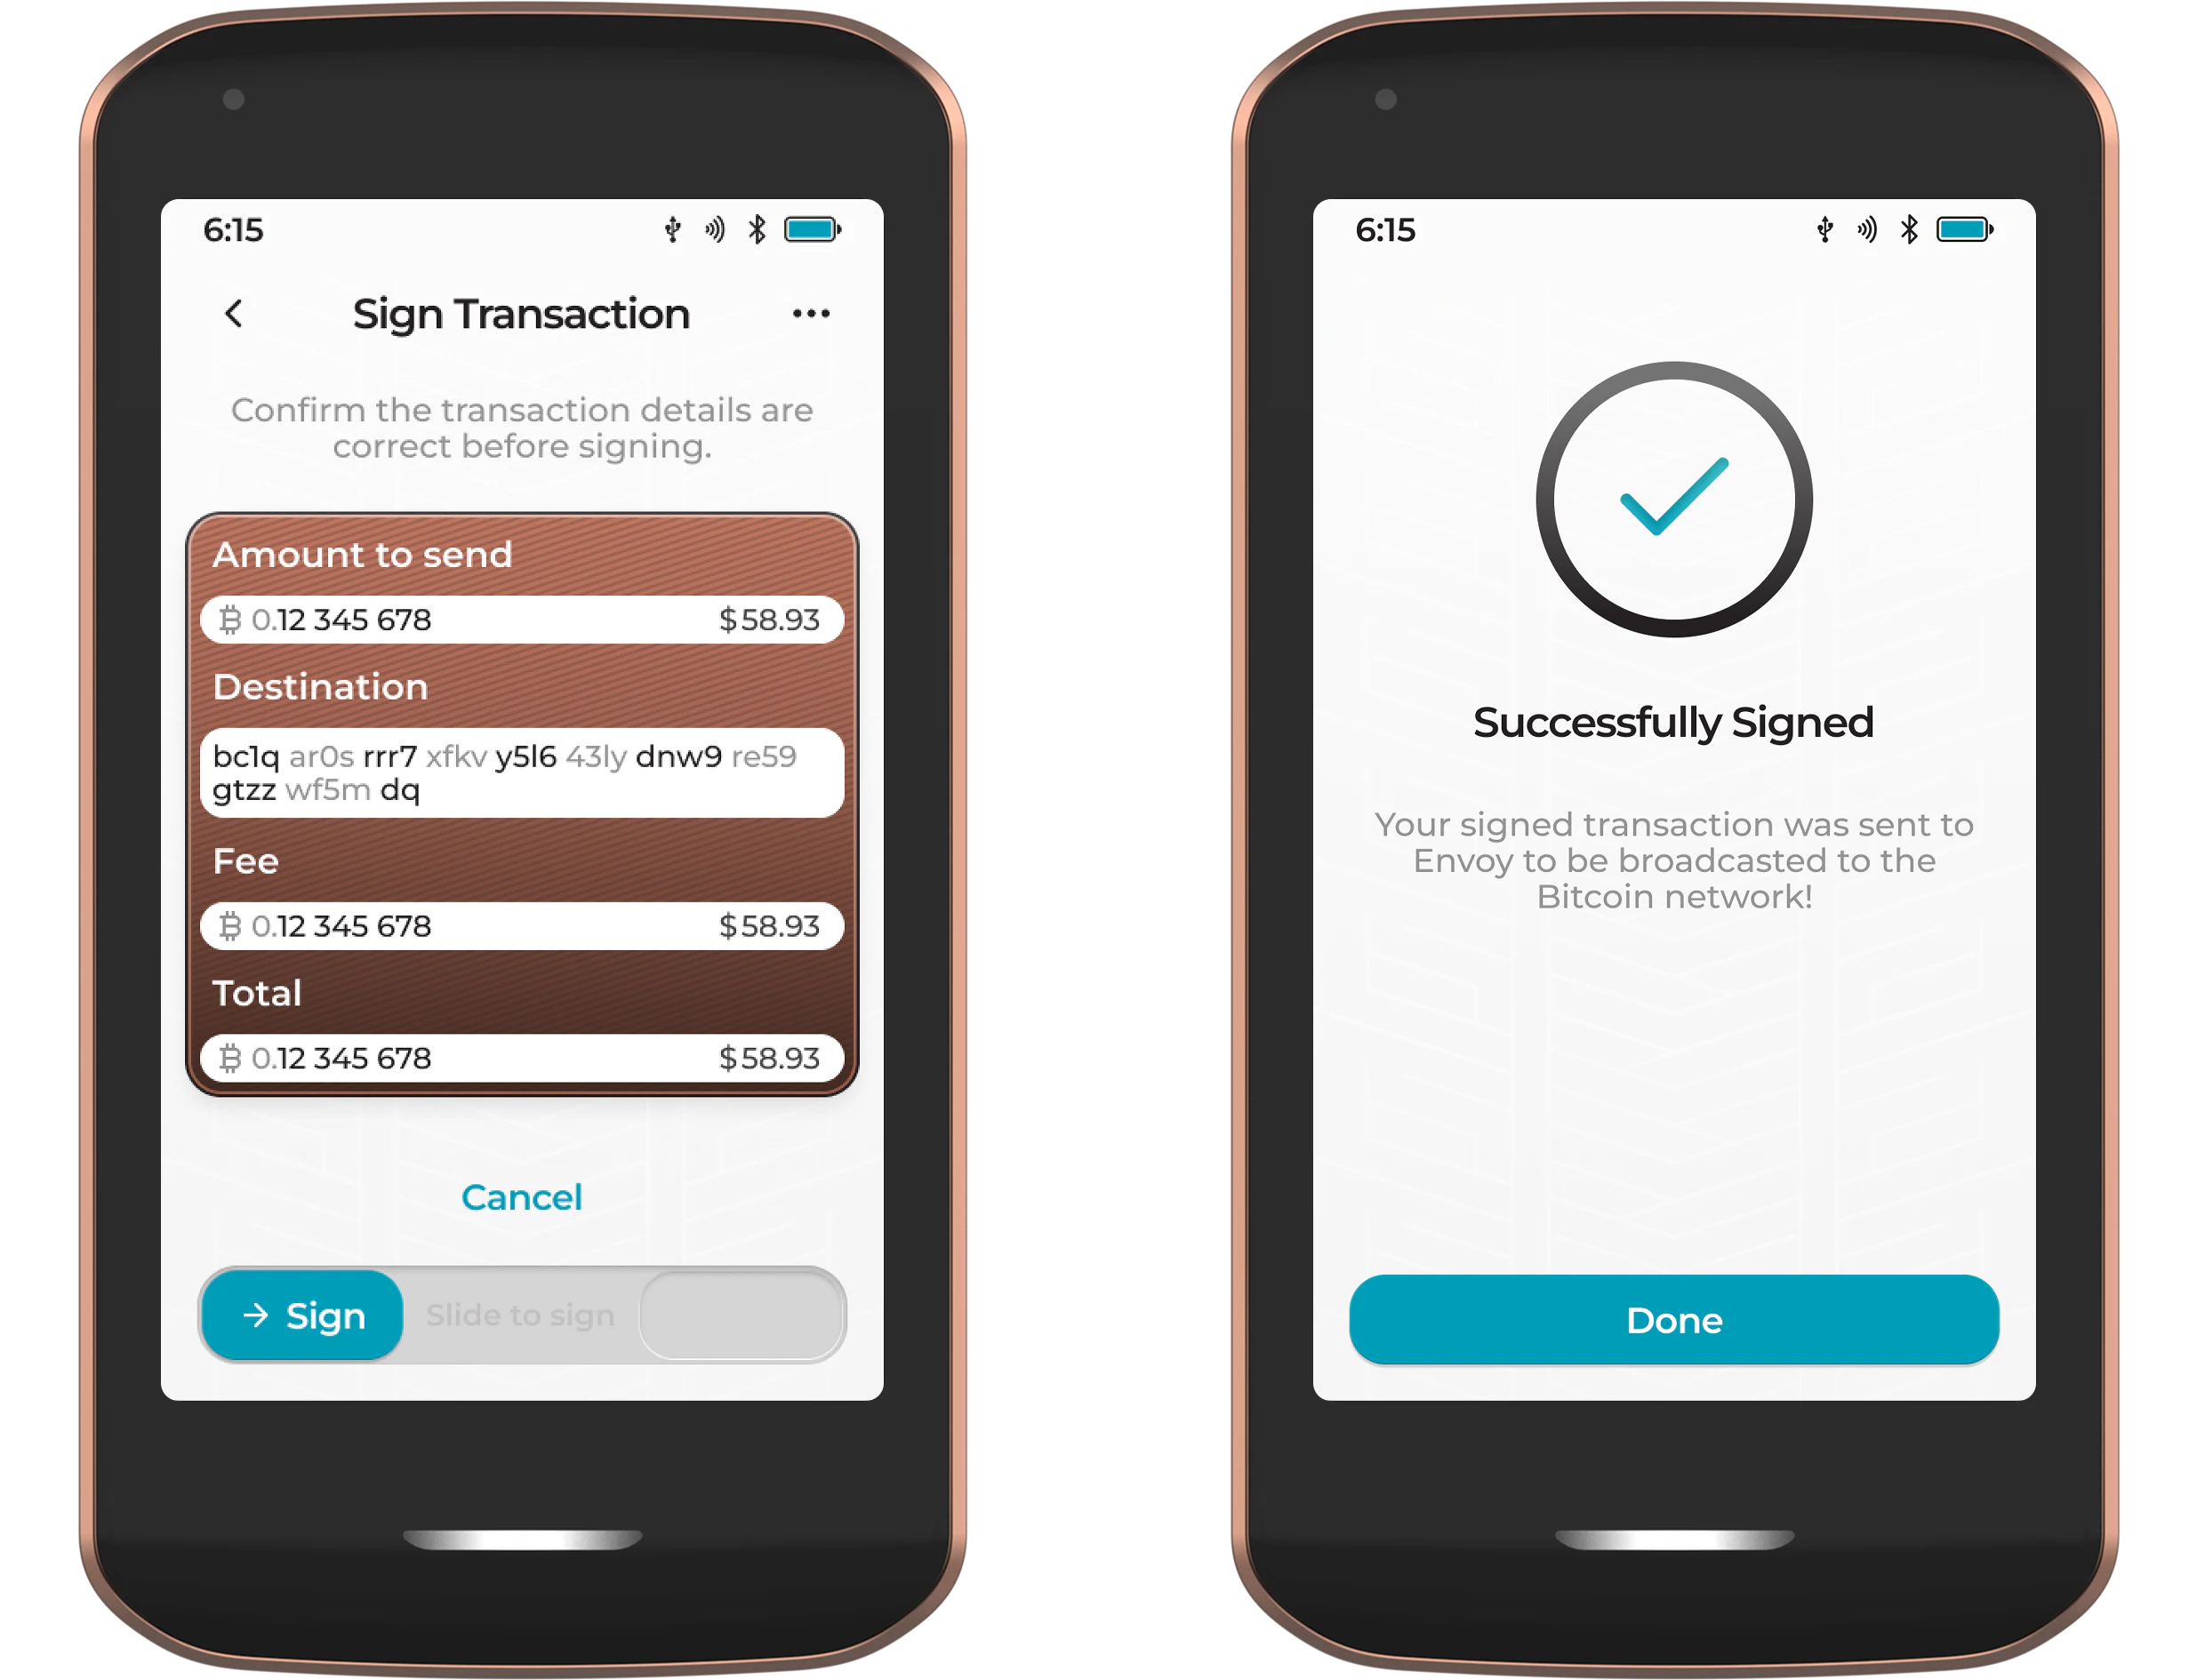
The fastest and simplest way to sign transactions with Passport Prime. You simply initiate the transaction from Envoy and when ready, Envoy will automatically contact Passport Prime via QuantumLink and the transaction signing screen will show up for you to check and authorize by sliding the teal slider from left to right.
After signing, the signed transaction will be automatically sent back to Envoy, via QuantumLink, to be broadcast to the Bitcoin network.
Learn more about our QuantumLink Bluetooth protocol here .
Via QR Code
Tapping the QR icon in the bottom right corner of the home screen and Bitcoin wallet app will open Passport Prime's camera. Scan the unsigned transaction QR code series from Envoy (or other QR-compatible wallet software).
Once Passport Prime has read all of the information required, it will display the details for you to check and authorize by sliding the teal slider from left to right.
After signing, the signed transaction will be displayed as a series of animated QR codes on Passport Prime's screen. Scan these QR codes with Envoy (or other QR-compatible wallet software) to transfer the signed transaction back to be broadcast to the Bitcoin network.
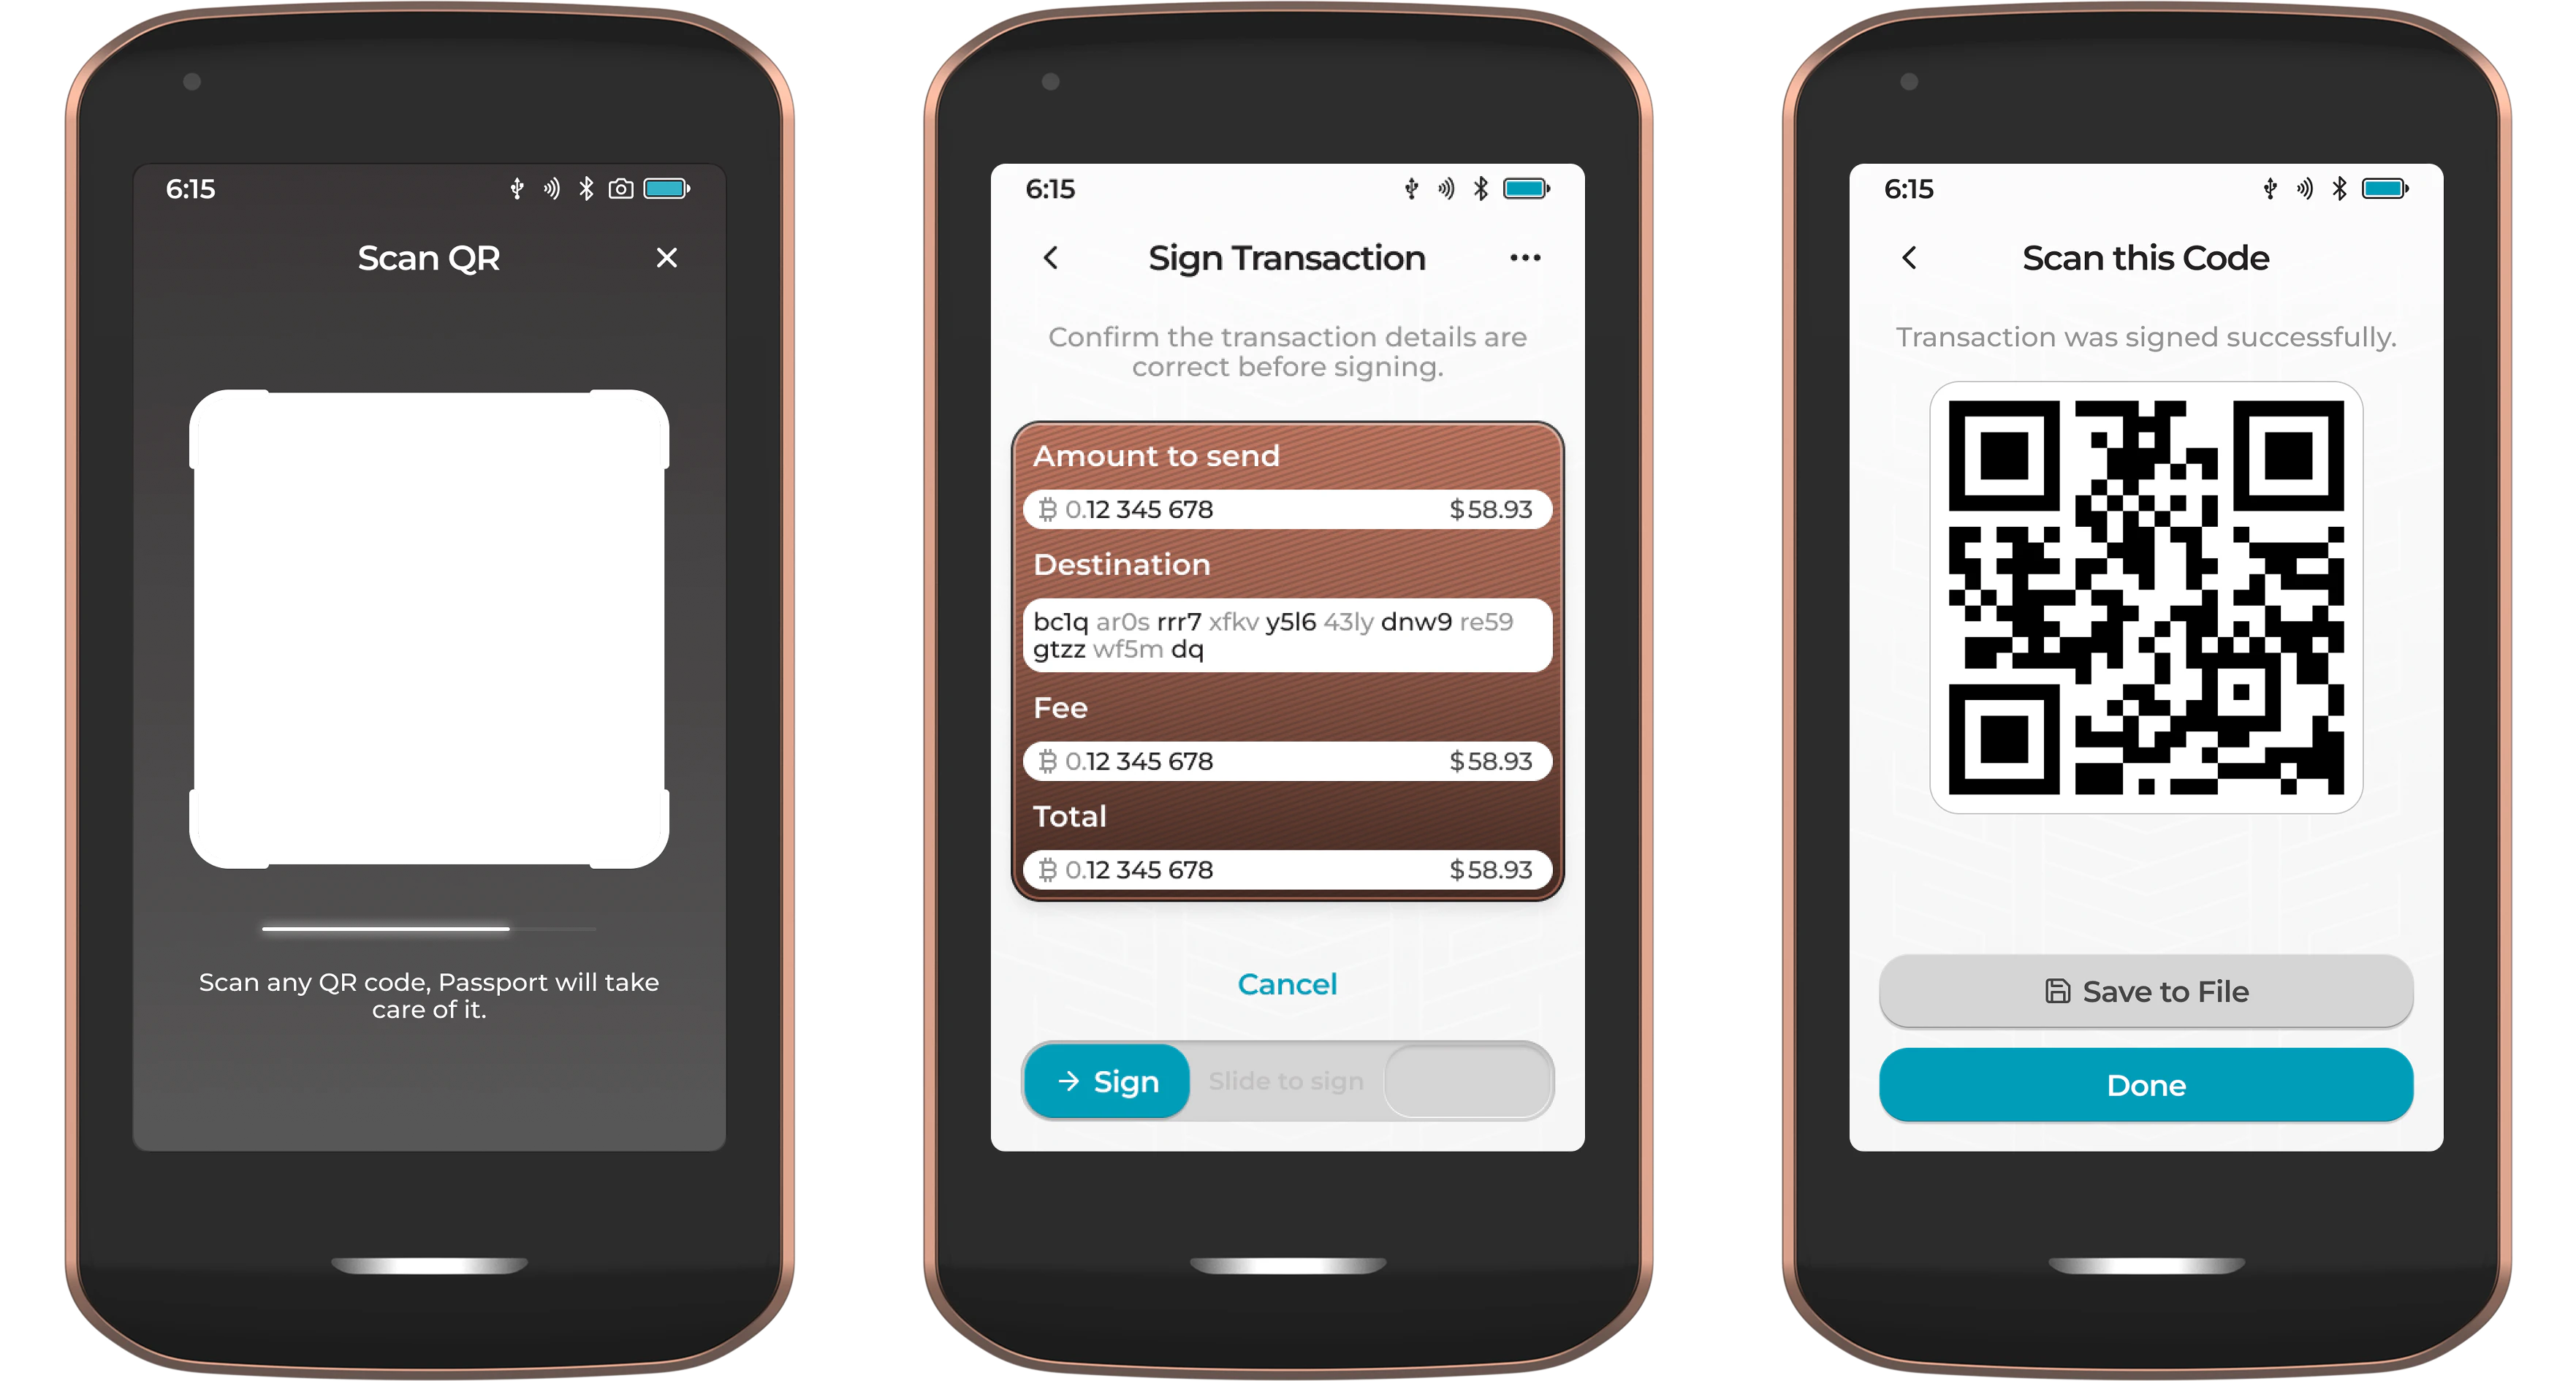
Why are the QR codes animated? To securely transmit larger and more complex Bitcoin transactions, Passport Prime displays a series of animated QR codes. This format (known as UR2 or animated QR) allows for fast, reliable data transfer that wouldn’t fit in a single static code.
Via File
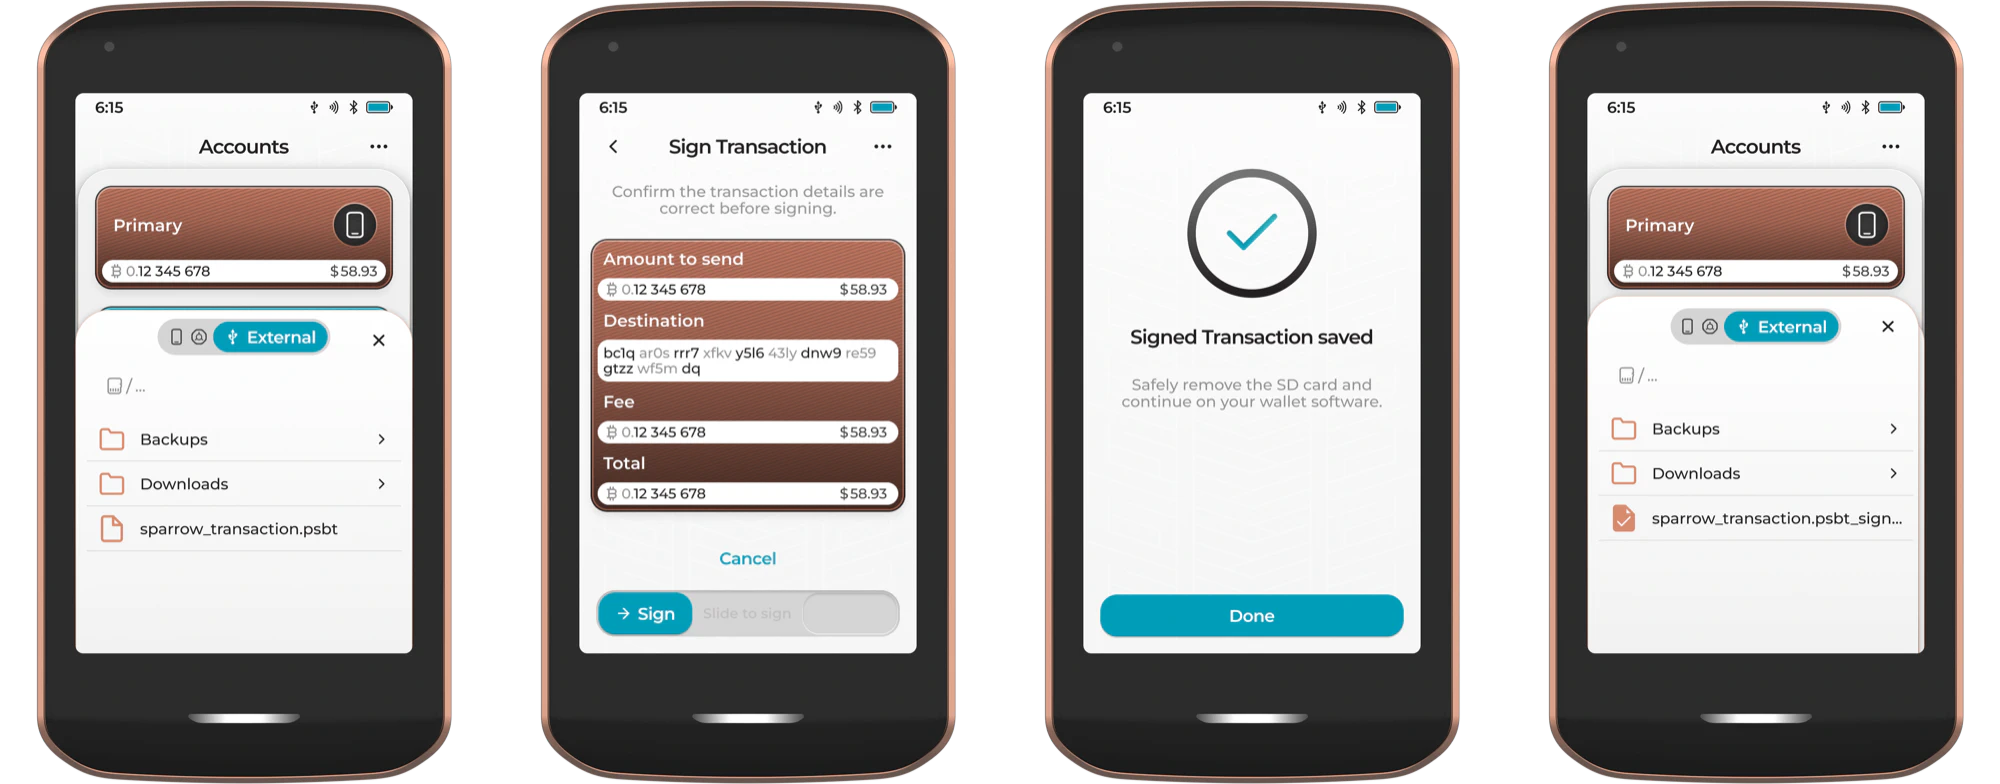
Tapping the file icon in the bottom left corner of the home screen and Bitcoin wallet app will open Passport Prime's file picker. Once open, you can choose to load a file from the onboard storage, or an external storage media, such as a USB thumb drive or microSD card, that can be inserted into the USB-C port at the bottom of the device.
Once located, simply tap on the .psbt transaction file to open it. Passport Prime will then display the transaction details for you to check and authorize by sliding the teal slider from left to right.
After signing, the signed transaction file (PSBT) will be saved to the same storage location as the original unsigned PSBT file. Remove the storage media and share the signed PSBT file with any compatible wallet software for the signed transaction to be broadcast to the Bitcoin network.
Three Dot Menu
Tapping the three dots in the top right corner of the Accounts page shows a sub-menu offering advanced features and settings.
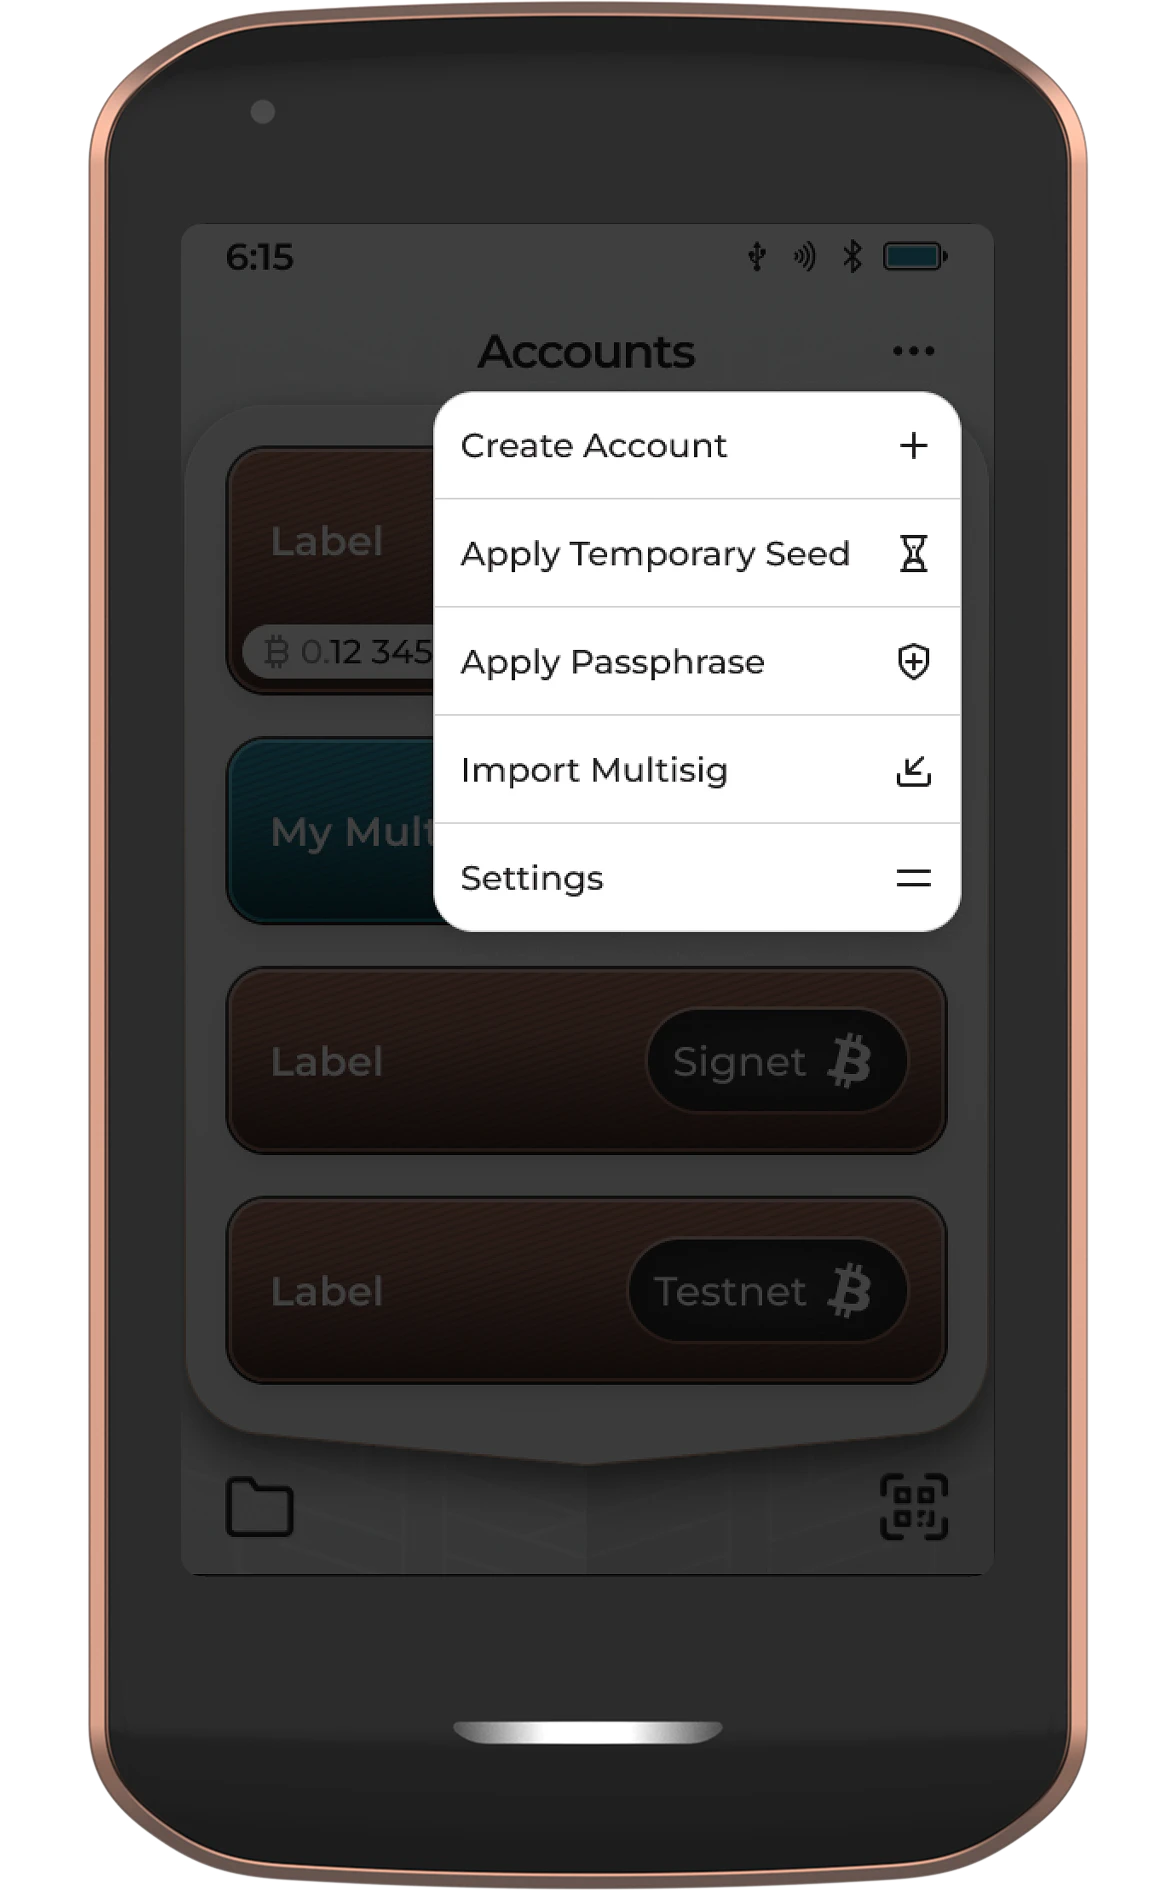
Create Account
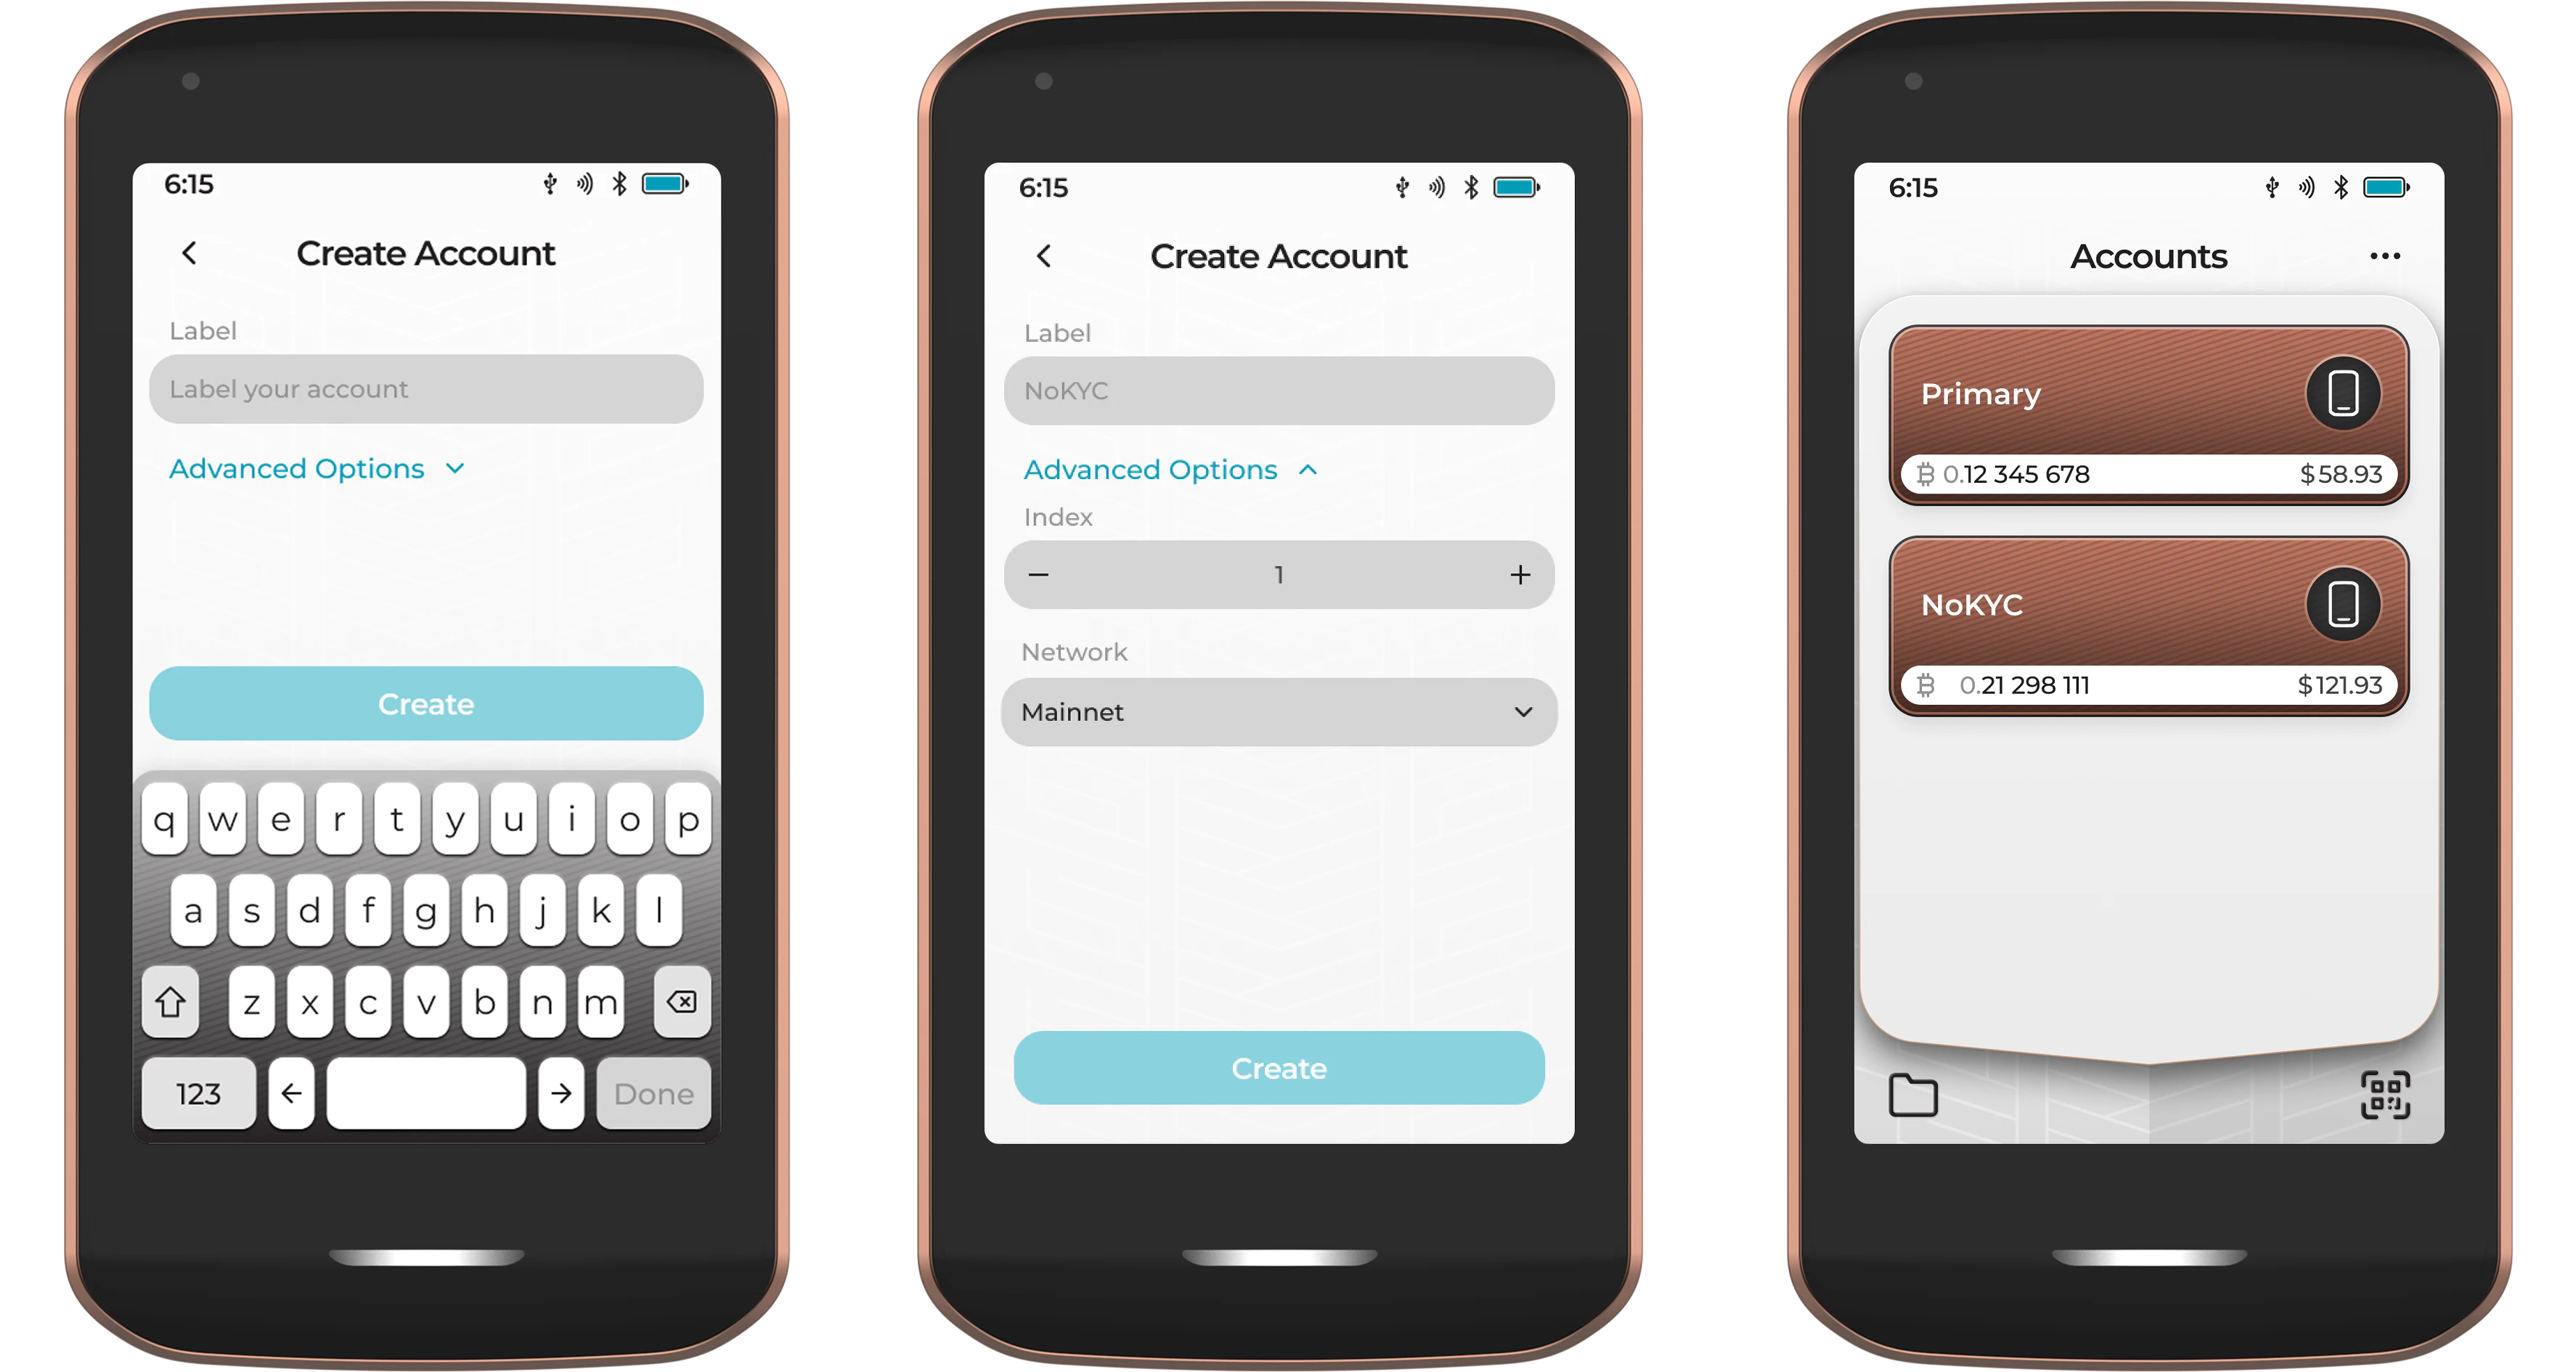
Adding additional accounts is a great way to manage separate stacks of Bitcoin using a single device and seed. When adding new accounts to Passport Prime, the device will require two pieces of information:
- A label for the account - It is good practice to name the account in line with its purpose. E.g., ‘Business’ or ’Savings’
- An account index - Passport Prime will automatically increment these, but advanced users are free to choose their own
Each account is automatically assigned a color based on its account index, so the same account always appears in the same color across Passport Prime, Passport Core, and Envoy.
Once added, the new account(s) will be visible from the Accounts page of the Bitcoin wallet app and auto-synced with Envoy via QuantumLink (if connected). For those using Passport Prime with a third-party wallet, new accounts will need to be manually paired (Account menu > Connect Wallet).
Apply Temporary Seed - COMING SOON
Under normal usage, Passport Prime generates and securely stores a single ‘master’ private key. The temporary seed function allows you to temporarily load a different seed onto the device. Once loaded, you can perform all typical Bitcoin wallet app related activity from the temporarily loaded seed. This includes:
- Connect any account from the loaded seed to Envoy or other wallet software
- Verify addresses
- Sign transactions
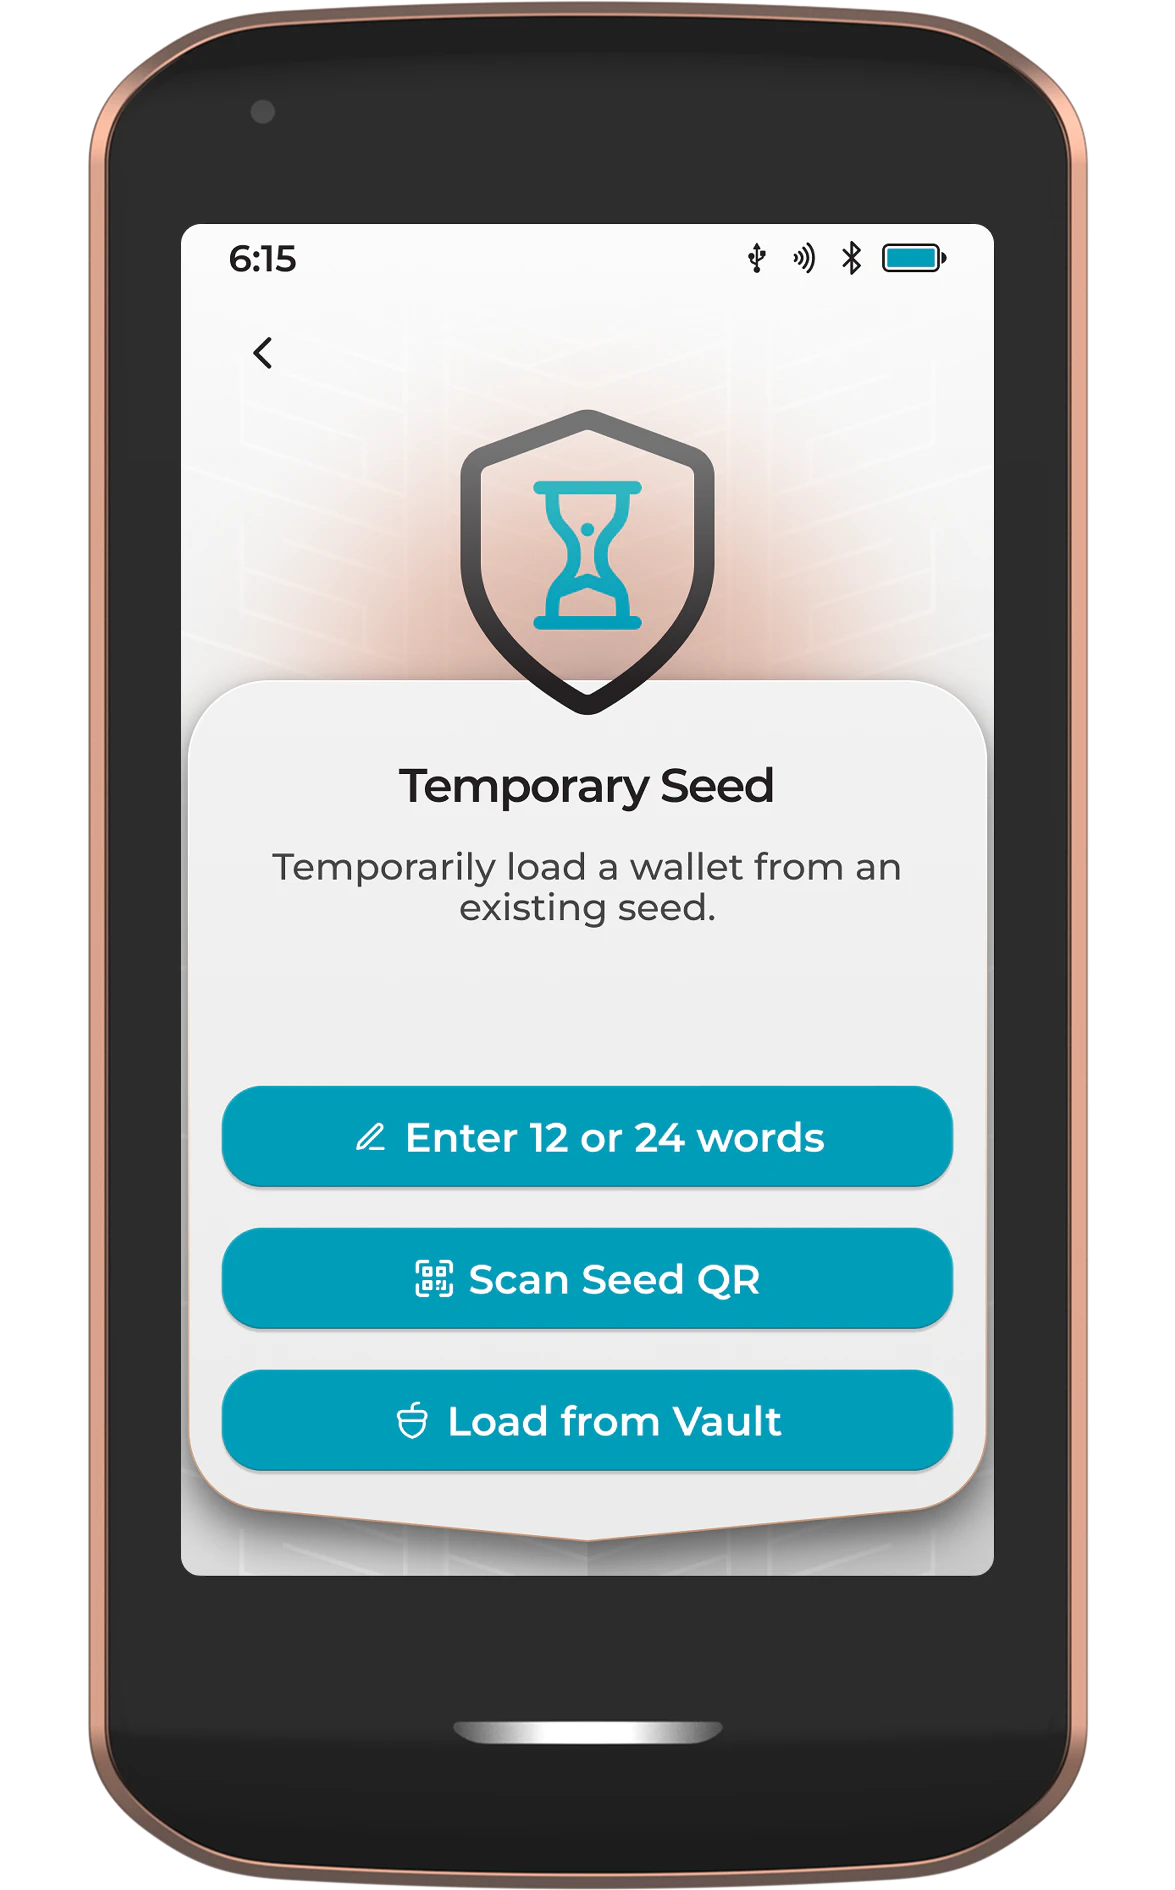
Seeds can be loaded temporarily in three main ways:
- Manually entering 12 or 24 words
- Scanning a SeedQR
- Loading a seed from the Vault app
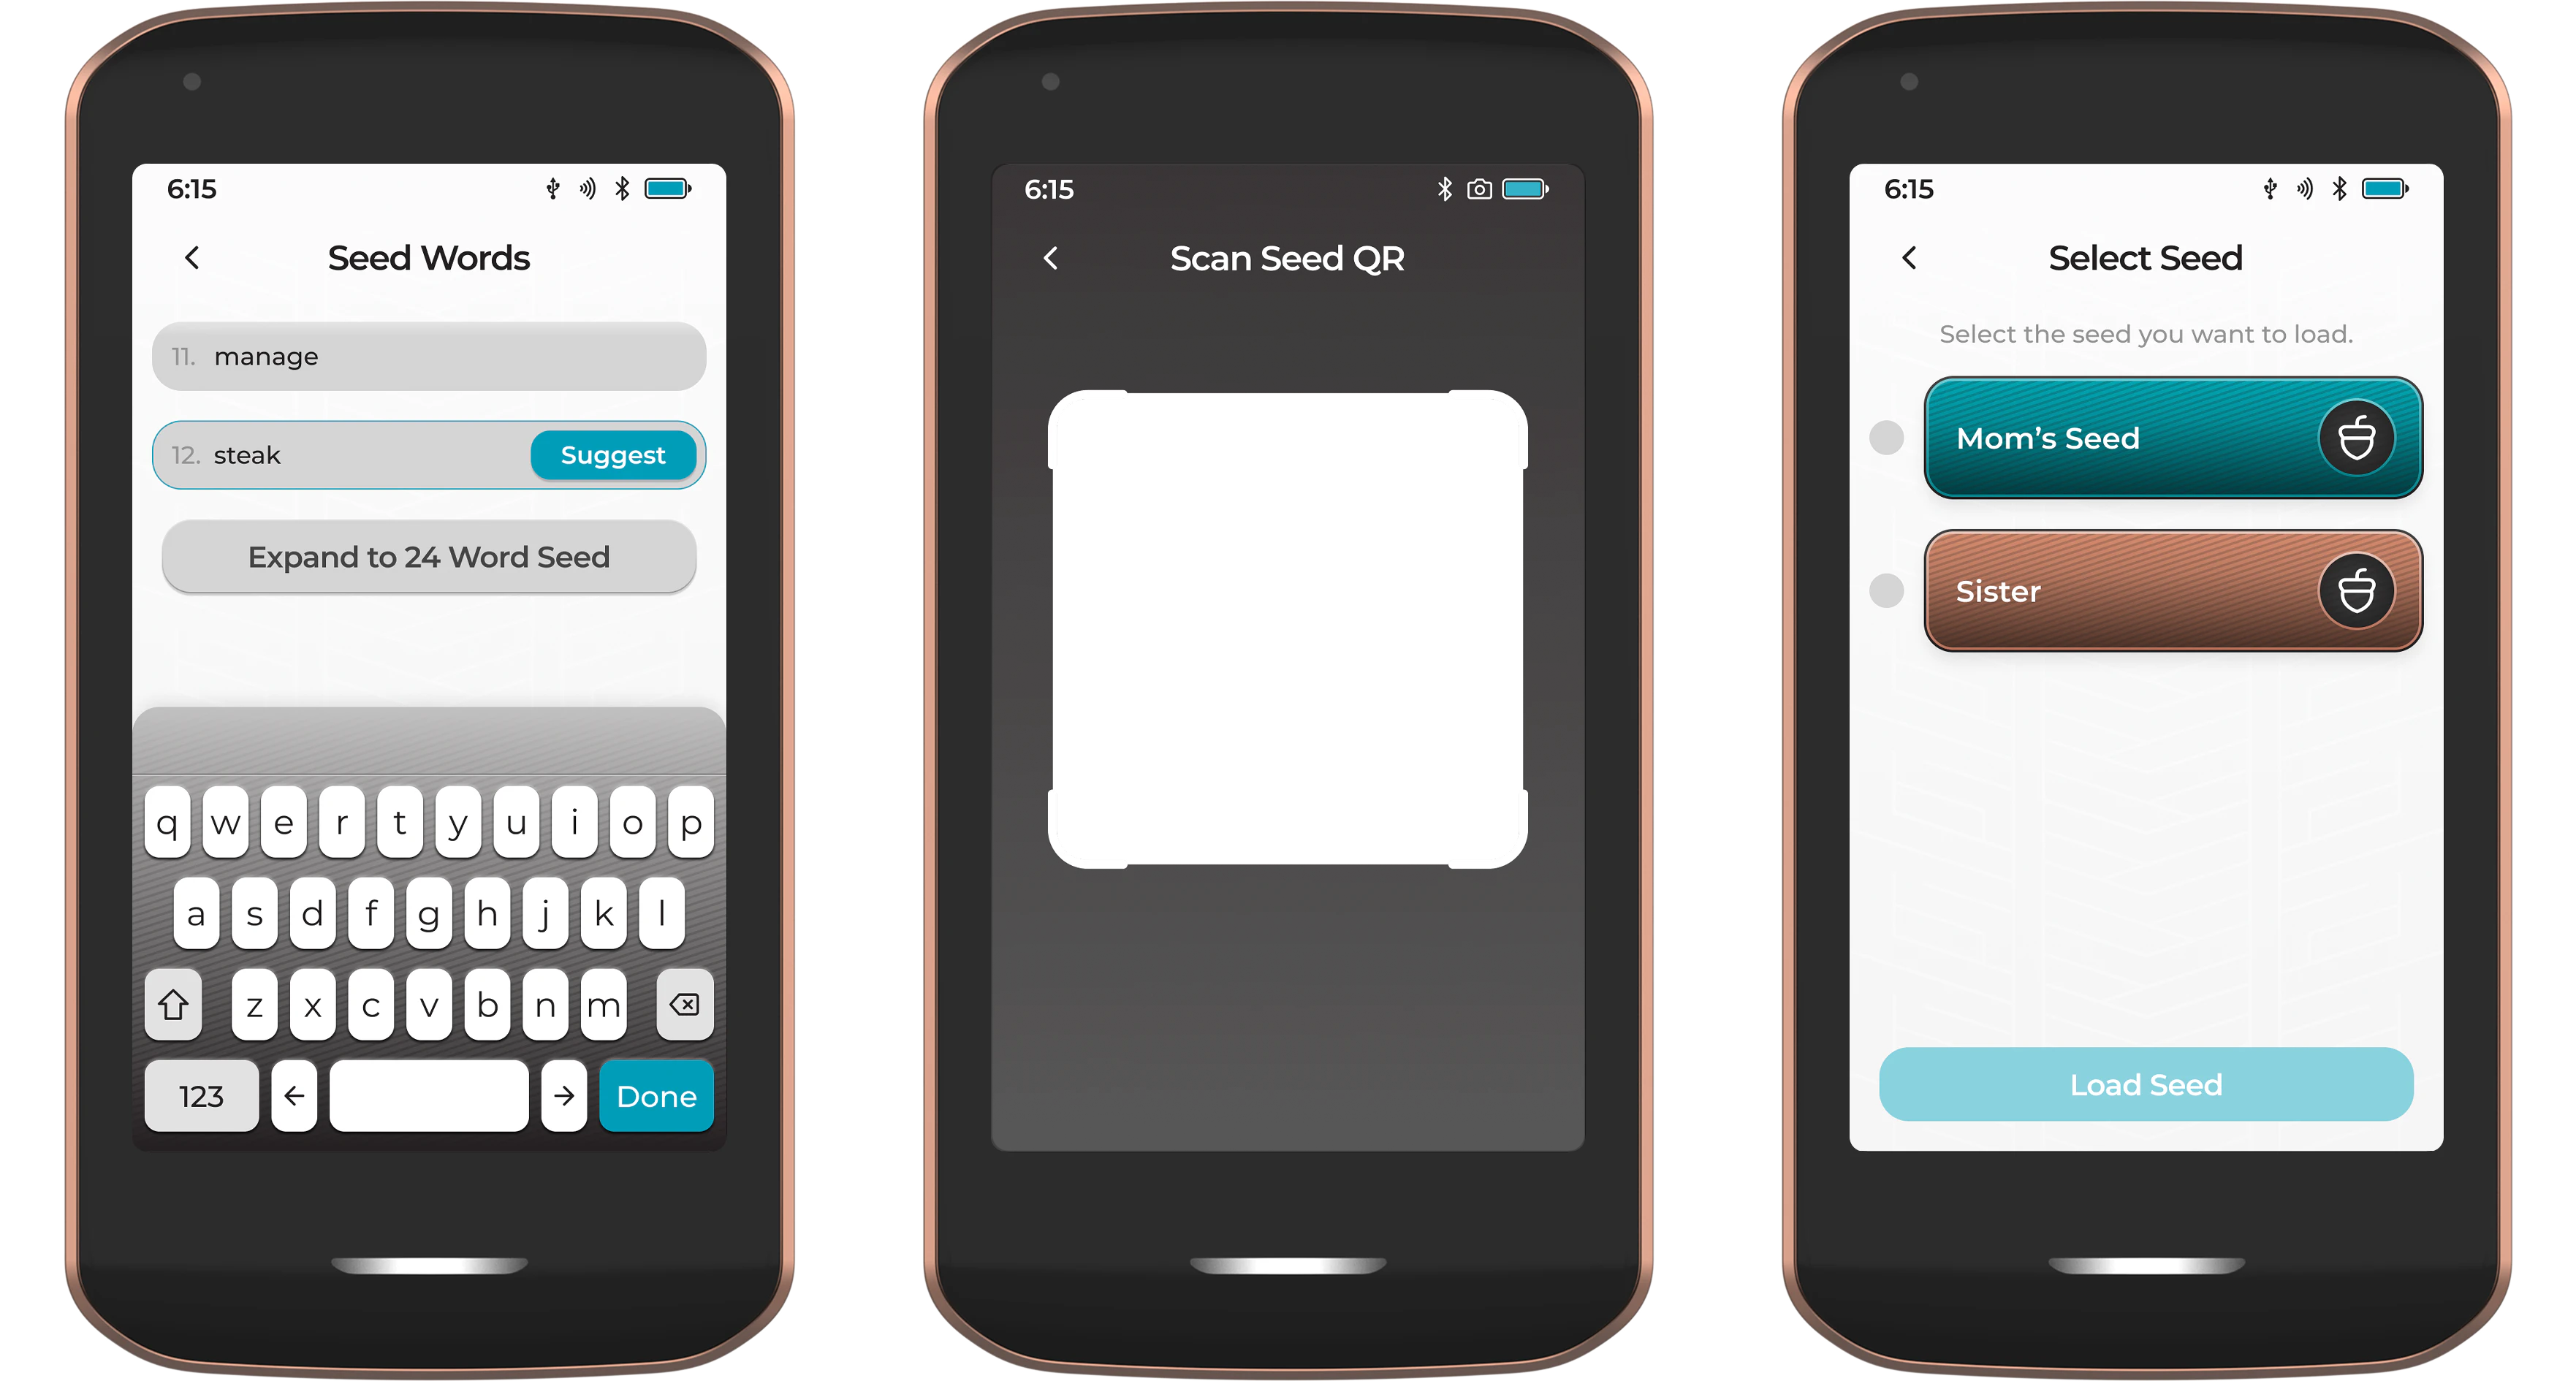
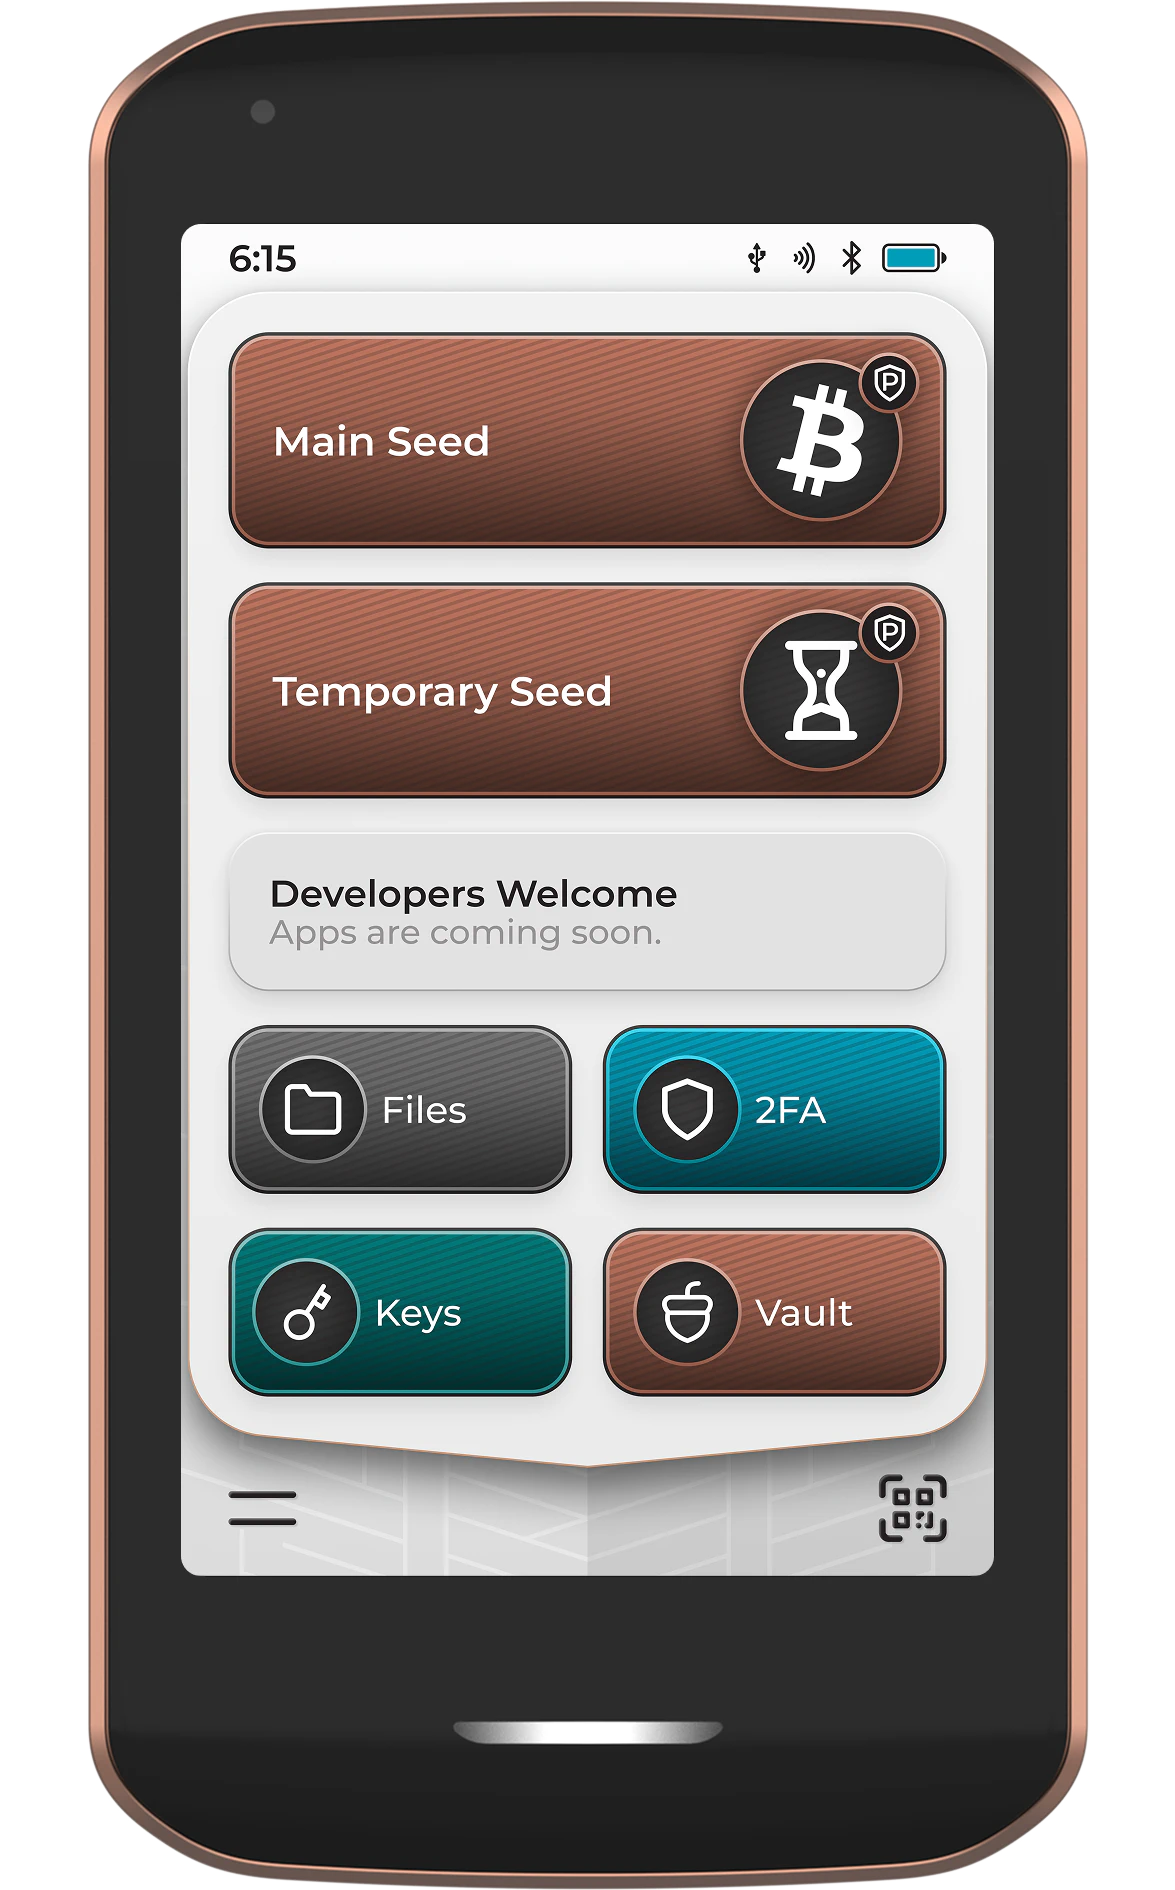
Temporary seeds remain active on Passport Prime until they are manually cleared from the device, or the device is turned off. When a temporary seed is active on Passport Prime, it will be visible as an additional tile on the home screen, displaying an hourglass icon.
Just like with the Primary Account, the temporary seed account(s) can be accessed with a simple tap. From here, all of the typical Bitcoin wallet app features are accessible, but applicable to the temporarily loaded seed.
Apply Passphrase
For increased plausible deniability in the event of a physical attack, a passphrase can be applied to Passport Prime. A passphrase acts as a second layer of security to protect your Bitcoin in the event that someone discovers your seed words . Multiple passphrases can be used with a single device as another method of segregating funds. Your passphrase is never saved to Passport Prime. Ensure it is safely backed up!
Applying a passphrase to Passport Prime creates a new wallet that is completely independent of the default wallet created by your 12/24 word seed and will have its own unique list of accounts and receive addresses.
If you already have funds in a non passphrase protected account, then subsequently apply a passphrase and want to move your Bitcoin to the passphrase wallet, you must create a spend transaction to move the Bitcoin to a receive address from the new passphrase protected account.
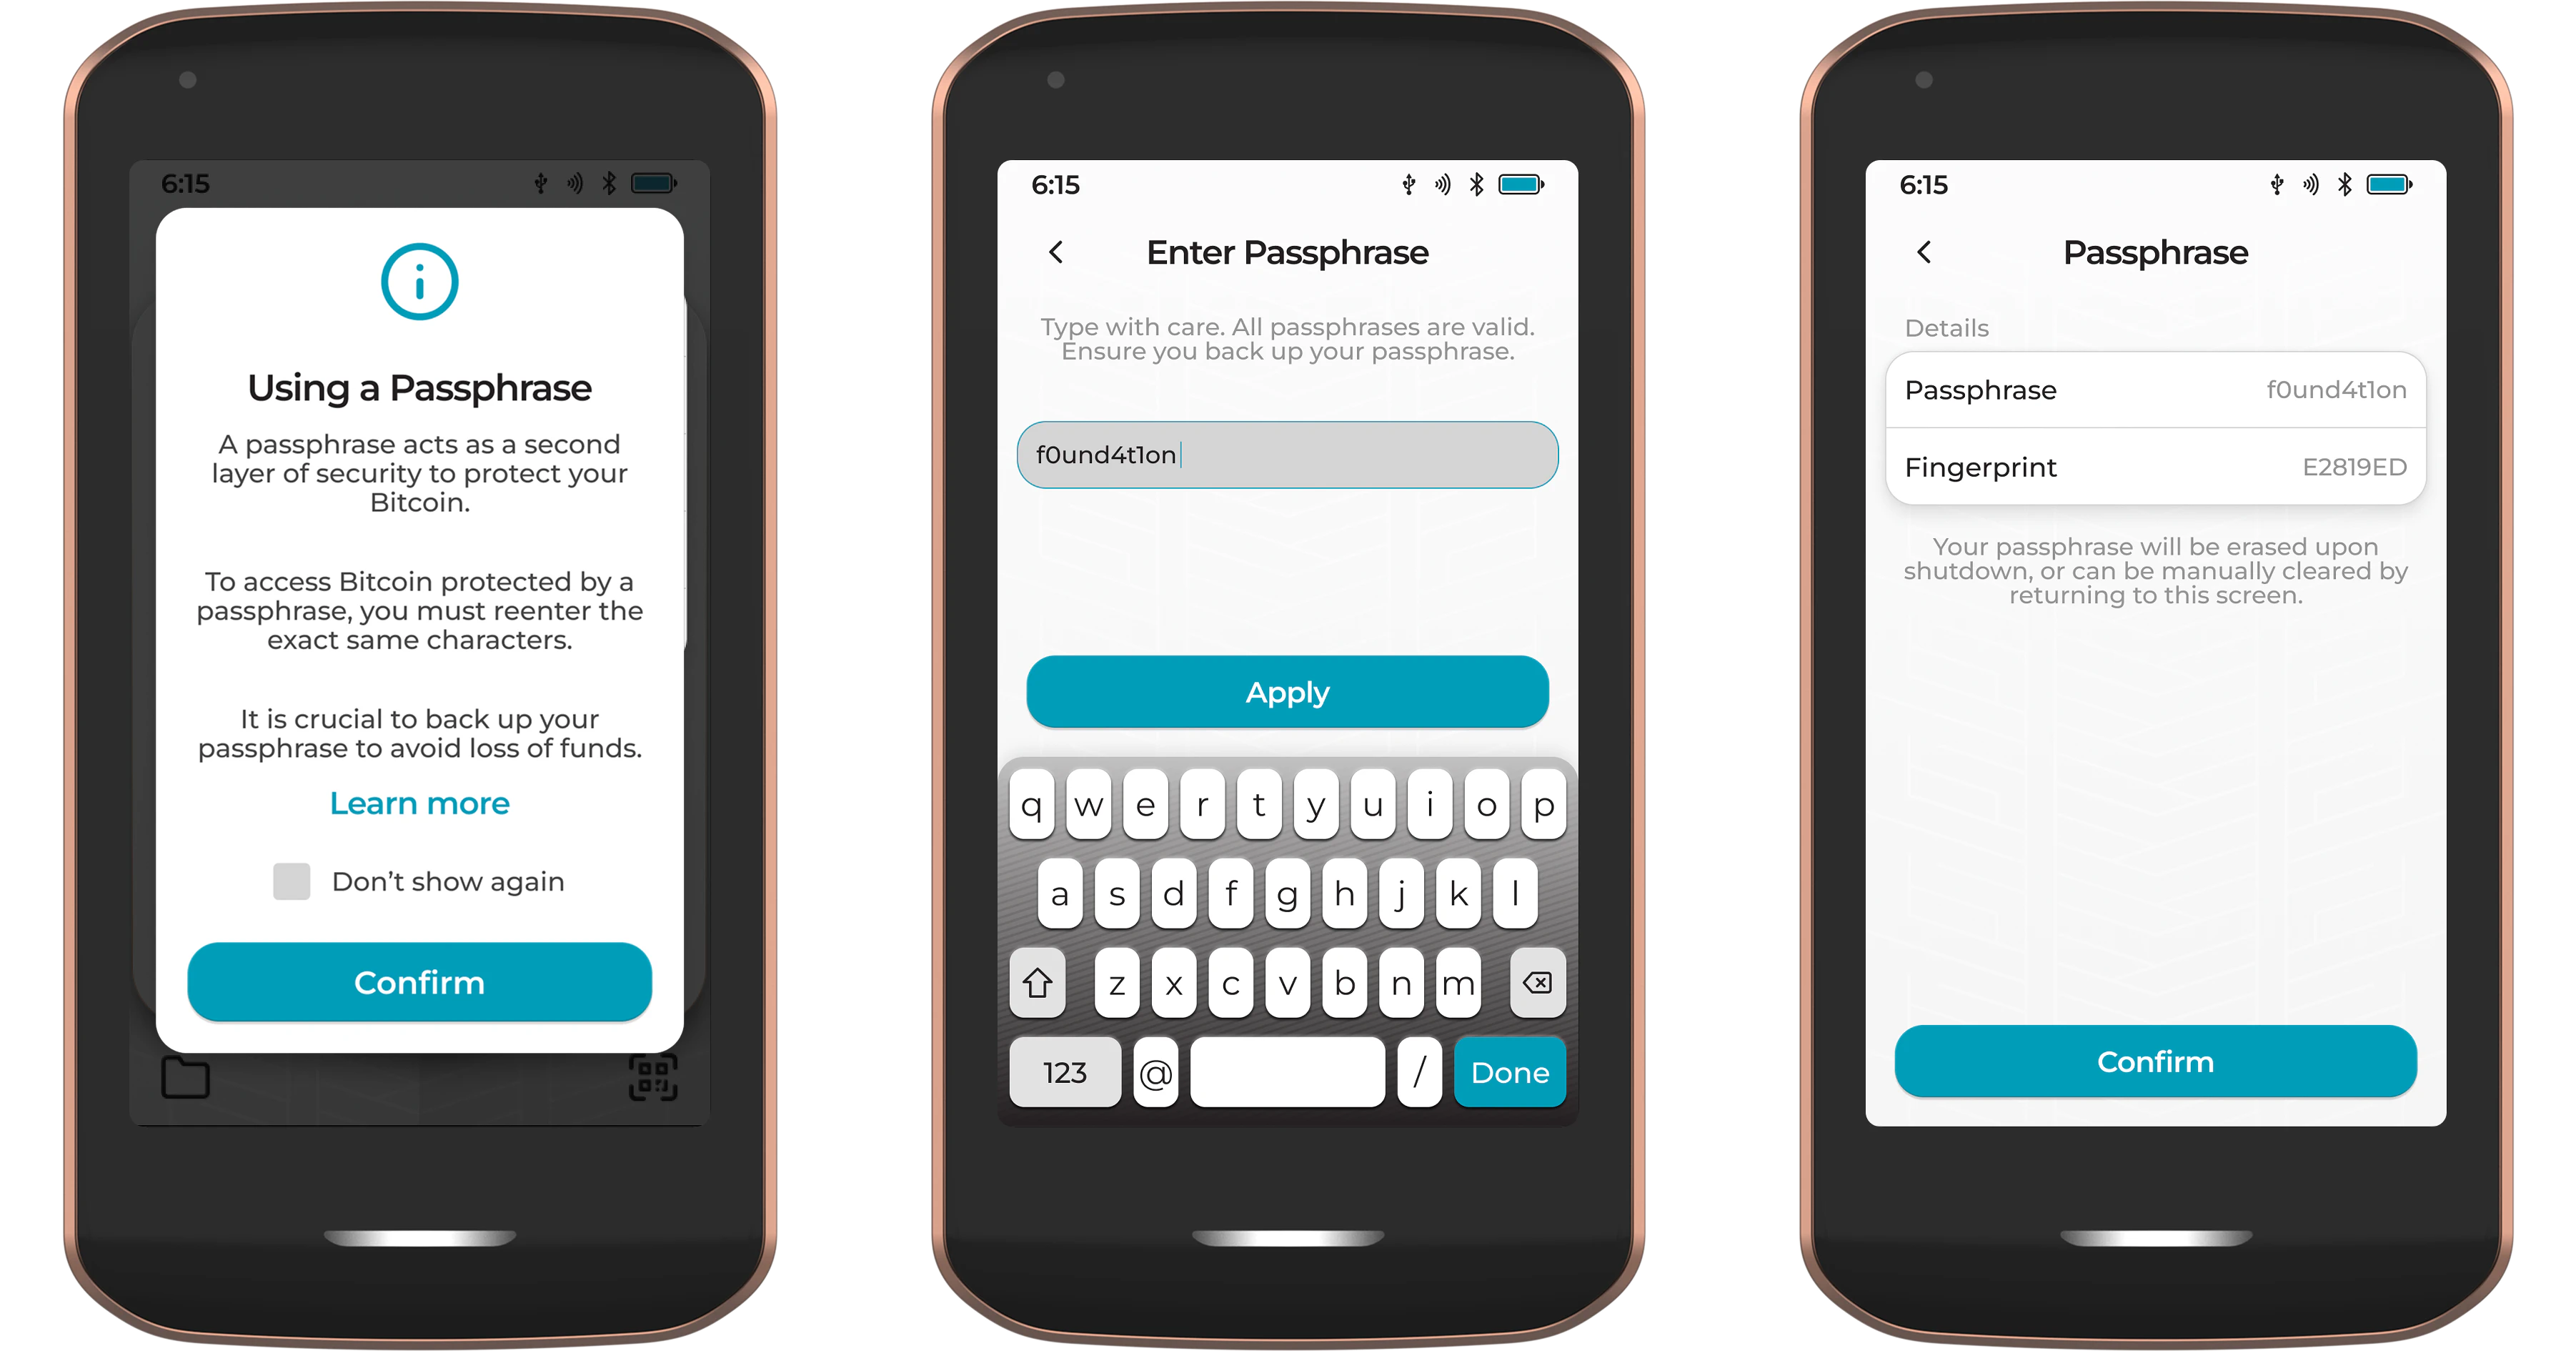
Once a passphrase has been applied to Passport Prime, the accounts view will display two tabs. One for the default non-passphrase accounts, and another for all accounts related to the active passphrase. Each new passphrase account must be paired with the software wallet of your choice. If paired with Envoy via QuantumLink, passphrase accounts will automatically appear in Envoy as soon as the passphrase is activated on Passport Prime, and will be removed from view when the passphrase is cleared.
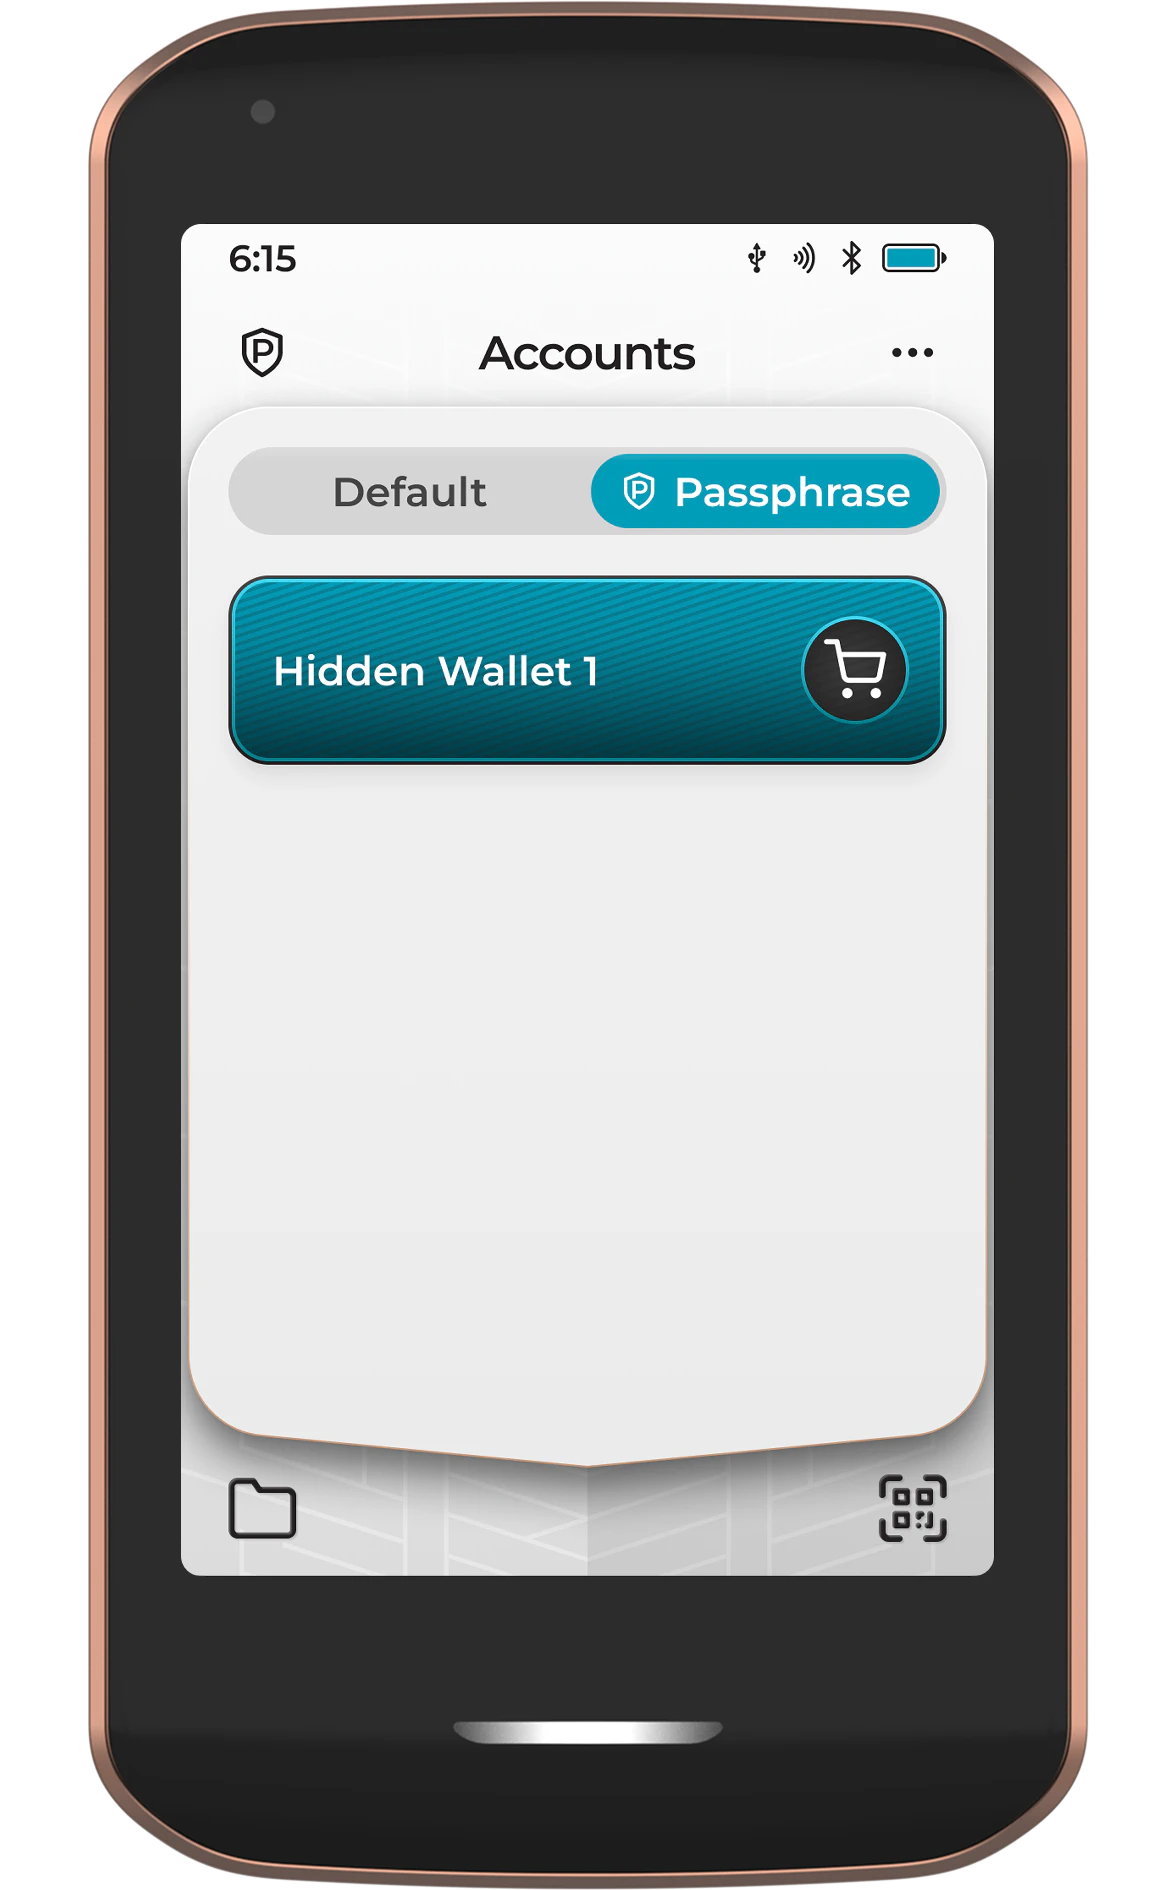
A passphrase will remain active on Passport Prime until:
- It is removed by tapping the three dot menu and choosing Clear Passphrase
- The device is powered off
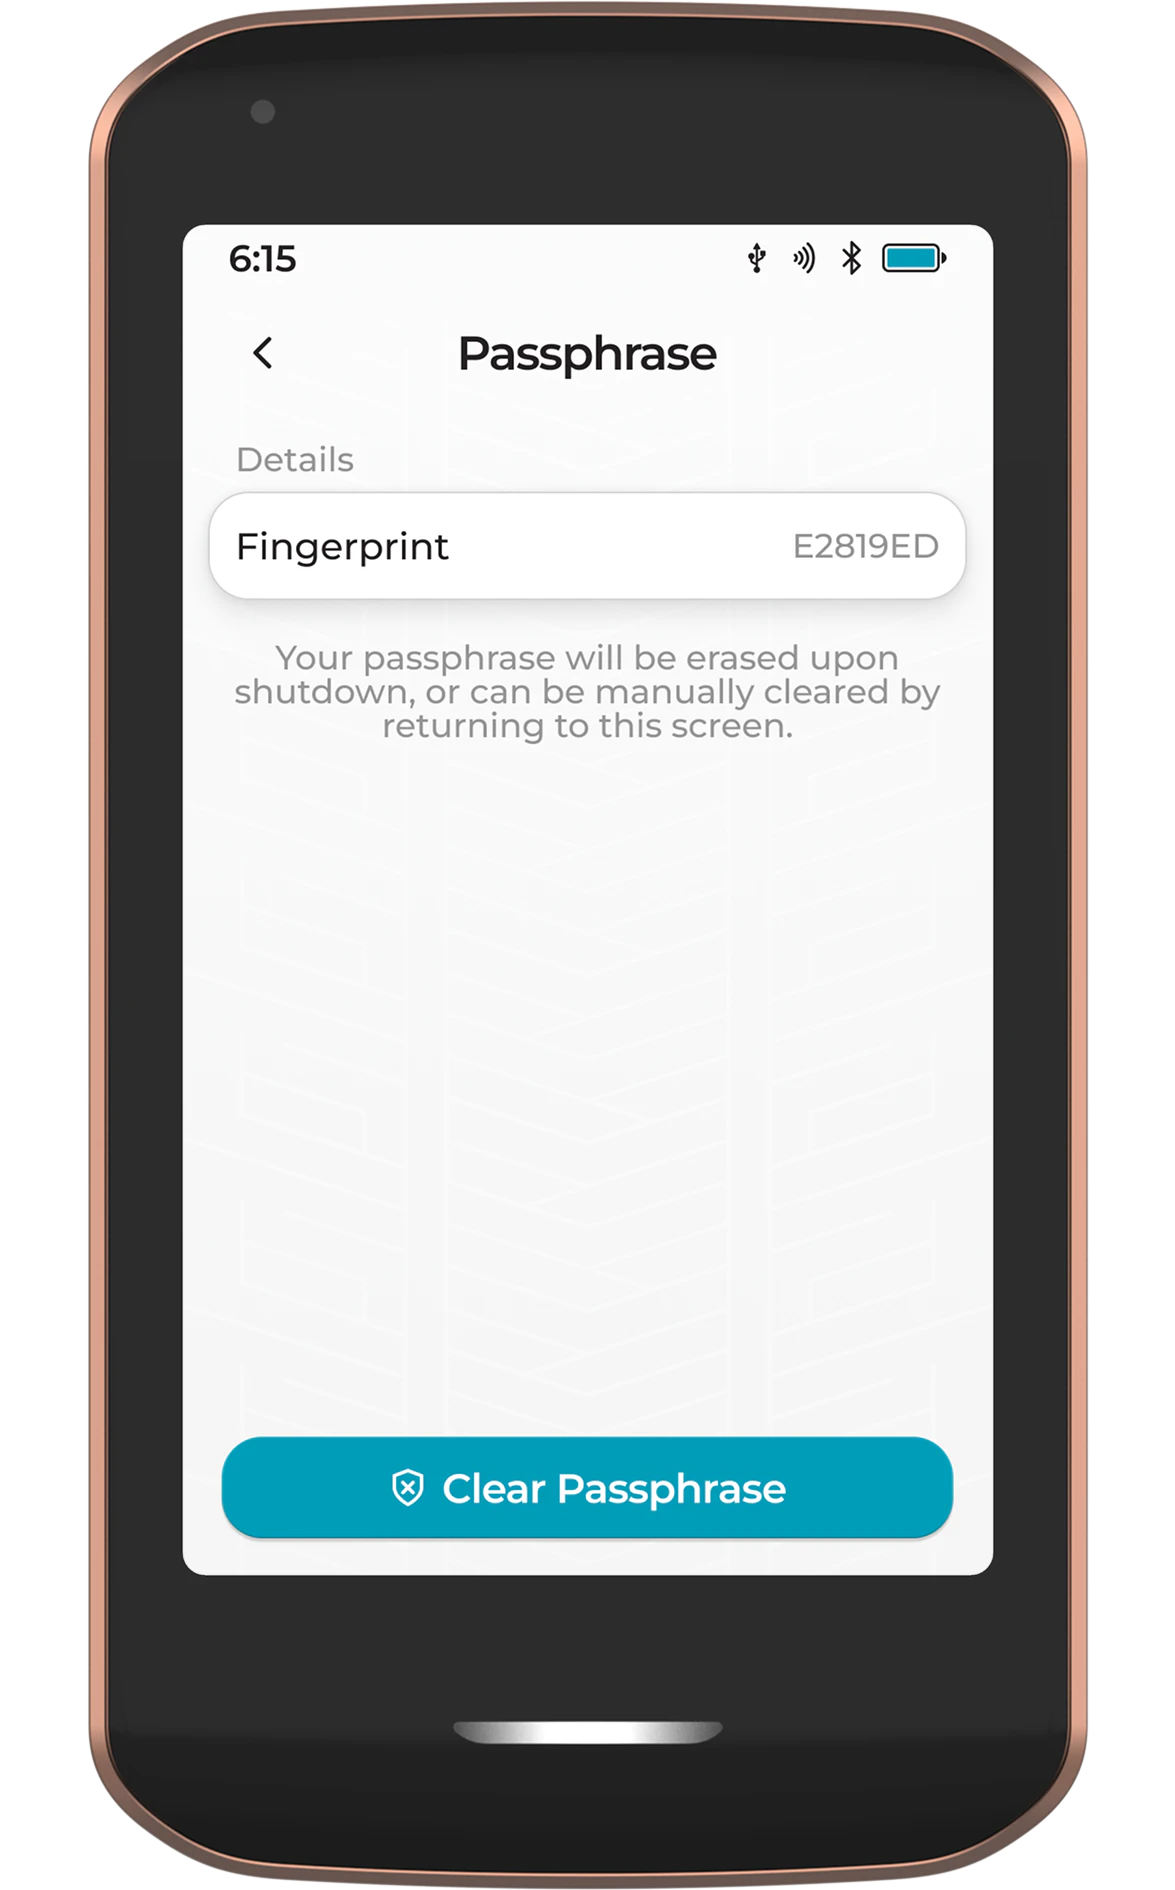
To ensure proper plausible deniability, Passport Prime controlled passphrase accounts will only be visible on Envoy when the passphrase is active on Passport Prime.
Import Multisig
Use this feature to import an existing multisignature wallet configuration file to be registered on Passport Prime. This is a crucial step to ensure you're able to securely verify addresses and sign transactions from any multisig wallets where Passport Prime is a cosigner.
After importing the config via QR or a file, Passport Prime will display the configuration details for you to check, then ask you to give a label. Once imported, the new multisig configuration will be displayed in the accounts page of the Bitcoin wallet app.
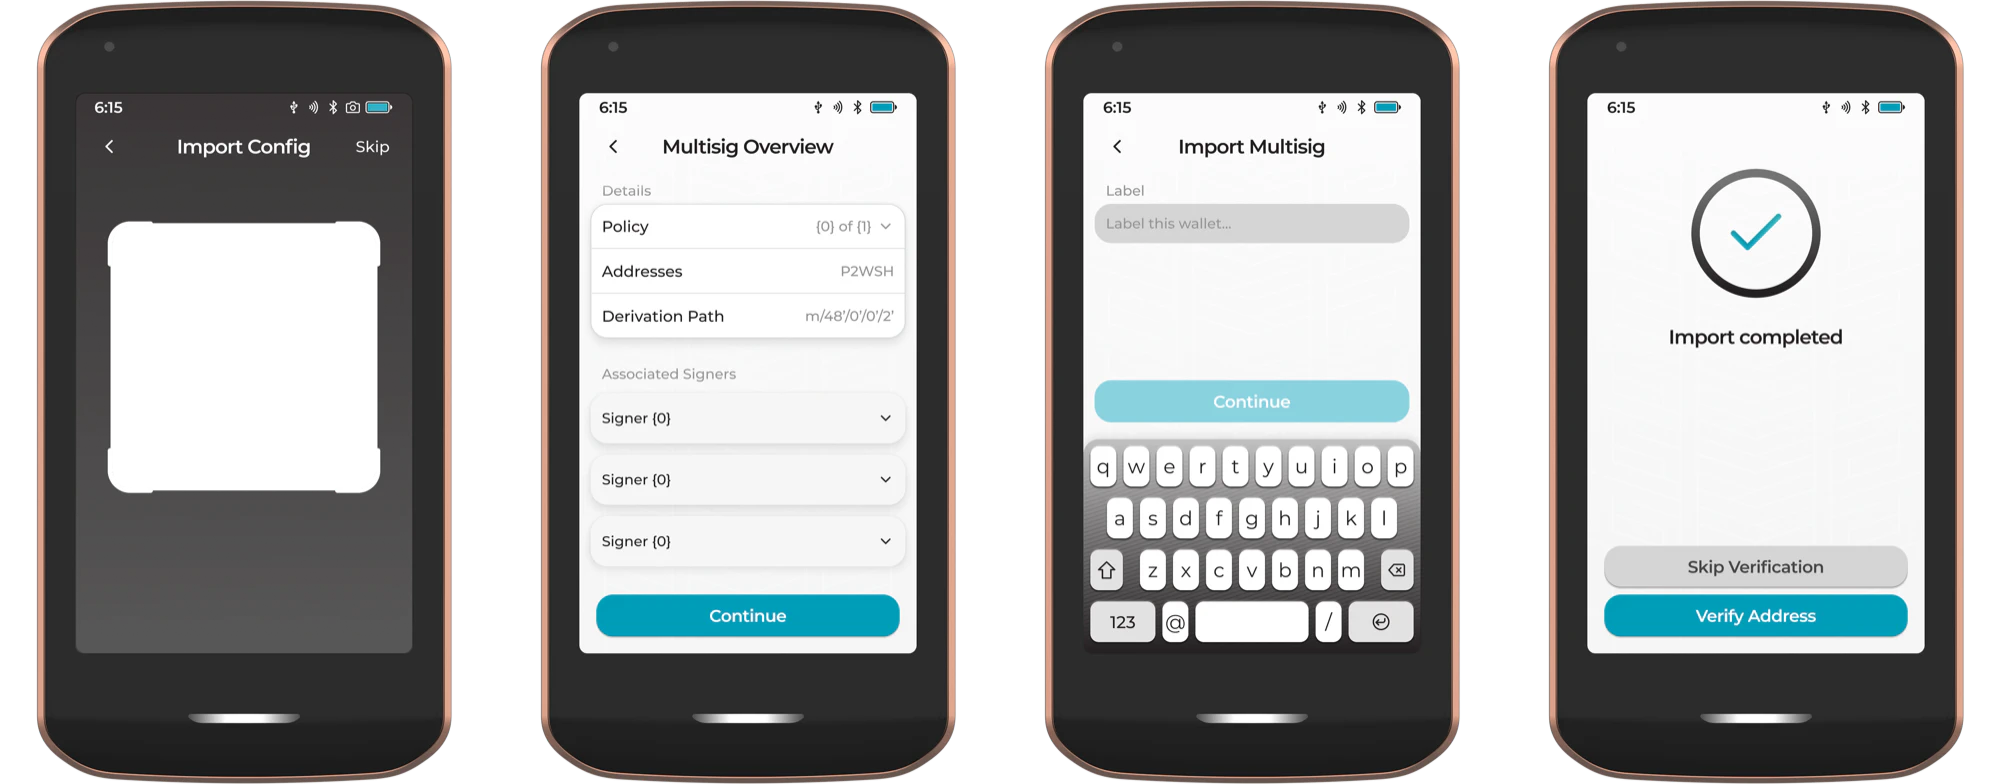
If Passport Prime is asked to sign from a multisig configuration that is not imported to the device, it will ask to import and save the configuration before signing.
Settings
Configure the settings related to interactions within the Bitcoin wallet app. These include:
- Amount Display - Have transaction amounts displayed in BTC or Sats
- Show Fiat Value - Show Bitcoin amounts in your chosen fiat currency
- Verify Full Input History - Reject transactions where Passport Prime cannot verify all input history

Verify Full Input History
When signing a transaction, Passport Prime needs to know how much each input is worth so it can show you the correct amount and fee. By default it will accept the input amount supplied in the PSBT when the full previous transaction is not included.
Turn Verify Full Input History on and Passport Prime instead requires the complete previous transaction for every input, and refuses to sign anything it cannot check for itself. This closes off a class of attack where a malicious PSBT understates an input so that the fee you are shown is far lower than the fee you would actually pay.
The trade-off is compatibility and size. Some wallets do not supply full previous transactions, and PSBTs that do include them are considerably larger, which means more QR frames or a bigger file. The setting is off by default for that reason.
Leave this on if your coordinator supports it, particularly for high value transactions. For more detail on the attack this prevents, see What is input history verification? in the FAQ.