The extensions menu on Passport Core offers a simple way to enable extra features on Passport Core. Enabling extensions from this screen creates menu items that allow you to use Passport Core with specific types of third party applications.
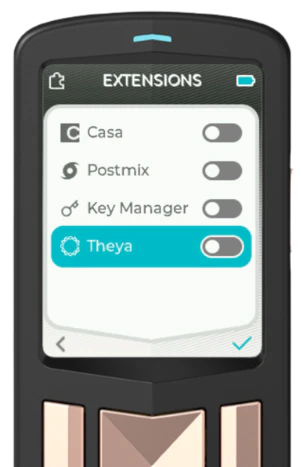
Casa
The Casa extension adds an additional account screen with extra, Casa specific features to make using Passport Core with the Casa platform easy.
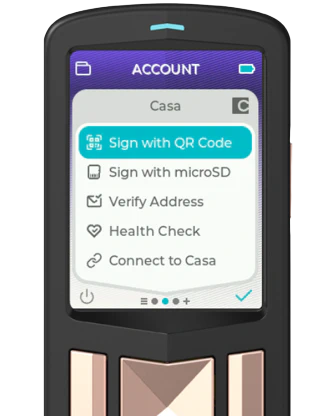
Sign with QR code
Sign a transaction by scanning QR codes as you would any other Passport account.
Sign with microSD
Sign a transaction by selecting a file from an inserted microSD card, just as you would with any other Passport account.
Verify Address
Verify a receive address being displayed by the Casa app.
Please note that Casa does not currently offer a multisig configuration file export option. This means that Passport Core will not be able to verify receive addresses displayed by the Casa app, even though that device is one of three keys in the setup. However, you can achieve this with some extra steps .
Health Check
Periodically test that Passport Core is still successfully connected and to your Casa account and ensures that Passport Core can sign transactions. This can be done via QR code or microSD, depending on your preference.
Connect to Casa
Connect Passport Core with your Casa account and have it act as one of the keys in your collaborative custody solution. This can be done via QR code or microSD, depending on your preference.
Theya
The Theya extension adds an additional account screen with extra, Theya specific features to make using Passport Core with the Theya platform easy.
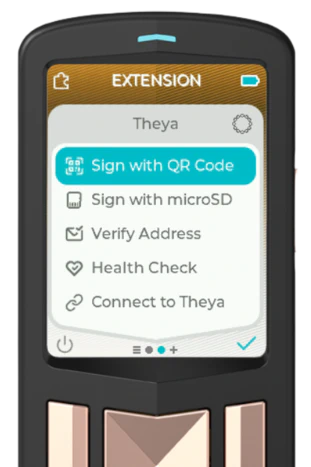
Sign with QR code
Sign a transaction by scanning QR codes as you would any other Passport account.
Sign with microSD
Sign a transaction by selecting a file from an inserted microSD card, just as you would with any other Passport account.
Verify Address
Verify a receive address being displayed by the Theya app. For this feature to work, you'll need to ensure you have imported the multisig configuration file from the Theya app into Passport.
Health Check
Periodically test that Passport is still successfully connected and to your Theya account and ensures that Passport can sign transactions. This can be done via QR code or microSD, depending on your preference.
Connect to Theya
Connect Passport Core with your Theya account and have it act as one of the keys in your collaborative custody solution. This can be done via QR code or microSD, depending on your preference.
Postmix
The Postmix extension adds an additional account screen with a pre-configured account derivation m/84'/0'/2147483646'. Once enabled, this account behaves in the exact same way as a typical account does on Passport Core. The only difference being that, when used in conjunction with a desktop Whirlpool client like Sparrow Wallet, it offers users the ability to mix directly to cold storage, but then subsequently continue remixing, for free, at any time in the future.
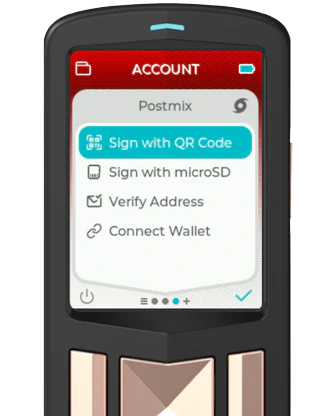
Full details on using the Postmix extension on Passport in conjunction with the Sparrow Wallet Whirlpool client.
Sign with QR code
Sign a transaction by scanning QR codes as you would any other Passport account.
Sign with microSD
Sign a transaction by selecting a file from an inserted microSD card, just as you would with any other Passport account.
Verify Address
Verify that the receive address being displayed by your chosen wallet software actually belongs to your Passport.
Connect Wallet
Connect the Postmix account to any compatible Software Wallets . At the time of writing, Sparrow Wallet offers the best compatibility with Whirlpool accounts.
Key Manager
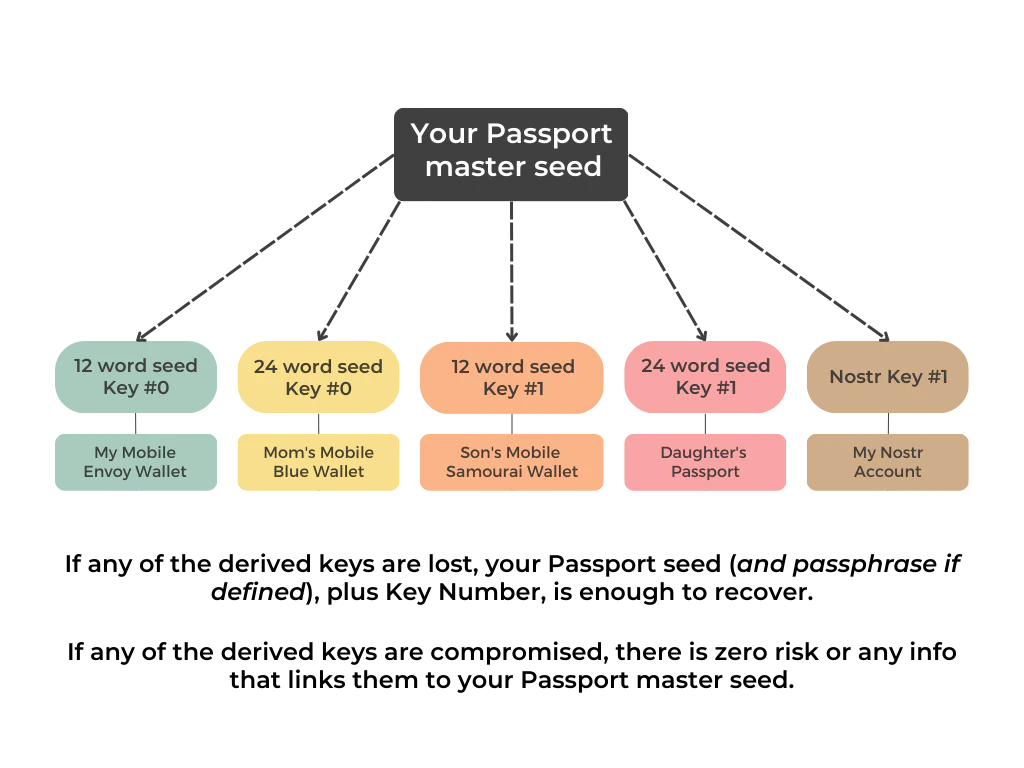
The Key Manager extension allows for the creation and export of BIP-85 defined 12 or 24 word 'child seeds', as well as NIP-06 defined Nostr private keys. The beauty of the Key Manager function on Passport Core is that all keys are generated in a deterministic fashion from your Passport Core master seed. A single backup for potentially hundreds of different wallets or keys!
A child seed is a fully valid BIP39 seed in its own right and can be used in the exact same way any other generated seed can be. Each child seed is completely unique and cannot be tied to the master seed or any other derived child seeds.
Key Manager Common Uses
Here are some of the wonderful ways you can leverage Passport Core's Key Manager.
- Populate all of your mobile wallets using unique child seeds from Passport. If you lose any of those mobile wallet backups, Passport can re-derive any of those seeds, so that your funds are not lost.
- Populate the wallets of your friends and family while sleeping safe with the knowledge that in the likely event they fail to properly back up their wallet, you can re-derive their seed and bail them out at any time.
- Securely generating and backing up your Nostr private key.
- Securely generating and backing up your loved ones’ Nostr private keys. If they lose access, once again you can bail them out and restore access to their Nostr account for them.
Passport Core's encrypted backups includes all generated Seeds and Nostr keys as well as their key numbers and names.
See the Key Manager in action!
Bitcoin Keys
Generate a Bitcoin Seed
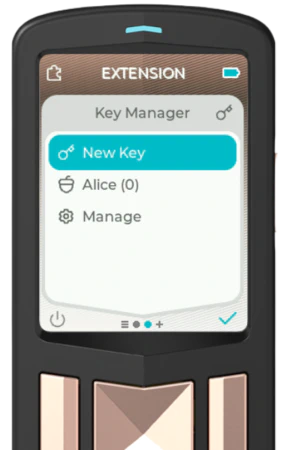
- Tap New Key, then choose the length of the seed to be generated. This can be 12 or 24 words long.
- Choose the Key Number. The default starts at 0 and will increment with each additional Seed of this type and length. Advanced users are free to choose their own Key Number.
- Give the Key a name. It’s good practice to give the name of the person using the seed or the wallet it is being applied to (e.g., Alice).
- The new key will then be saved. If there is a microSD inserted into Passport Core, an updated Backup file will be created.
Export a Bitcoin Key
When exporting any Bitcoin Seed from Passport, ensure you are in a safe environment. Anyone with access to the derived Bitcoin Seed can access any of the funds deposited into that wallet.
Once your Bitcoin Seed is generated, click on it from the Key Manager menu, then the next screen, click Export. You’ll then be met with 3 export options.
- Export via QR
- Export via microSD
- Show seed words
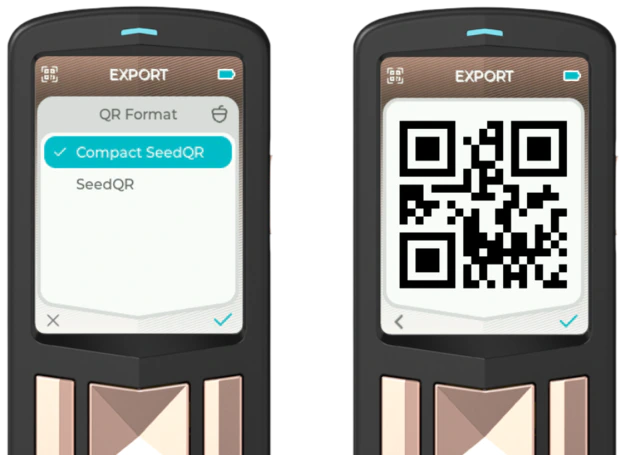
Export via QR
Within this menu you export the Seed via the Compact SeedQR or SeedQR standards . At the time of writing, these options are supported by Sparrow Wallet, Specter DIY, Seed Signer and the Blockstream Jade, to allow you to populate the seed into any of those wallets in seconds.
Please note that if you export keys as QR codes, you should be careful what you scan them with! Apps like Google Camera will often open the content of the QR code in your default search engine, exposing that key to Google etc.
Export via microSD
This option will export the Seed in plain text to a file onto the inserted microSD card for sharing with the destination wallet or person. This option works well with BlueWallet on mobile.
The file name will look something like this:
12_Word_Seed-Name.txt
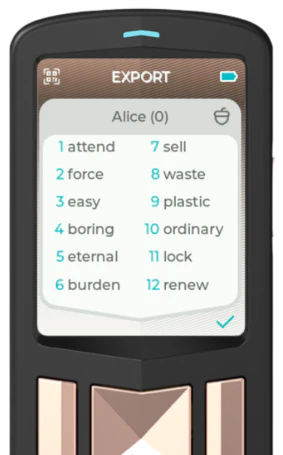
Show Seed Words
Shows the seed words in plain text on the Passport Core screen. Useful if you prefer to manually type in the seeds to your other wallets.
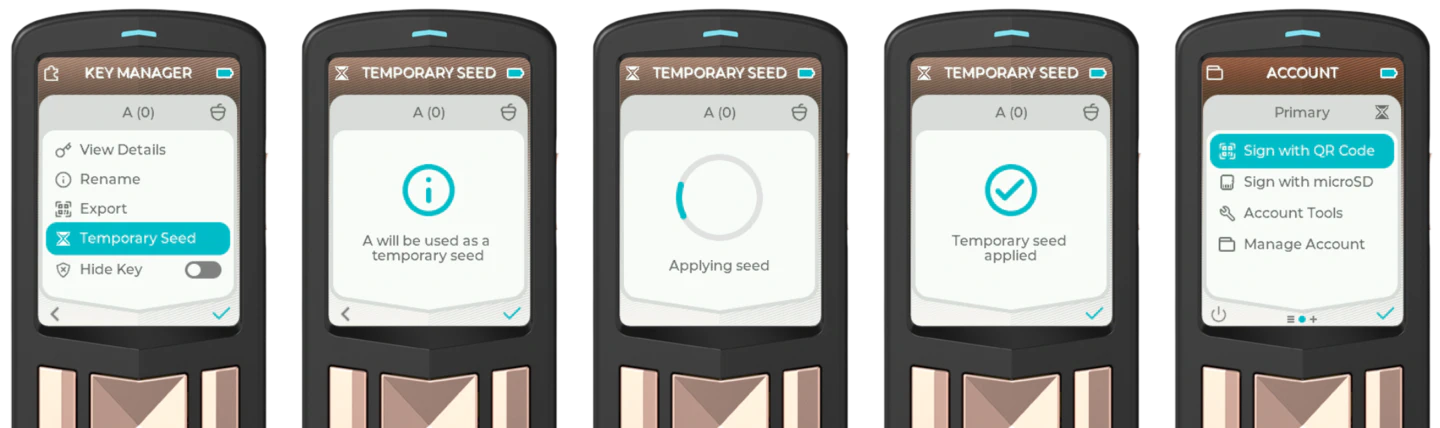
Temporary Seed
Any Bitcoin 'child' seed generated with the Key Manager can be temporarily loaded to Passport. This enables you to perform all typical Passport related activity from the temporarily loaded wallet. This includes:
- Connect any account from the generated child seed to Envoy or other wallet software
- Verify addresses from the child seed accounts
- Sign transactions from any of the child seed accounts
Temporary seeds loaded from the Key Manager menu remain active on Passport until they are manually cleared from the device, or the device is turned off. When a temporary seed is active on Passport, all account screens will show an hourglass icon in the top right corner of the account card.
To clear a temporary seed from the device, scroll right to the 'More' screen and choose 'Clear Temporary Seed'.
Advanced users can use Passport Core in full 'stateless' mode if desired. Simply erase any master seed from the device (after ensuring you have robust backups in place). After the device restarts, choose 'Import Seed' > 'Temporary Seed' and then import a seed to the device via text input or SeedQR. The temporary seed will remain active on the device until it is powered off. When the device is powered back on, you'll be returned to the wallet create/import screen.
Nostr Keys
Generate a Nostr Key
- Tap New Key, then choose Nostr Key.
- Choose the Key Number. The default starts at 0 and will increment with each additional Nostr Key added. Advanced users are free to choose their own Key Number.
- Give the Key a name. It’s good practice to give the name of the person using the Key or the client it is being applied to (e.g., Amethyst).
- The new key will then be saved. If there is a microSD inserted into Passport, an updated Backup file will be created.

Export a Nostr Key
When exporting any Nostr Key from Passport Core, ensure you are in a safe environment. Anyone with access to the derived Key can access the corresponding Nostr account.
Once your Nostr Key is generated, click on it from the Key Manager menu, then the next screen, click Export. You’ll then be met with 2 export options.
- Export via QR
- Export via microSD
Export via QR
The generated QR code is the Nostr private key in nsec formatting. At the time of writing this can be scanned by the Amethyst Android mobile client, but we are working with other client developers to expand compatibility.
Export via microSD
This option will export the Nostr Key using nsec formatting, onto the inserted microSD card for sharing with the chosen client. This option will work with any client.
The file name will look something like this:
Nostr_Key_Name.txt
Managing Keys
- Key details can be viewed by opening each key and clicking View Details
- Keys can be renamed by opening the key and clicking Rename
- Keys can be hidden or un-hidden from view by opening the key and clicking Hide Key
- Hidden Keys can be temporarily added back to the main Key Manager menu by clicking Manage > Show Hidden