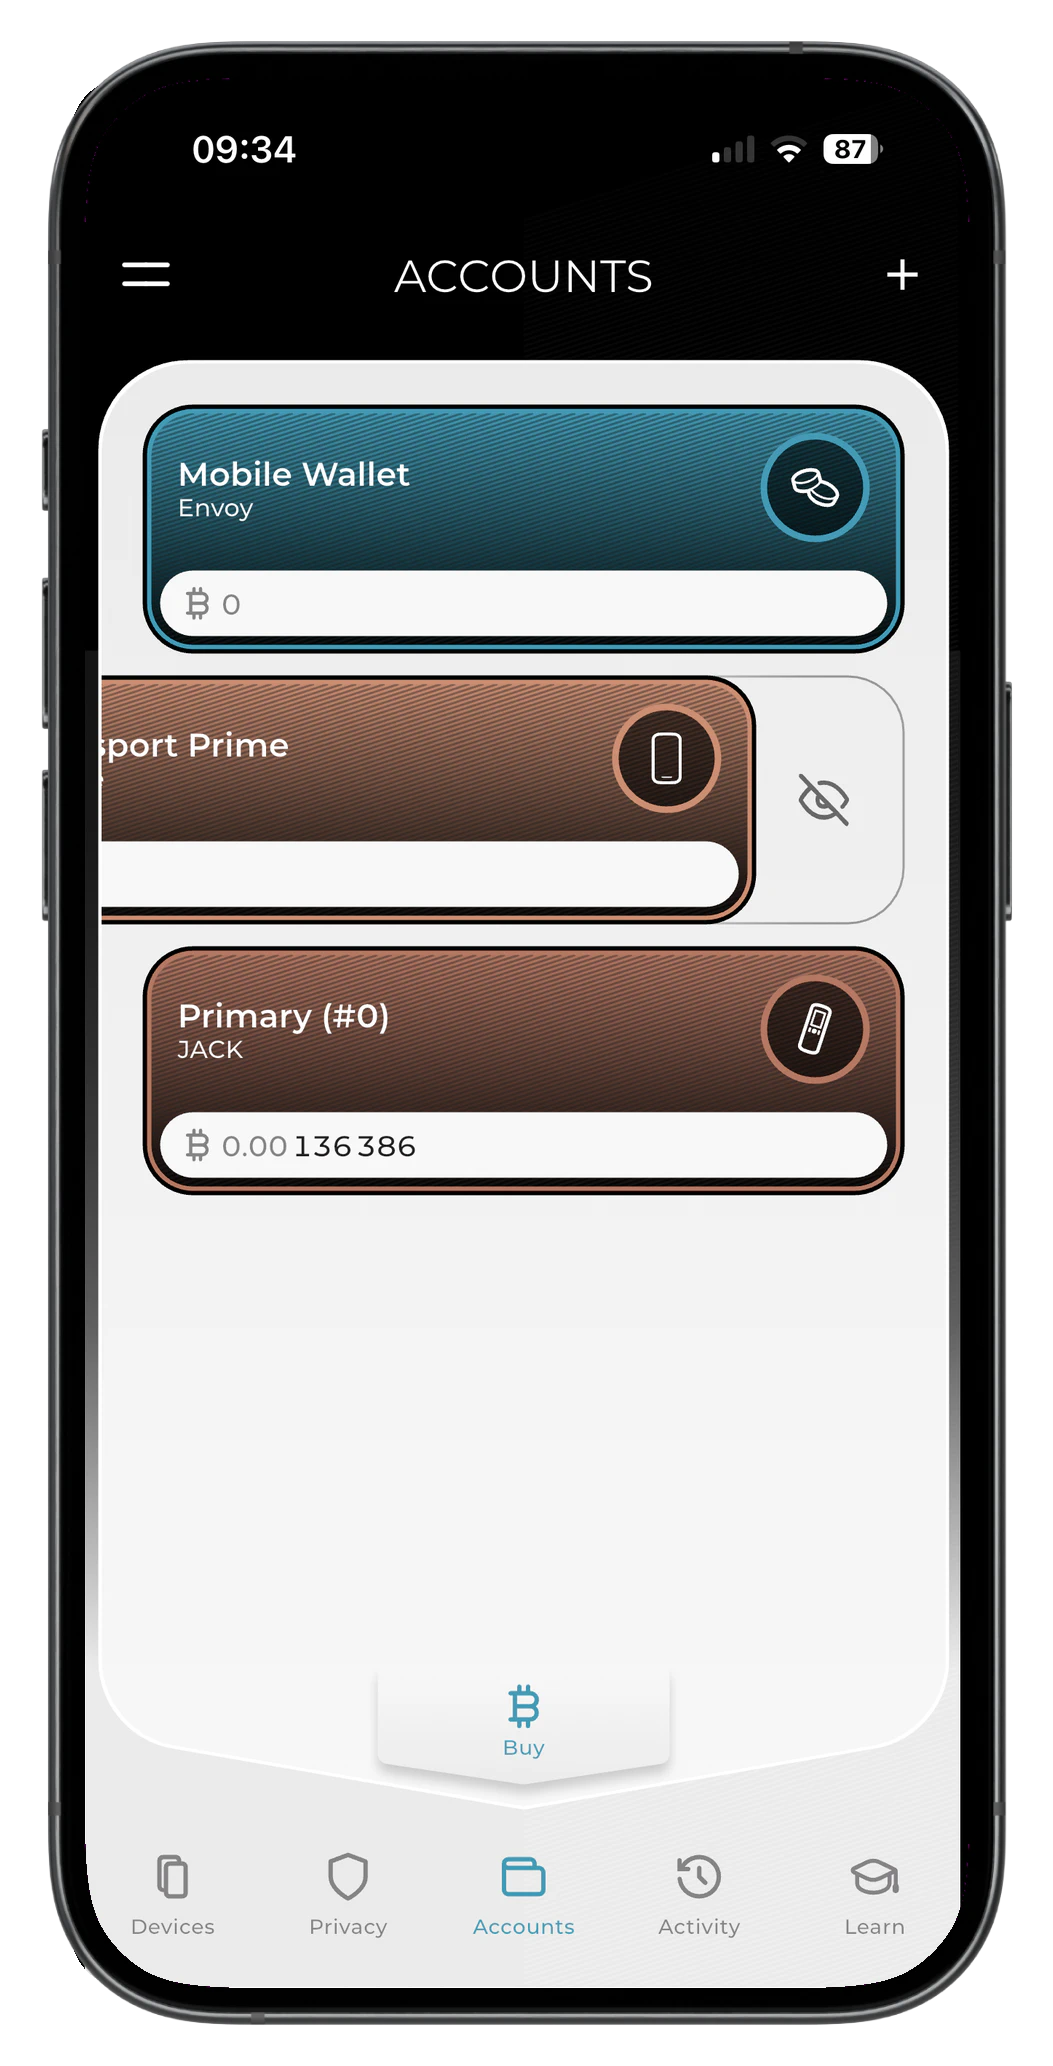
Accessed by tapping Accounts from the menu bar, this screen allows you to manage as many accounts from as many Passports as you like. From here you can add or remove accounts from Envoy, rename accounts and send or receive Bitcoin.
Envoy is also compatible with Bitcoin Testnet. Learn more by watching this video .
View Account Details
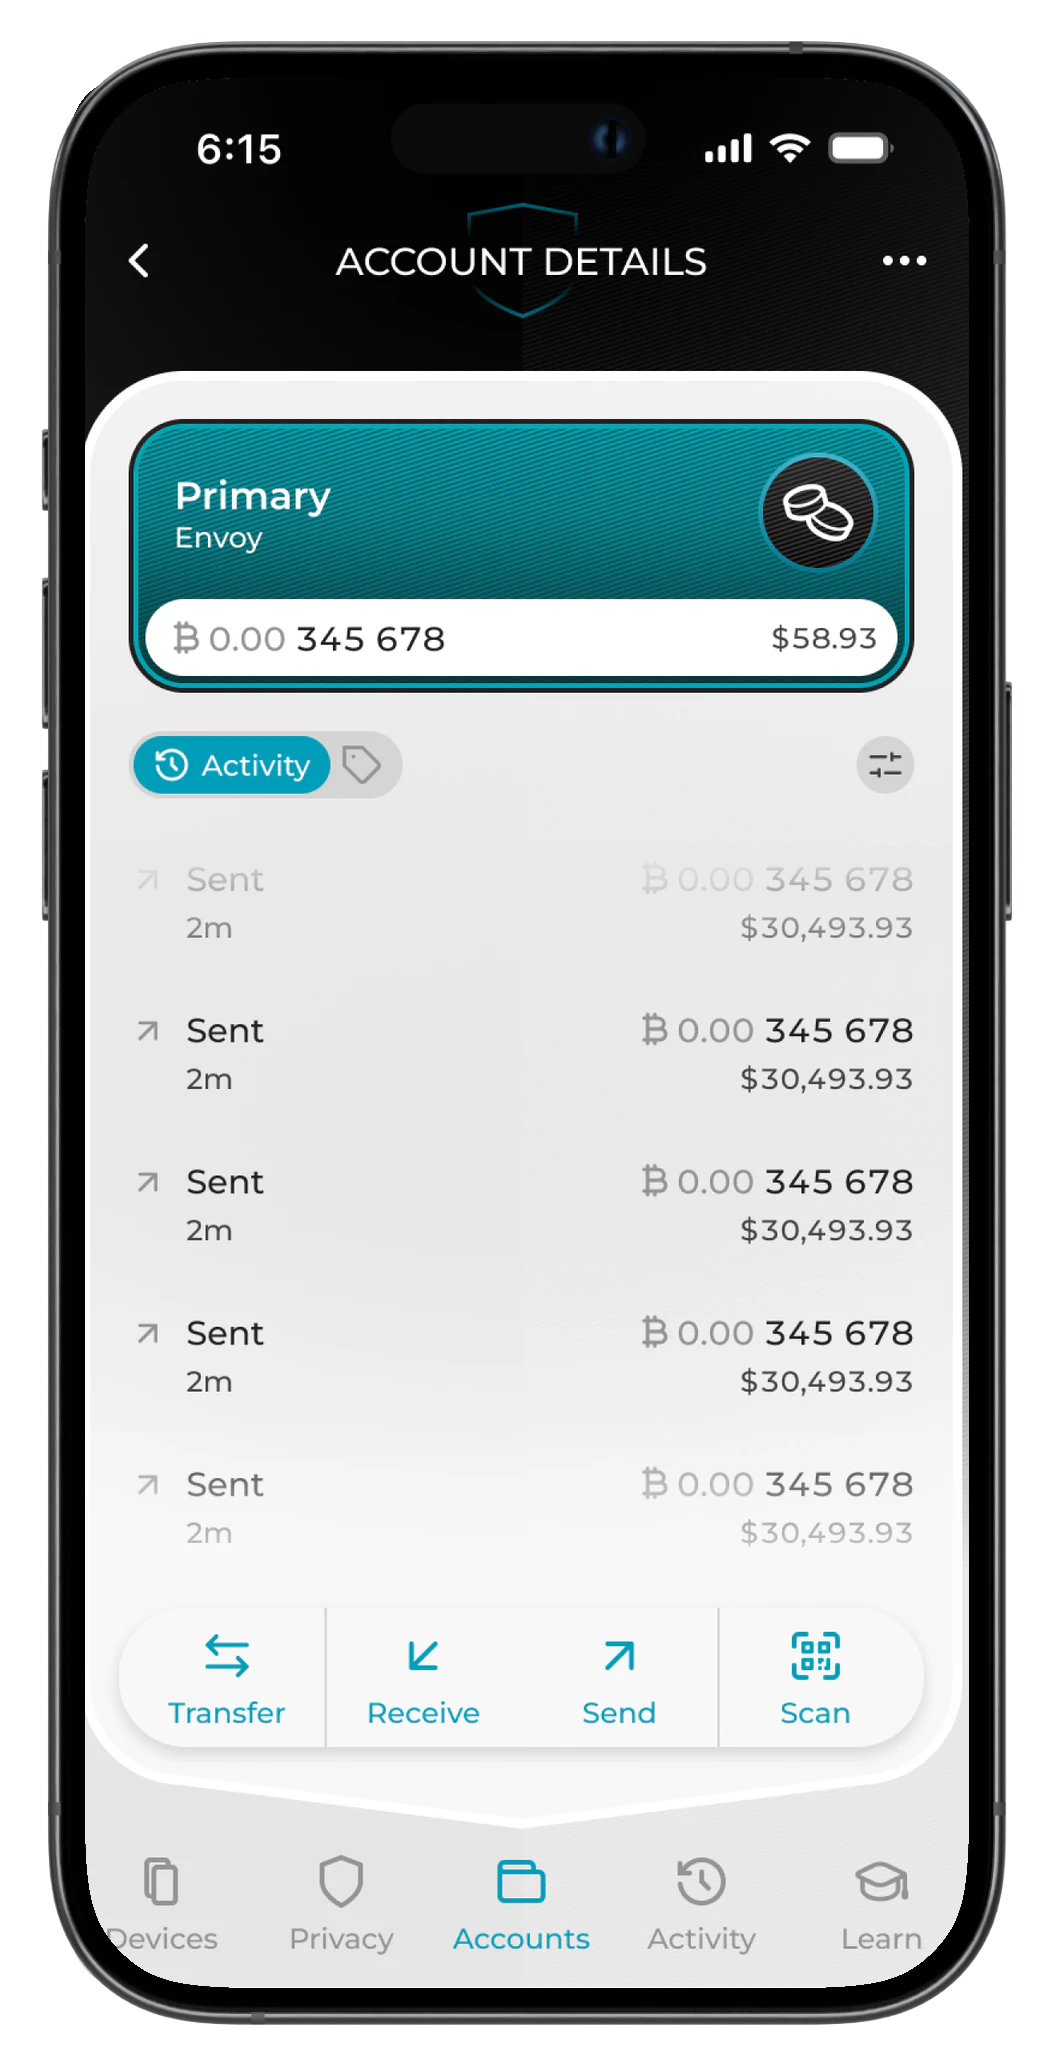
Tapping on any account from the account summary screen will open the detailed view for that account. The default view is the activity list, which shows your transactions in chronological order. A floating action bar at the bottom gives you quick access to Transfer, Receive, Send, and Scan.
Tapping on any transaction from the list will display the transaction details, including the amount, destination address, transaction ID, date, status, fee, and any note you've added. A long tap on the address or transaction ID will copy it to your phone's clipboard. The transaction can also be opened directly in the Foundation Explorer by tapping the Explorer pill button.

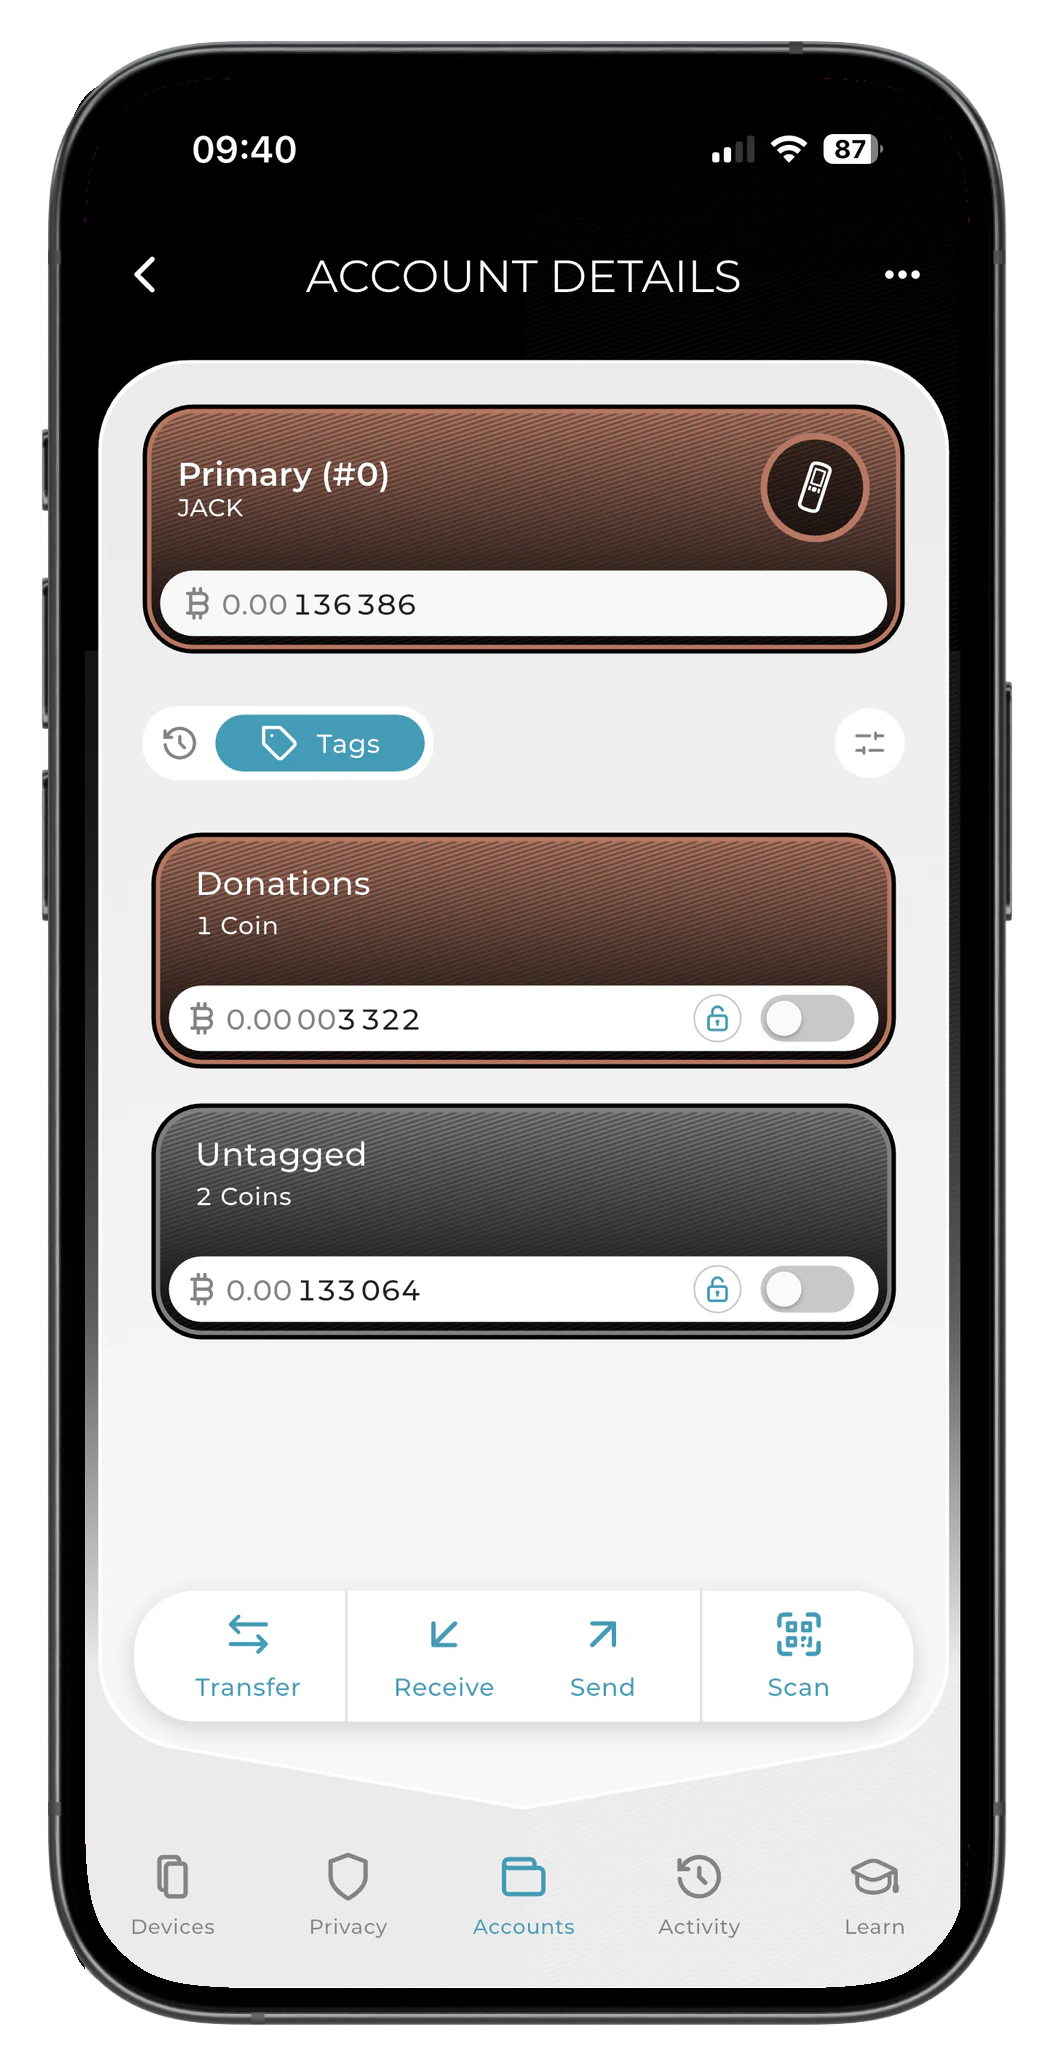
To view and manage the account coins and tags , tap the Tags toggle above your transaction activity list. The list switches from your transaction activity to your tagged coin groups, each showing its balance and a lock toggle you can flip to include or exclude the group from spending.
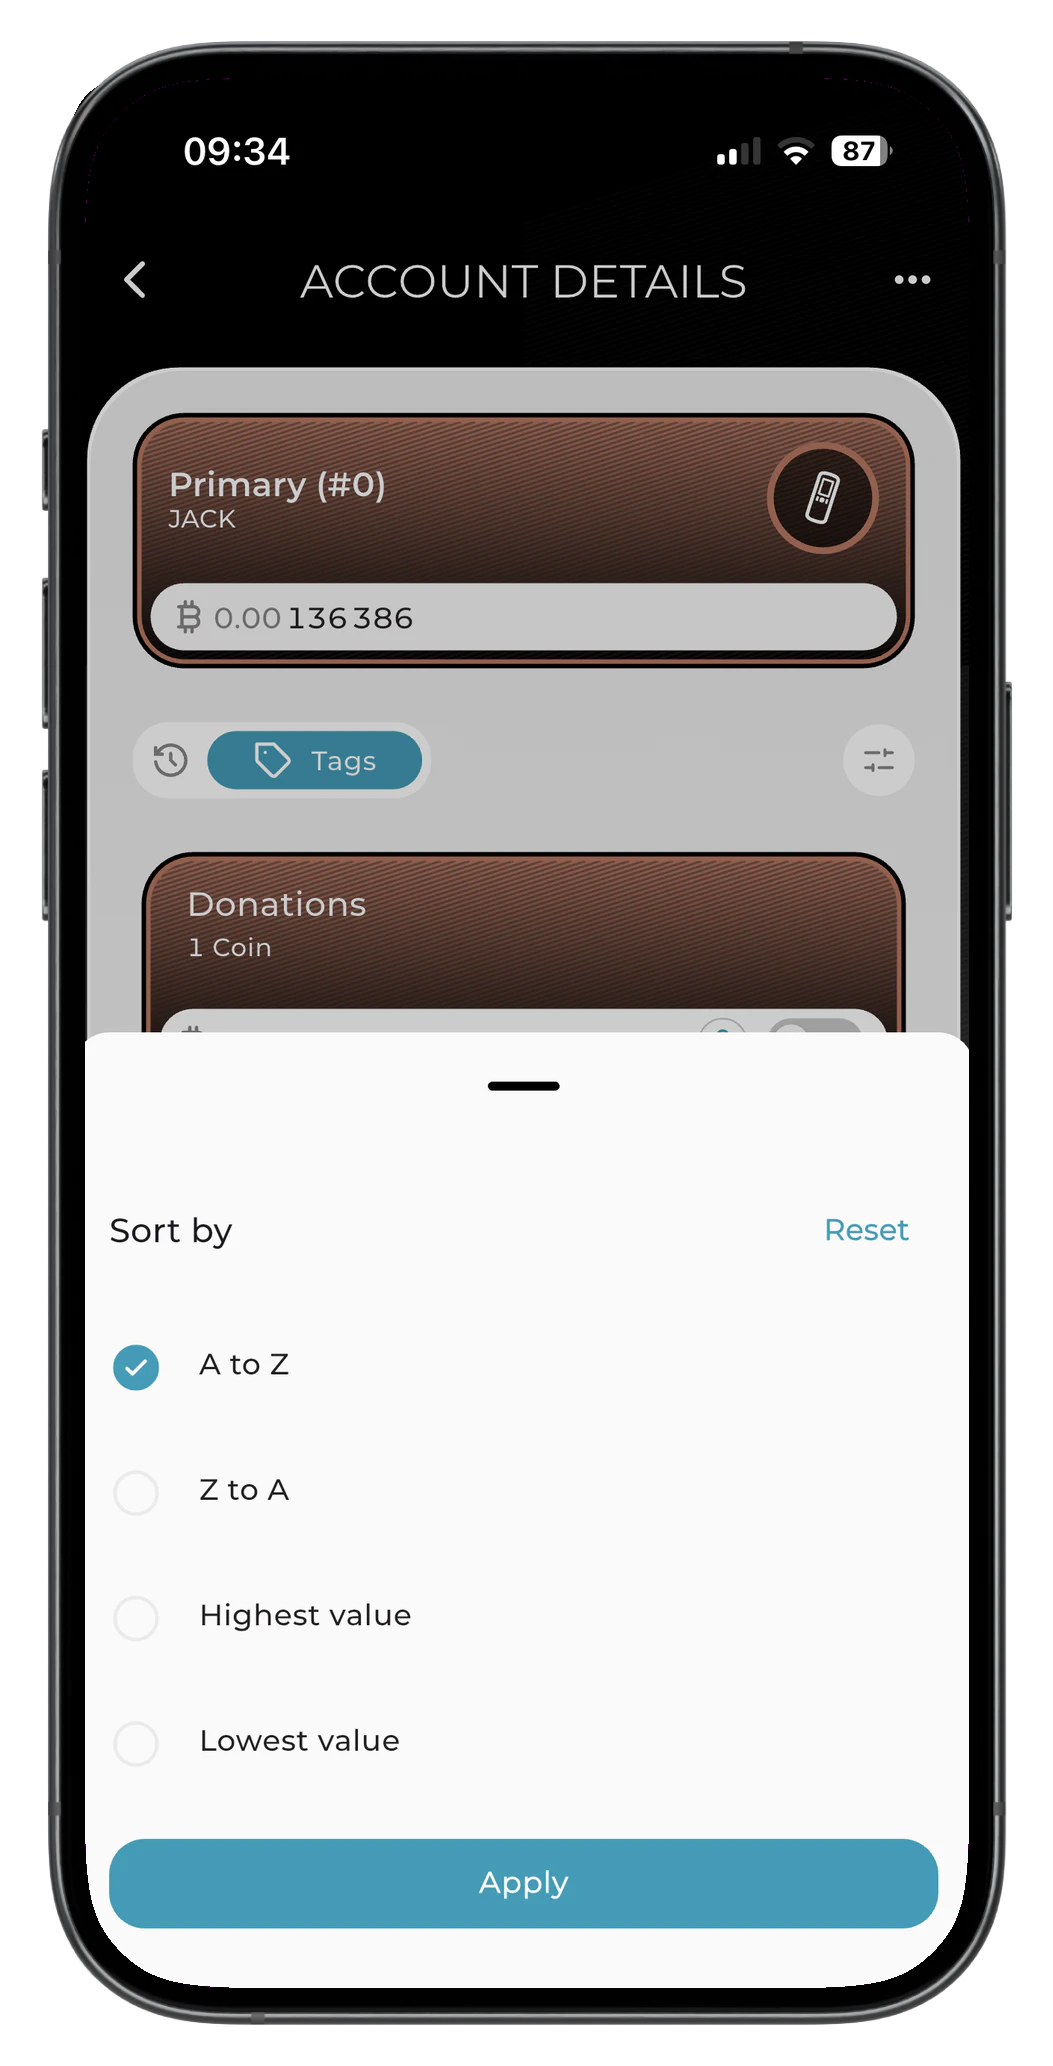
The Activity and Tags views can both be sorted by tapping the filter icon to the right. Sort options are A to Z, Z to A, Highest value, and Lowest value, with a Reset shortcut in the top right and an Apply button at the bottom of the sheet.
Account details can be quickly hidden from view by swiping left on the account card. A hidden-eye icon appears in the space vacated by the card; swipe left again from that state to bring the details back.
Add an Account
To add an account, on Passport, navigate to the account you wish to connect with Envoy, then tap Manage Account > Connect Wallet > Envoy.
In Envoy tap the + icon, then follow the on screen instructions and scan the QR codes being displayed by Passport.
After Envoy displays a Connection Successful message, you can opt to go straight to the home screen to view your paired account, or you can validate a receive address to allow Passport to verify the connection.
Tapping Validate Receive Address will have Envoy show a receiving address from that account. Scan this with Passport's camera and wait for the confirmation message. Once this is shown, confirm the successful validation in Envoy by pressing Continue which will take you to the accounts home screen.
Remove an Account
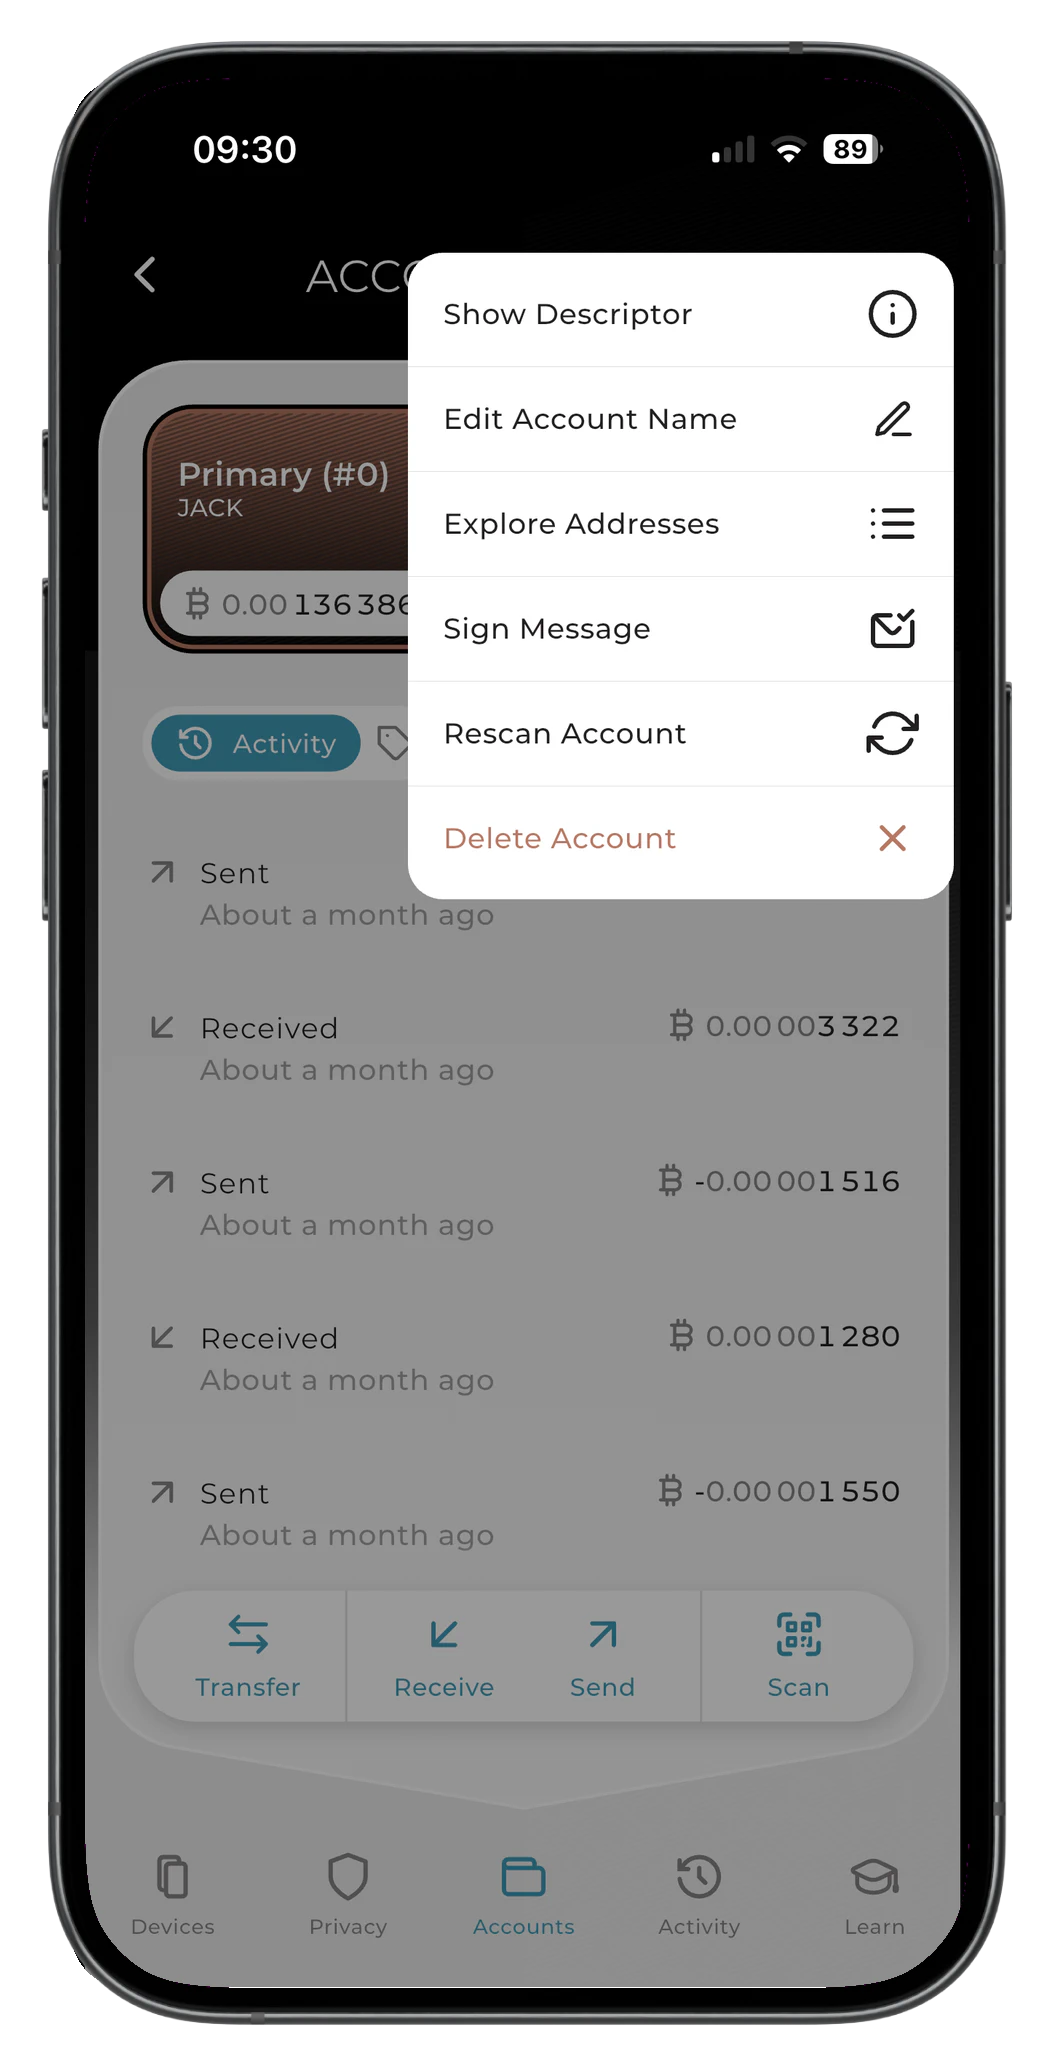
Open the account to be removed, tap the three-dot menu, then tap DELETE. Any deleted accounts can be easily reconnected at any time.
Envoy Mobile Wallet accounts must be removed from Settings > Backups.
Edit Account Name
Open the account to be renamed, tap the three-dot menu, then tap EDIT ACCOUNT NAME.
Envoy inherits the name of the account from Passport at the time of pairing. Due to Passport's completely offline architecture, updating an account name in Envoy does not pass the name update back across to Passport.
Re-order Accounts
From the Accounts home screen, tap and hold on the account to be moved, then drag to the desired location in the list.
Receive Bitcoin
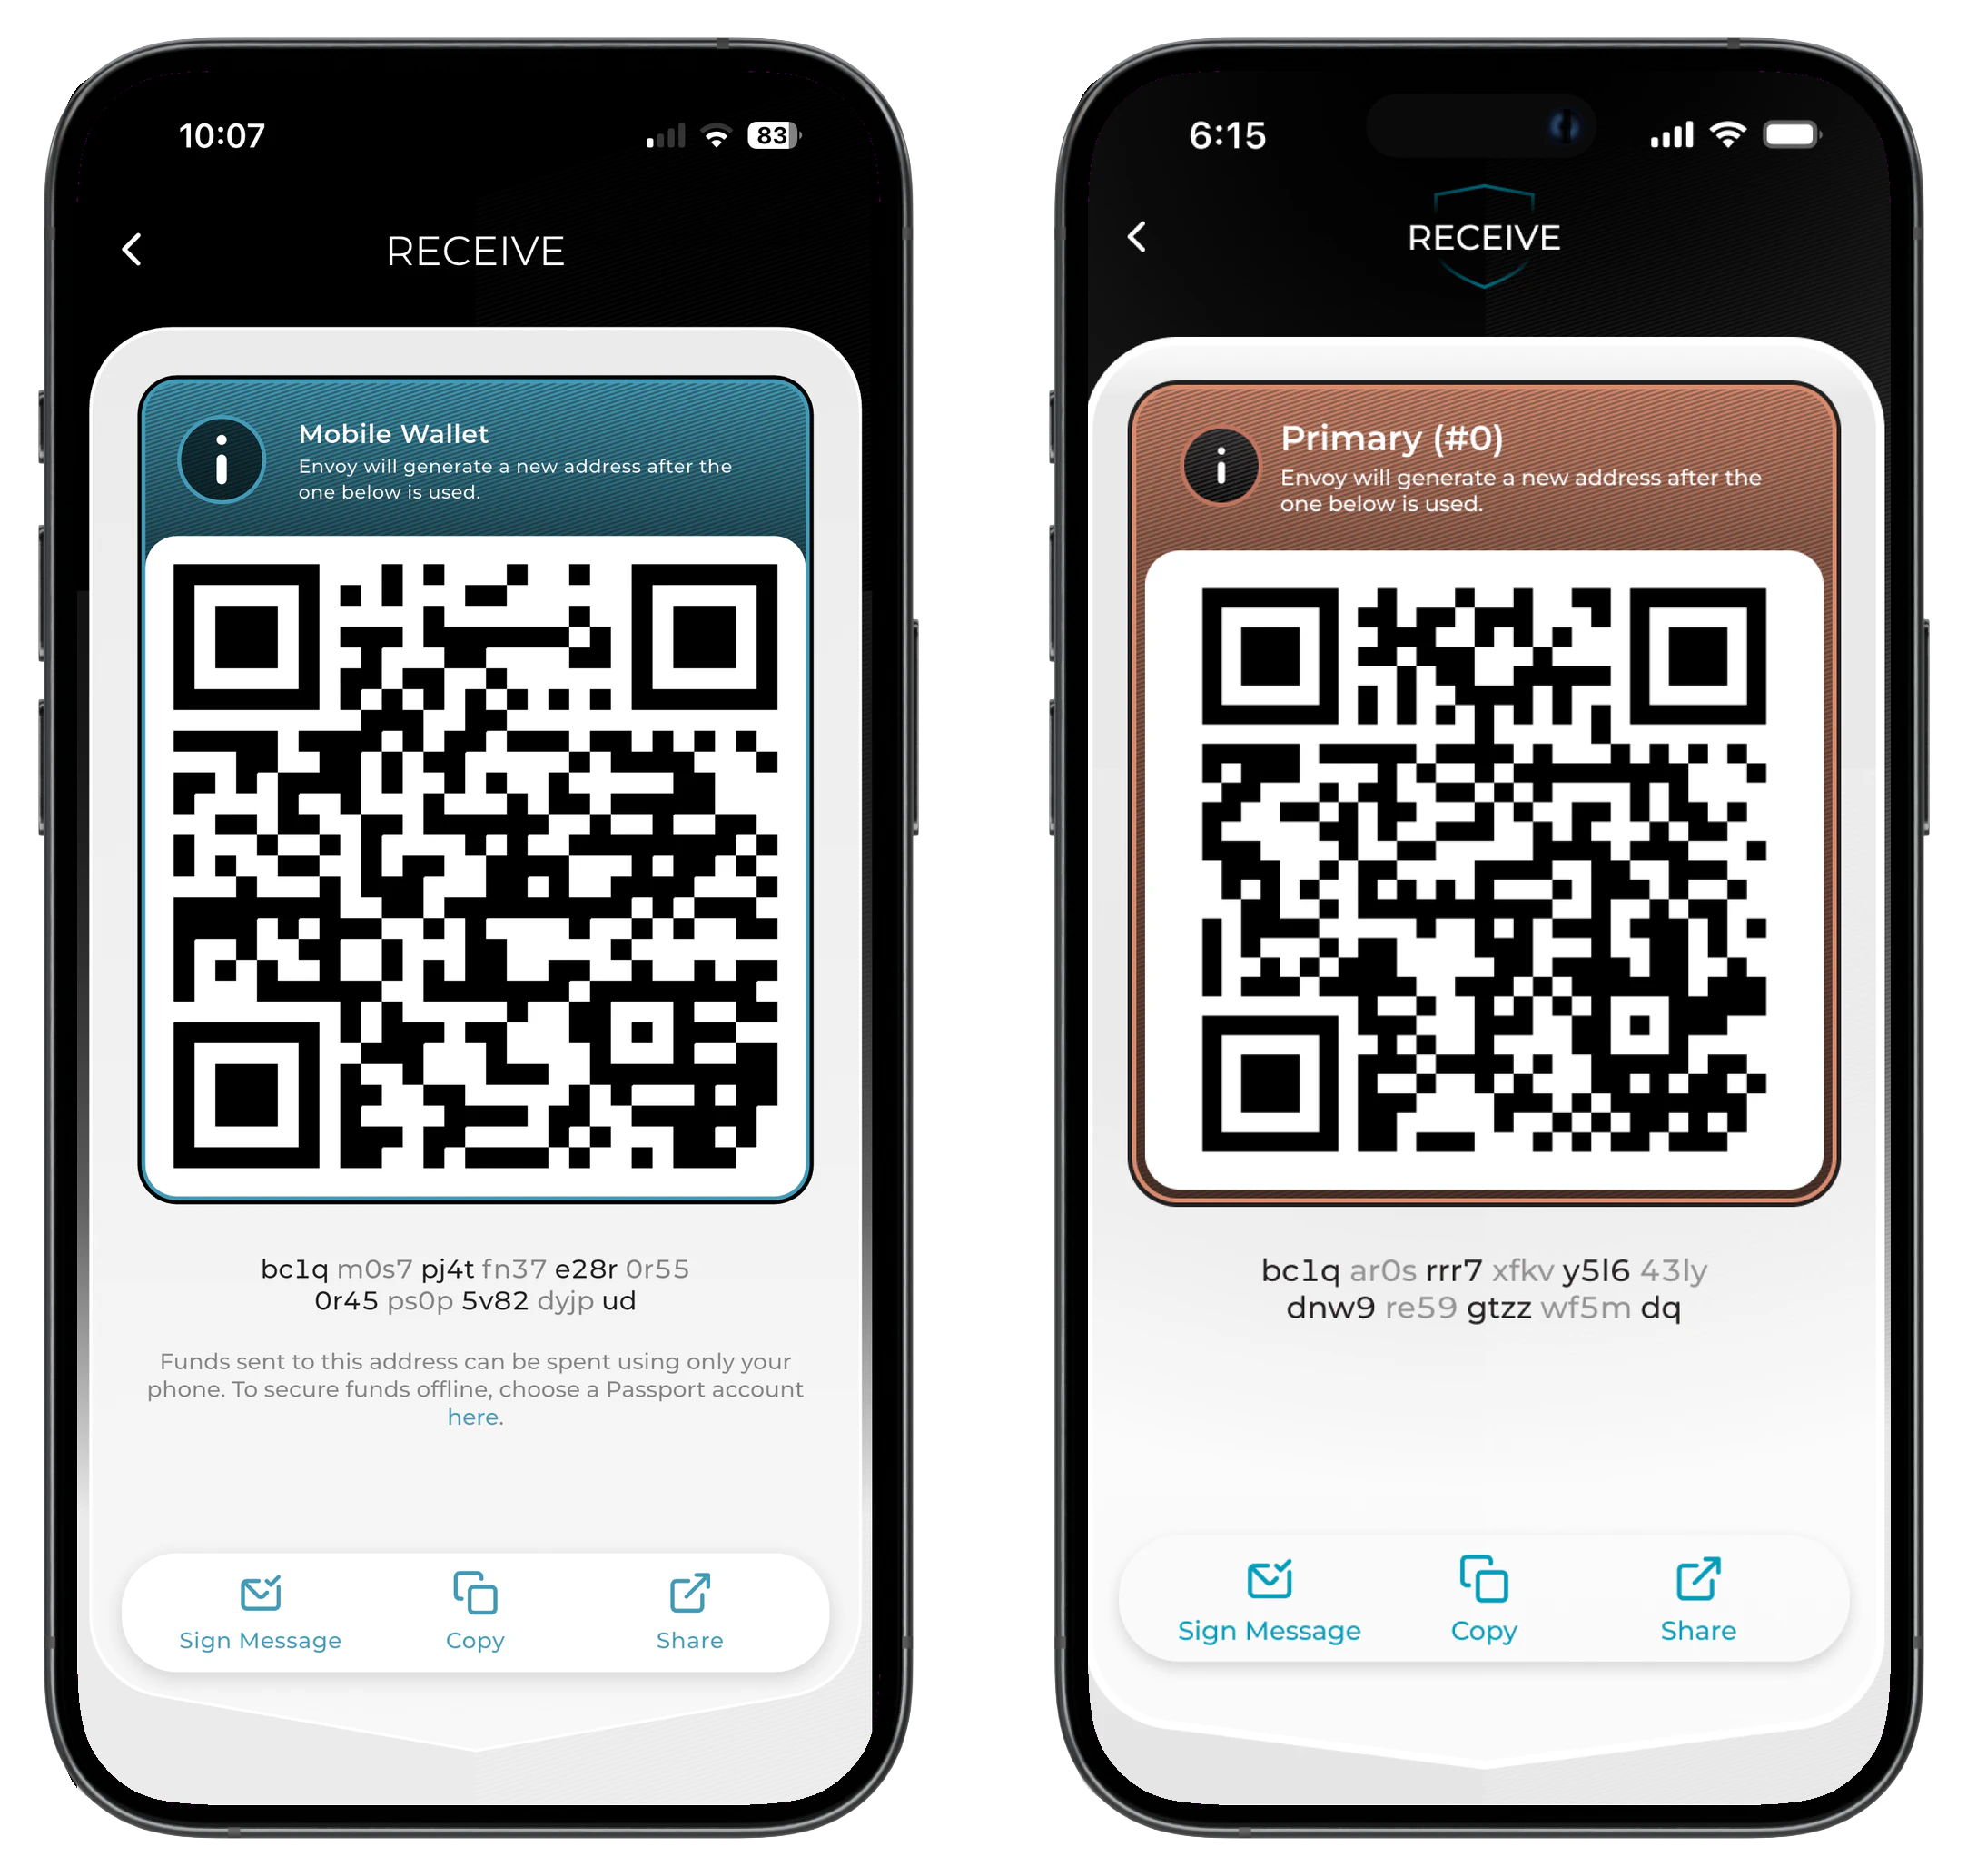
Open the account you wish to receive Bitcoin into, then tap Receive. Your current receive address is displayed as a QR code, with the address itself shown in a readable word-grouped format below.
Use the pill buttons at the bottom of the screen to Copy the address to your phone's clipboard, Share it with another app, or Sign Message to sign a message with this address to prove control. See Sign a Message below for more on message signing.
The card at the top of the screen reflects which account you're receiving to. A teal card indicates a Mobile Wallet account, where funds are spendable from the phone. A copper card indicates a Passport account, where funds require Passport to spend. When receiving to a Mobile Wallet account Envoy also shows an inline note reminding you that funds sent there can be spent from the phone alone, and links you to the setup for adding a Passport account if you'd prefer to keep larger balances offline.
As a privacy best practice Envoy will automatically show a new address each time you receive Bitcoin to the address currently being shown.
Explore Addresses
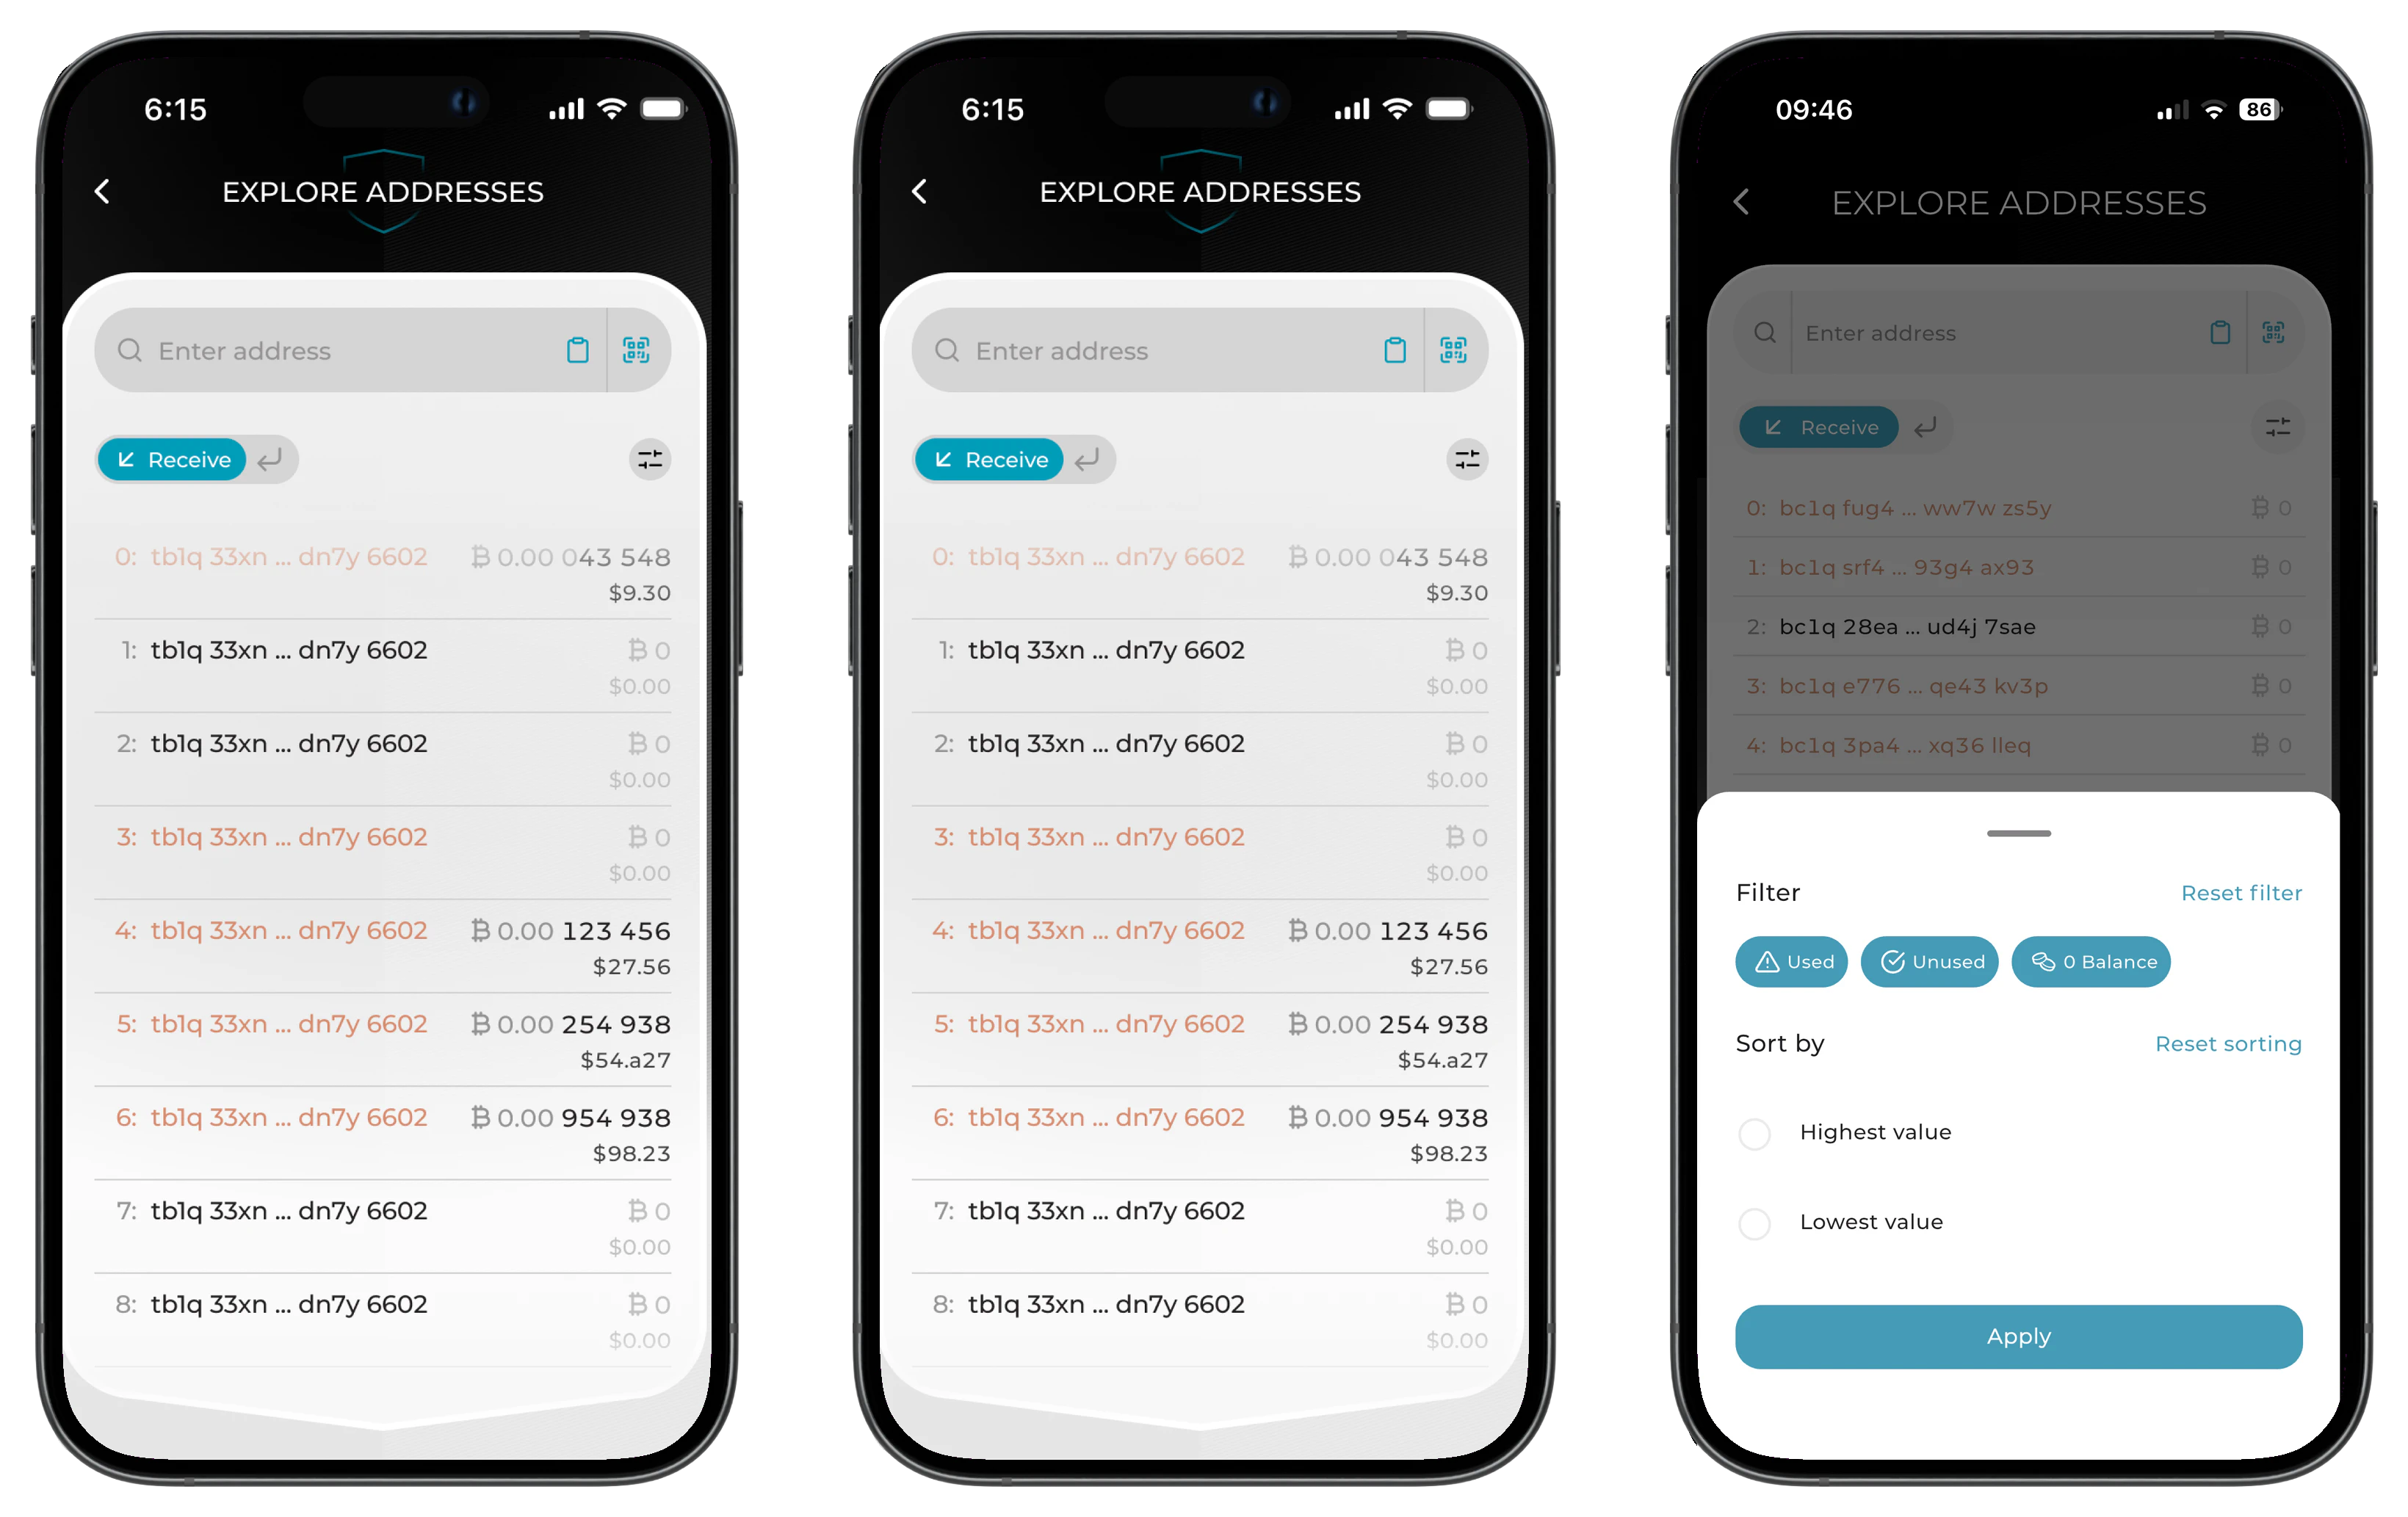
Envoy's address explorer lets you browse the full list of receive and change addresses for an account. This is useful when verifying an address history, auditing your wallet, or importing individual addresses into other tools.
- Open the account and tap the three-dot menu at the top right.
- Tap Explore Addresses.
- Toggle between the Receive and Change tabs to view each address list.
- Addresses shown in orange have already been used to receive Bitcoin. Addresses in the default color are unused.
- Tap the filter icon at the top right to narrow the list to Used, Unused, or 0 Balance addresses, or sort by Highest value or Lowest value.
- Tap any address to view its details, including its derivation path and usage status.
Send Bitcoin
Mobile Wallet
- Open the Envoy account to be spent from and tap Send.
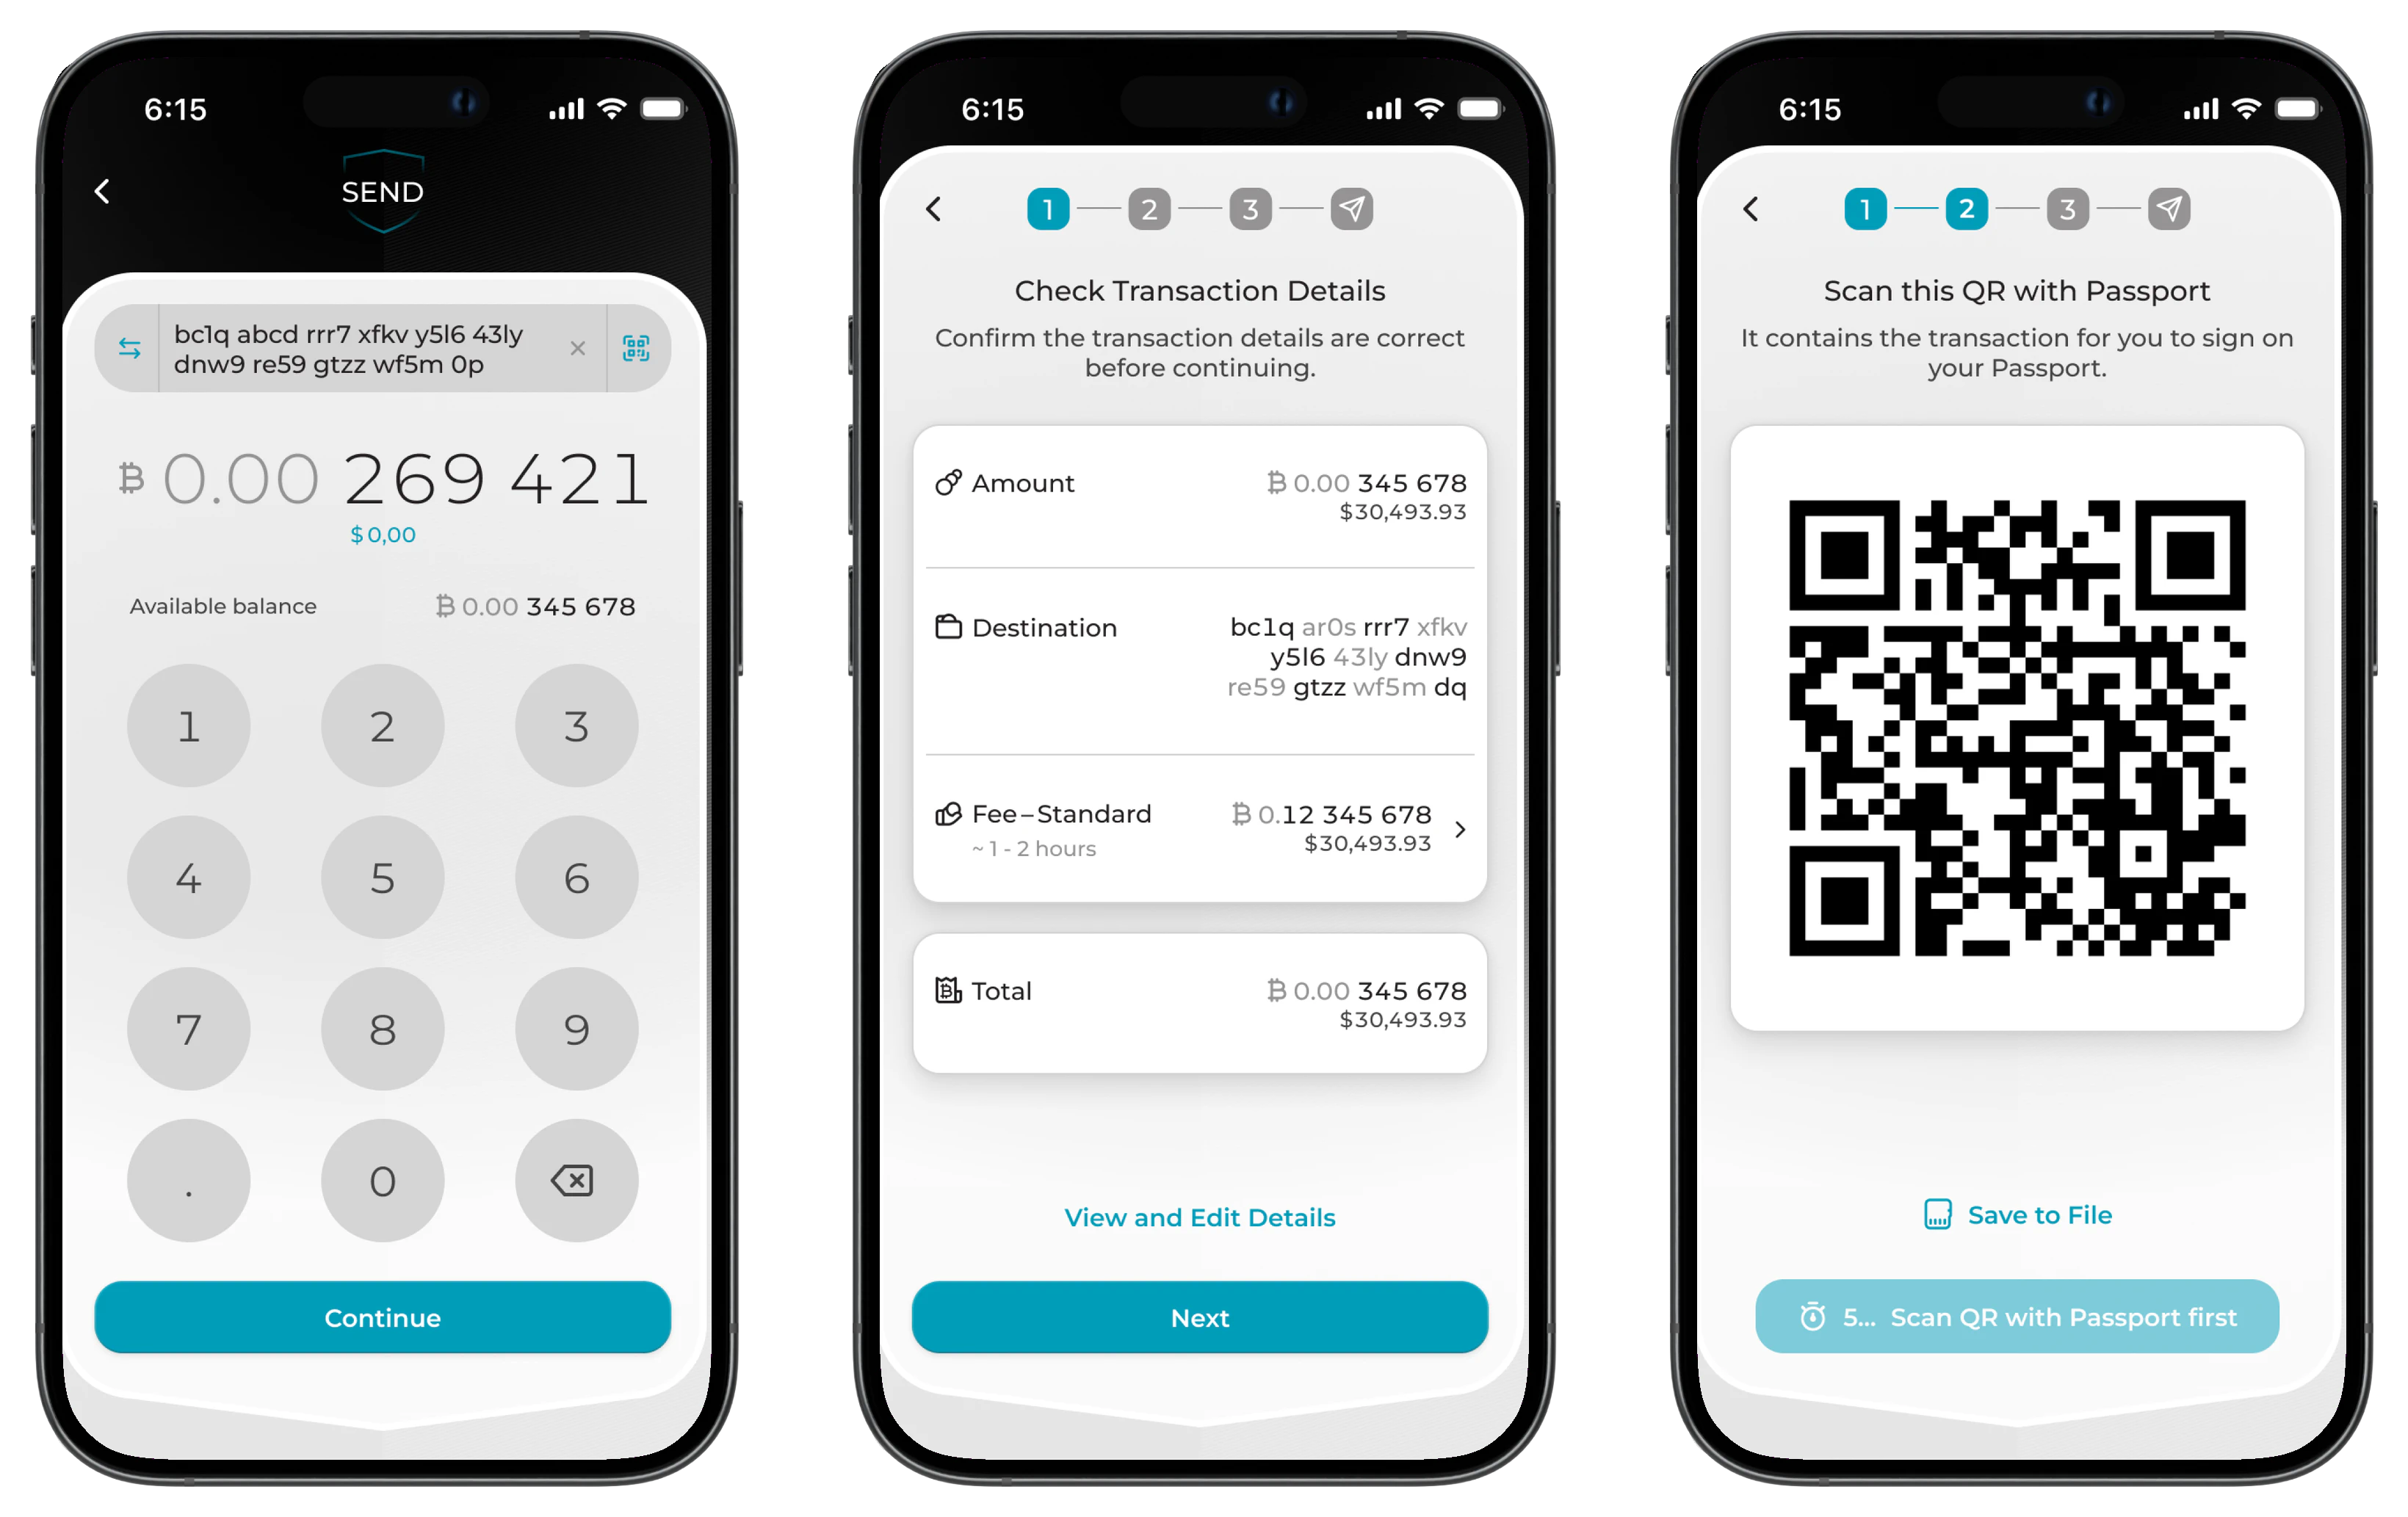
- Populate the recipient address by pasting, scanning a QR code, or typing it directly, then tap Confirm.
- Enter the amount to send. You can toggle the input between BTC and your local fiat currency; the other value updates live as you type.
- Choose your fee rate. The fee picker shows an estimated confirmation time next to each rate, with information banners explaining the trade-offs. For non-urgent sends, you can also select sub-satoshi fee rates when your connected node supports them. Envoy's default node does, so this option is available out of the box.
- Review the transaction details, then tap Send.
To learn more about spending with coin control in Envoy, click here .
Envoy shows the current account loading state clearly while it prepares your transaction, so you always know what's happening between tapping Send and being able to broadcast.
Passport Core
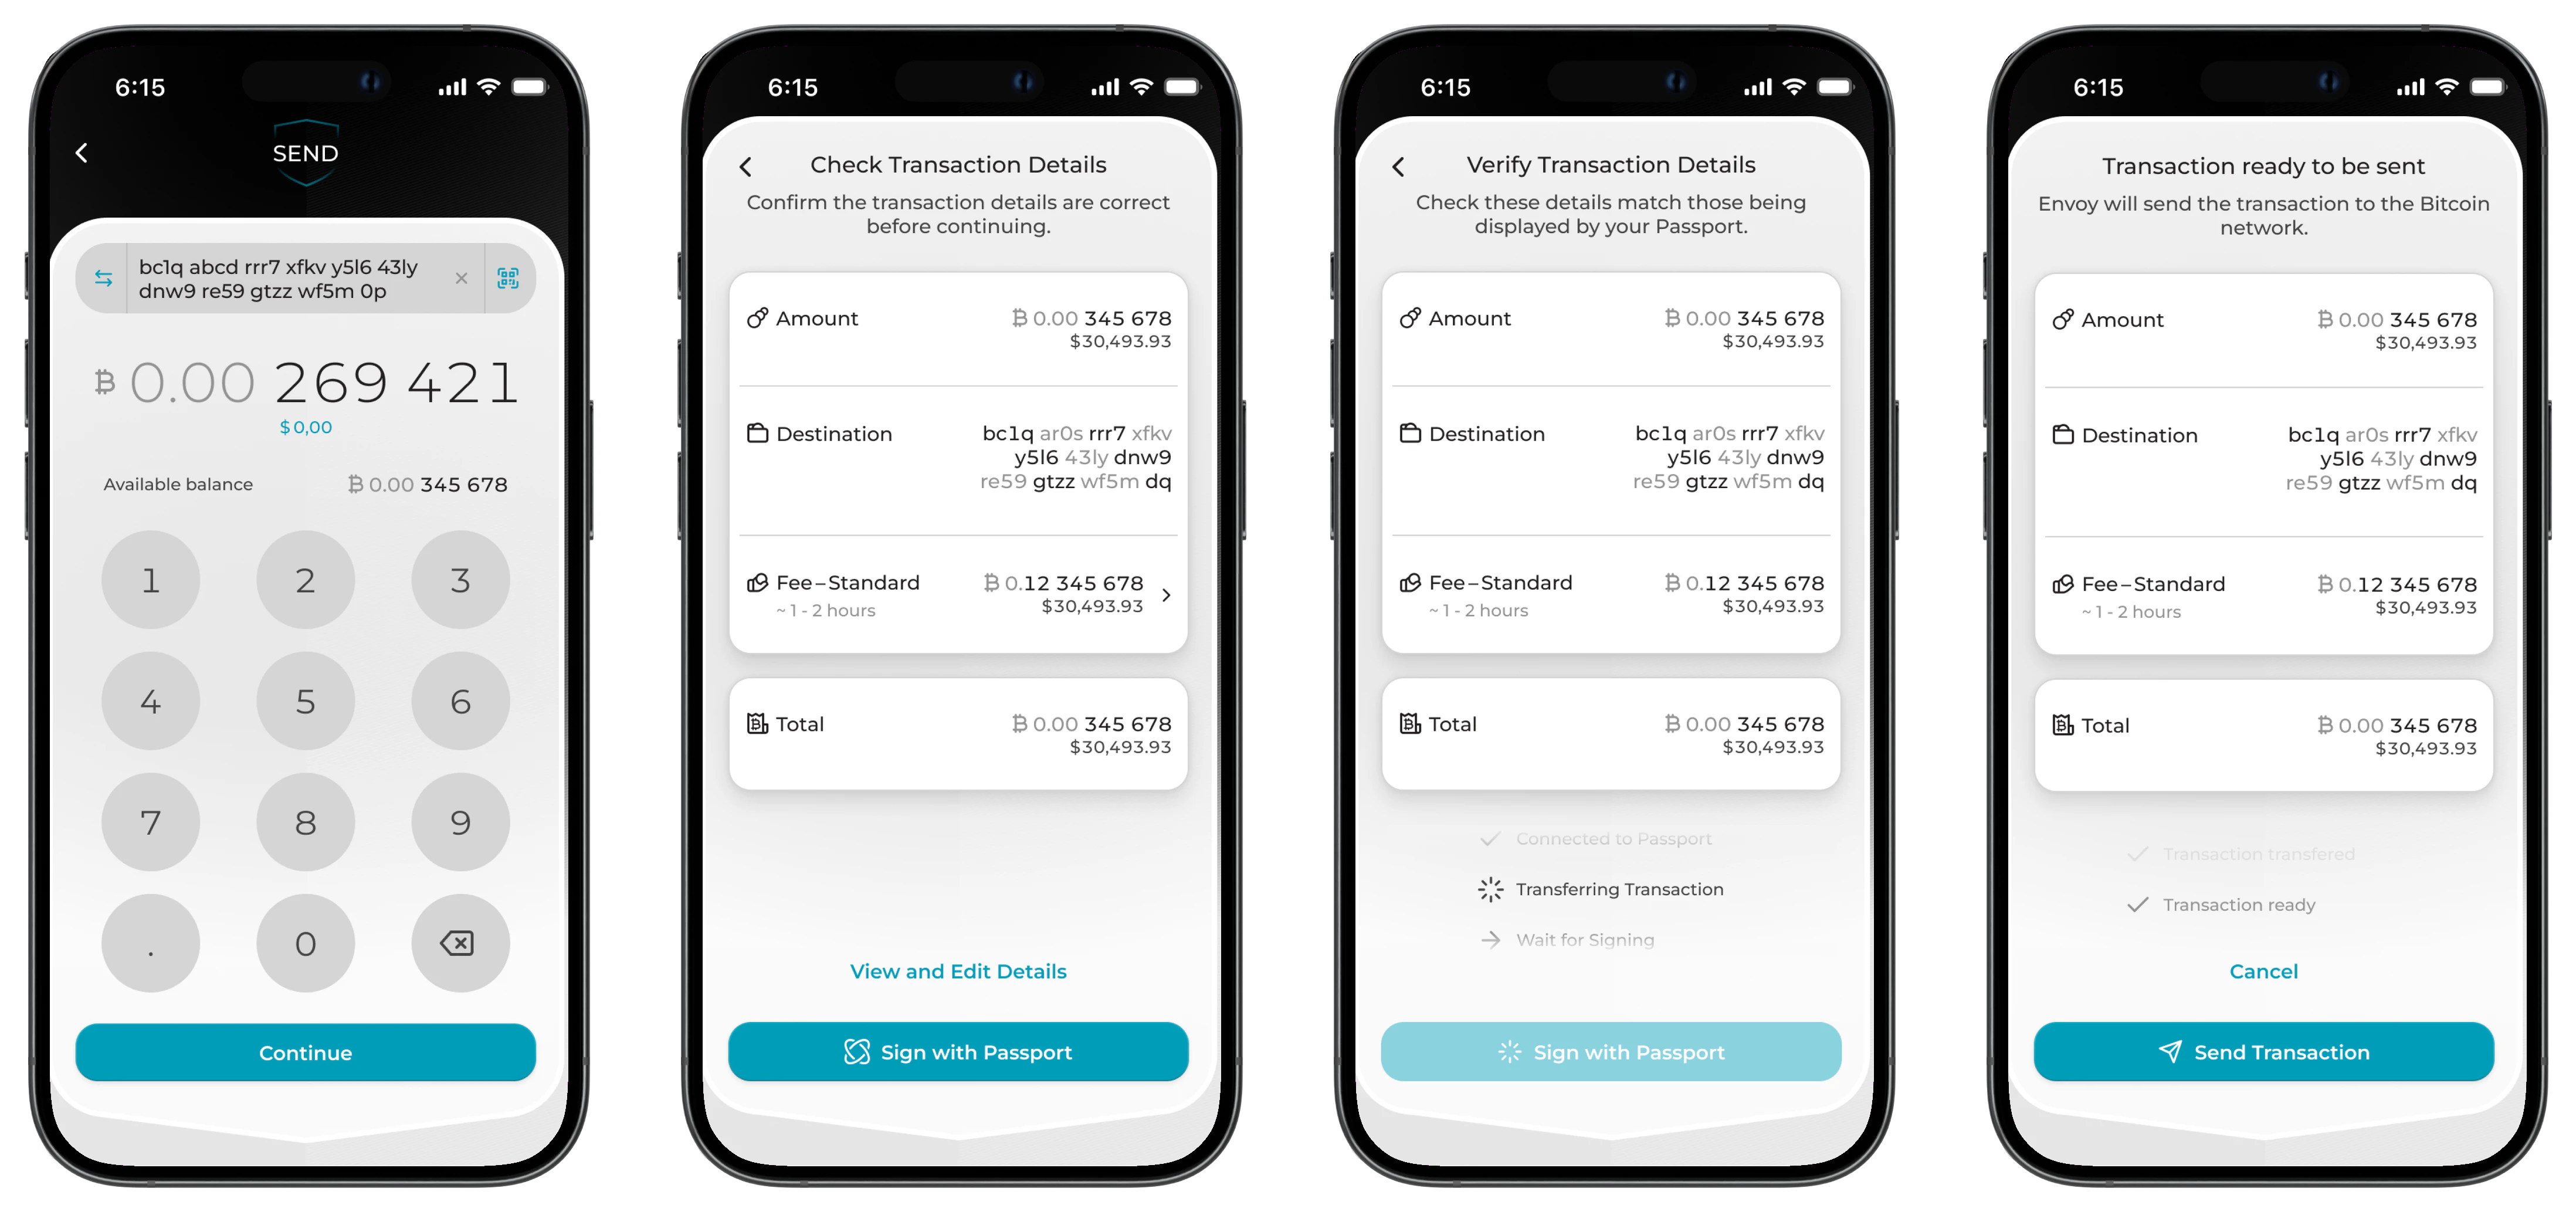
- Open the Passport account to be spent from and tap Send.
- Populate the recipient address by pasting, scanning a QR code, or typing it directly, then tap Confirm.
- Enter the amount to send. You can toggle the input between BTC and your local fiat currency.
- Choose your fee rate and tap Confirm.
- On Passport choose Sign with QR code, then scan the animated QR codes being displayed by Envoy.
- Confirm the transaction details on Passport and tap sign.
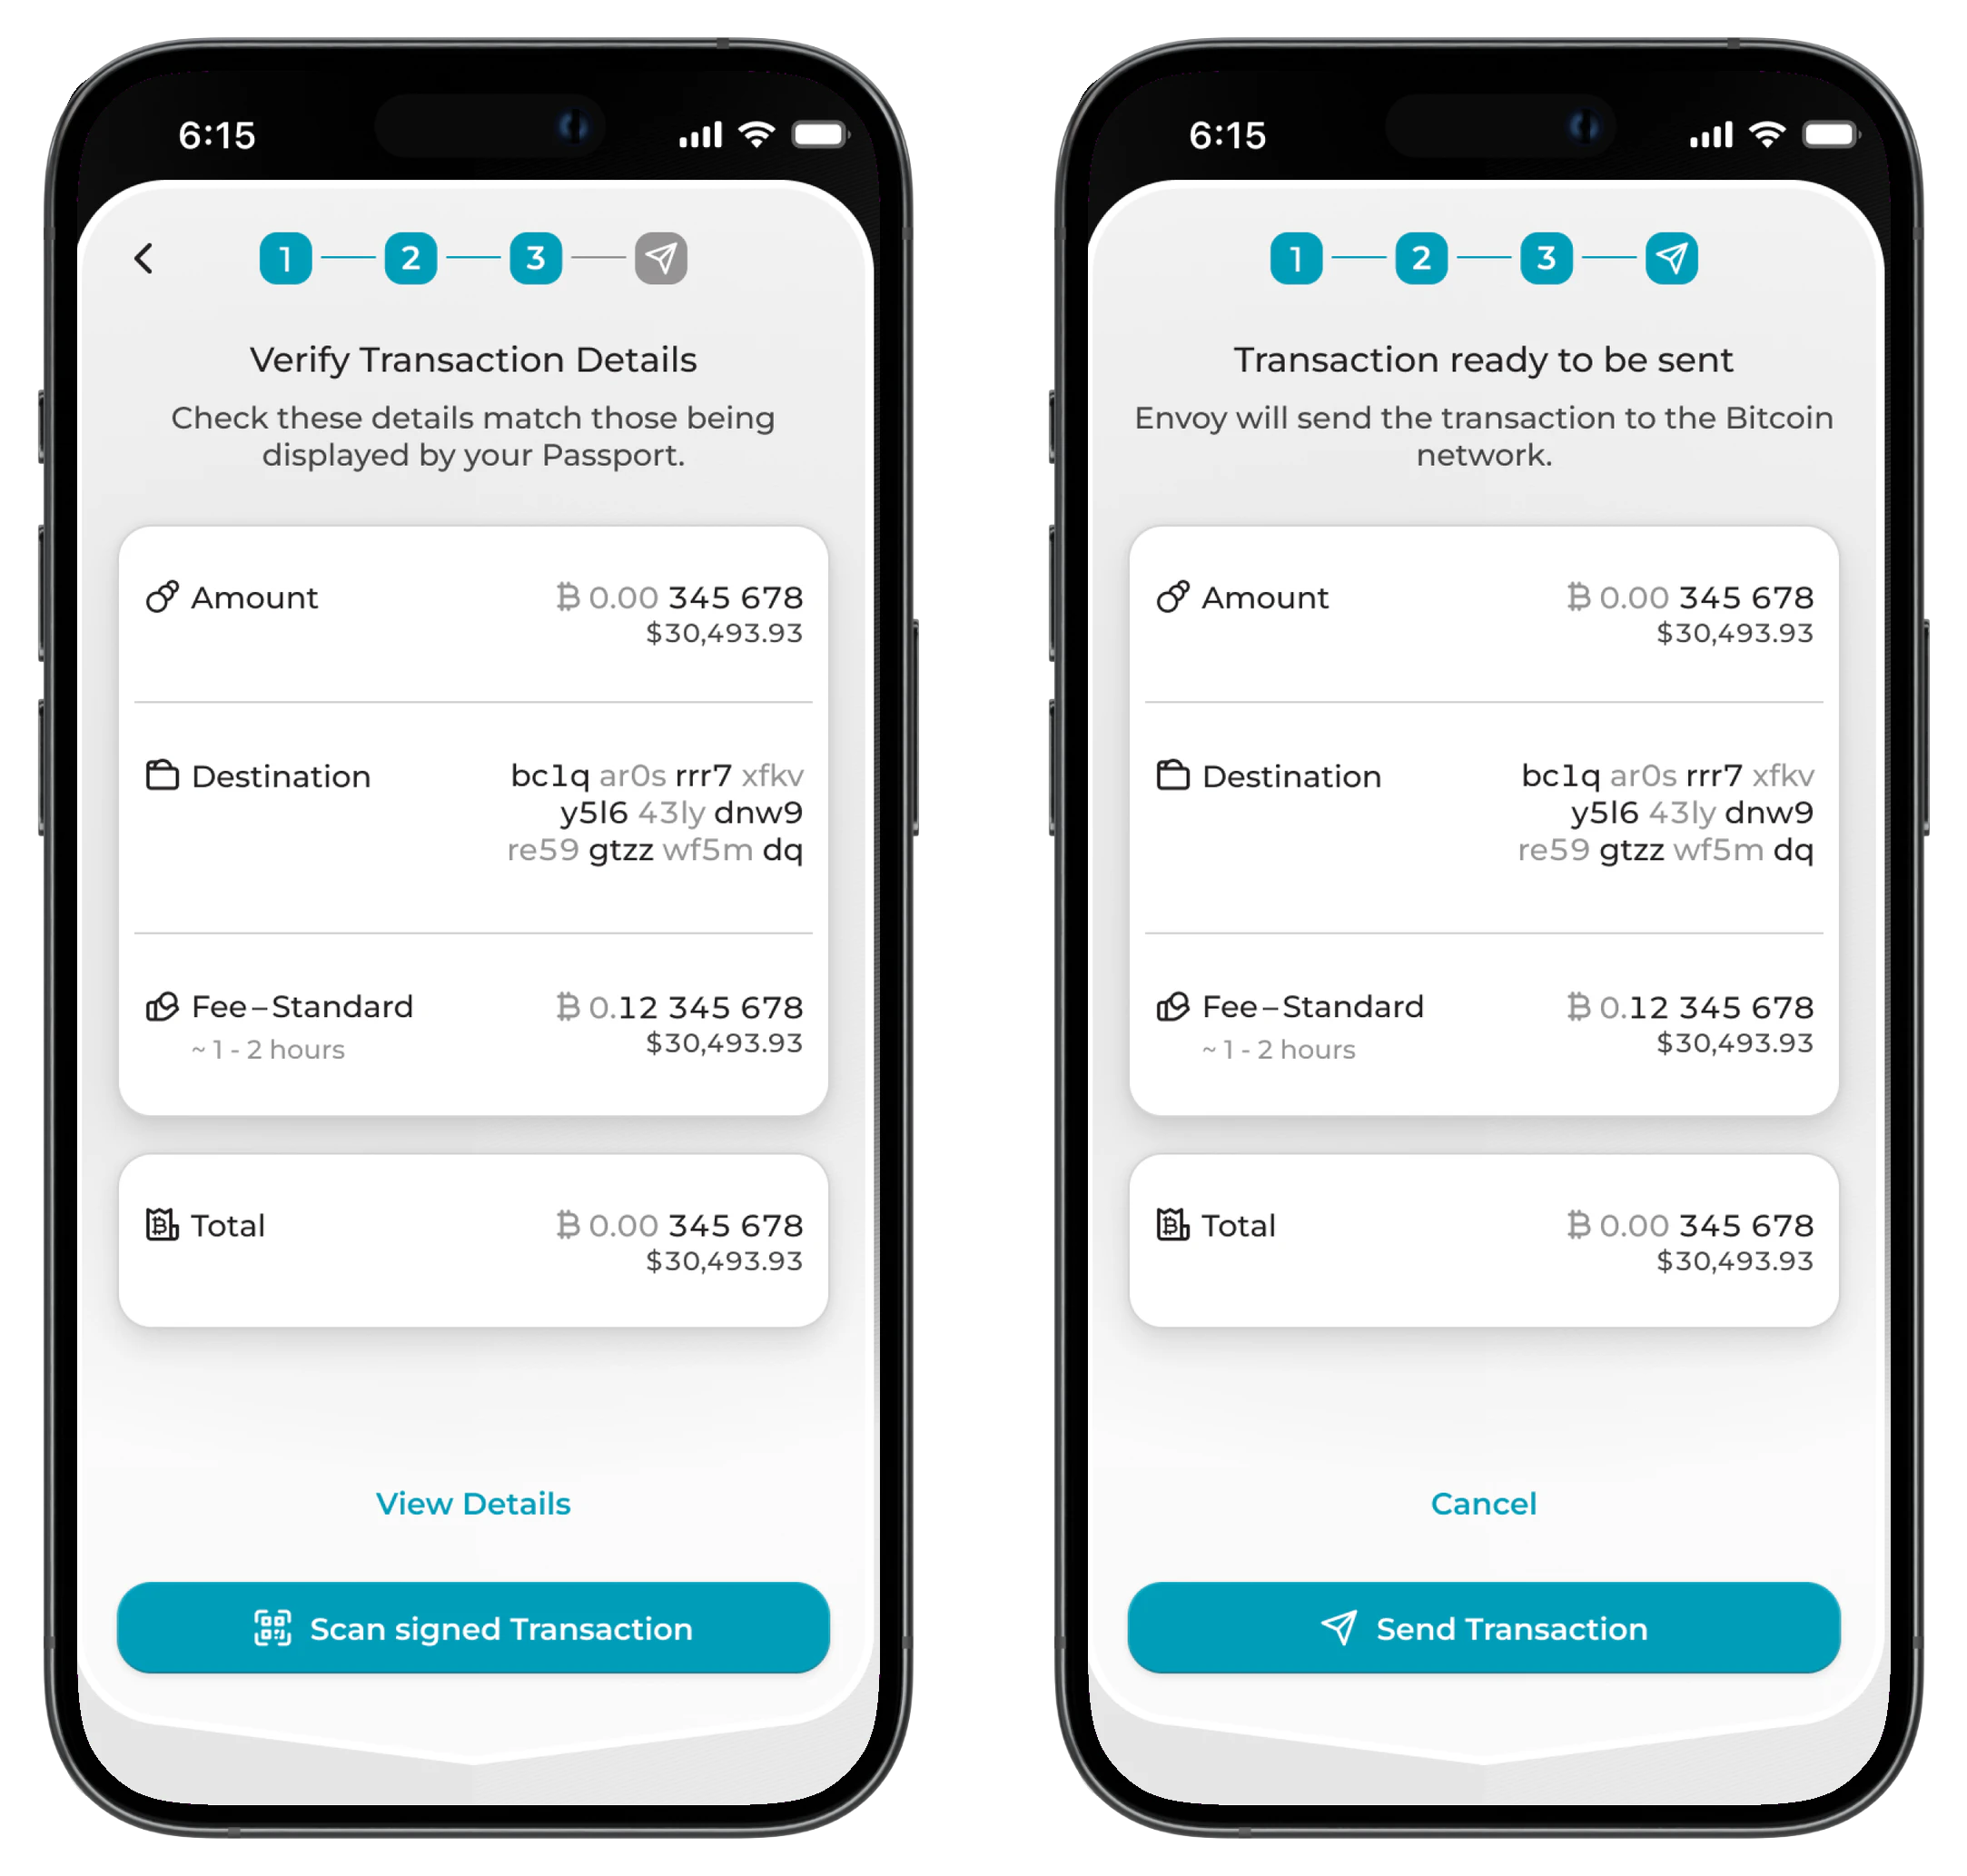
- In Envoy tap the QR scanner icon and scan the animated QR codes now being displayed by Passport.
- After reading them, Envoy will display the transaction summary. When you are happy with the details, tap Send.
- Envoy will then broadcast the signed transaction and update the transaction list and account balance.
On the QR display screen in step 5, you can adjust the QR code density directly from the signing flow. Higher density packs more data into each frame, so multi-input transactions scan faster, but it requires a steadier hand on both Envoy and Passport.
Setup (recipient, amount, fee)
Signing (QR display and scan-back)
Passport Prime
- Open the Passport Prime account to be spent from and tap Send.
- Populate the recipient address by pasting, scanning a QR code, or typing it directly, then tap Confirm.
- Enter the amount to send. You can toggle the input between BTC and your local fiat currency.
- Choose your fee rate and tap Confirm.
- Review the transaction details and tap Send. Envoy sends the unsigned transaction to Passport Prime over QuantumLink.
- Confirm the transaction details on Passport Prime and sign. The signed transaction is sent back to Envoy over the same QuantumLink connection.
- Envoy broadcasts the signed transaction and updates the transaction list and account balance.
Transfer Between Accounts
If you have more than one Envoy account, you can move funds directly between them without needing to copy an address across manually.
- Open the source account. There are two ways in:
- From the account details: tap the Transfer button on the floating menu, or
- From the Send flow: tap Send, then on the recipient step tap the account-picker icon to the left of the address bar.
- Select one of your other Envoy accounts as the destination.
- Enter the amount, choose your fee rate, review, and tap Send.
Envoy generates a fresh receive address on the destination account and populates it for you. Because the funds are still moving on the Bitcoin network, standard on-chain fees apply.
Sign a Message
Envoy can sign a message with any receive address in one of your accounts, producing a cryptographic signature that proves you control that address without moving any funds. This is useful when a service or counterparty asks you to prove ownership of an address.
Open the account, then start the signing flow from one of two places:
- From the Receive screen: tap the Sign Message pill button at the bottom.
- From the three-dot menu at the top right of the account details: tap Sign Message.
The signing itself works a little differently depending on the account type.
Mobile Wallet
- Enter the message you want to sign.
- Tap Sign. The Mobile Wallet Key stored in your phone's secure enclave signs the message directly, with no external device required.
- Envoy shows the signed message alongside the address it was signed with. You can copy or share the signature from here.
Passport Core
- Enter the message you want to sign.
- Envoy displays the message as an animated QR code. On Passport, choose to sign a message and scan the QR from Envoy.
- Confirm the details on Passport and sign, then scan the resulting signature QR back into Envoy.
- Envoy shows the signed message alongside the address it was signed with. You can copy or share the signature from here.

Passport Prime
- Enter the message you want to sign.
- Envoy sends the message to Passport Prime over QuantumLink. Confirm the details on Passport Prime and sign.
- The signed message is sent back to Envoy over the same QuantumLink connection.
- Envoy shows the signed message alongside the address it was signed with. You can copy or share the signature from here.
Boost or Cancel a Transaction
Envoy supports Replace-by-Fee (RBF) transactions. This allows for transactions to be sped up by increasing the fee rate, or even canceled by replacing a send transaction with another that uses a higher fee rate and sends the funds back to your own wallet.
Looking to troubleshoot Boost or Cancel transactions? Click here .
Boost a Transaction
If you have a transaction stuck in the Bitcoin transaction queue (the mempool) and would like to attempt to speed up the confirmation time, you can do so by using the boost feature in Envoy. Under the hood what's actually happening is that 'Transaction A' is being replaced by a very similar 'Transaction B', that pays the exact same recipient, but with a higher fee.
- Tap on the pending transaction from the Account Details screen.
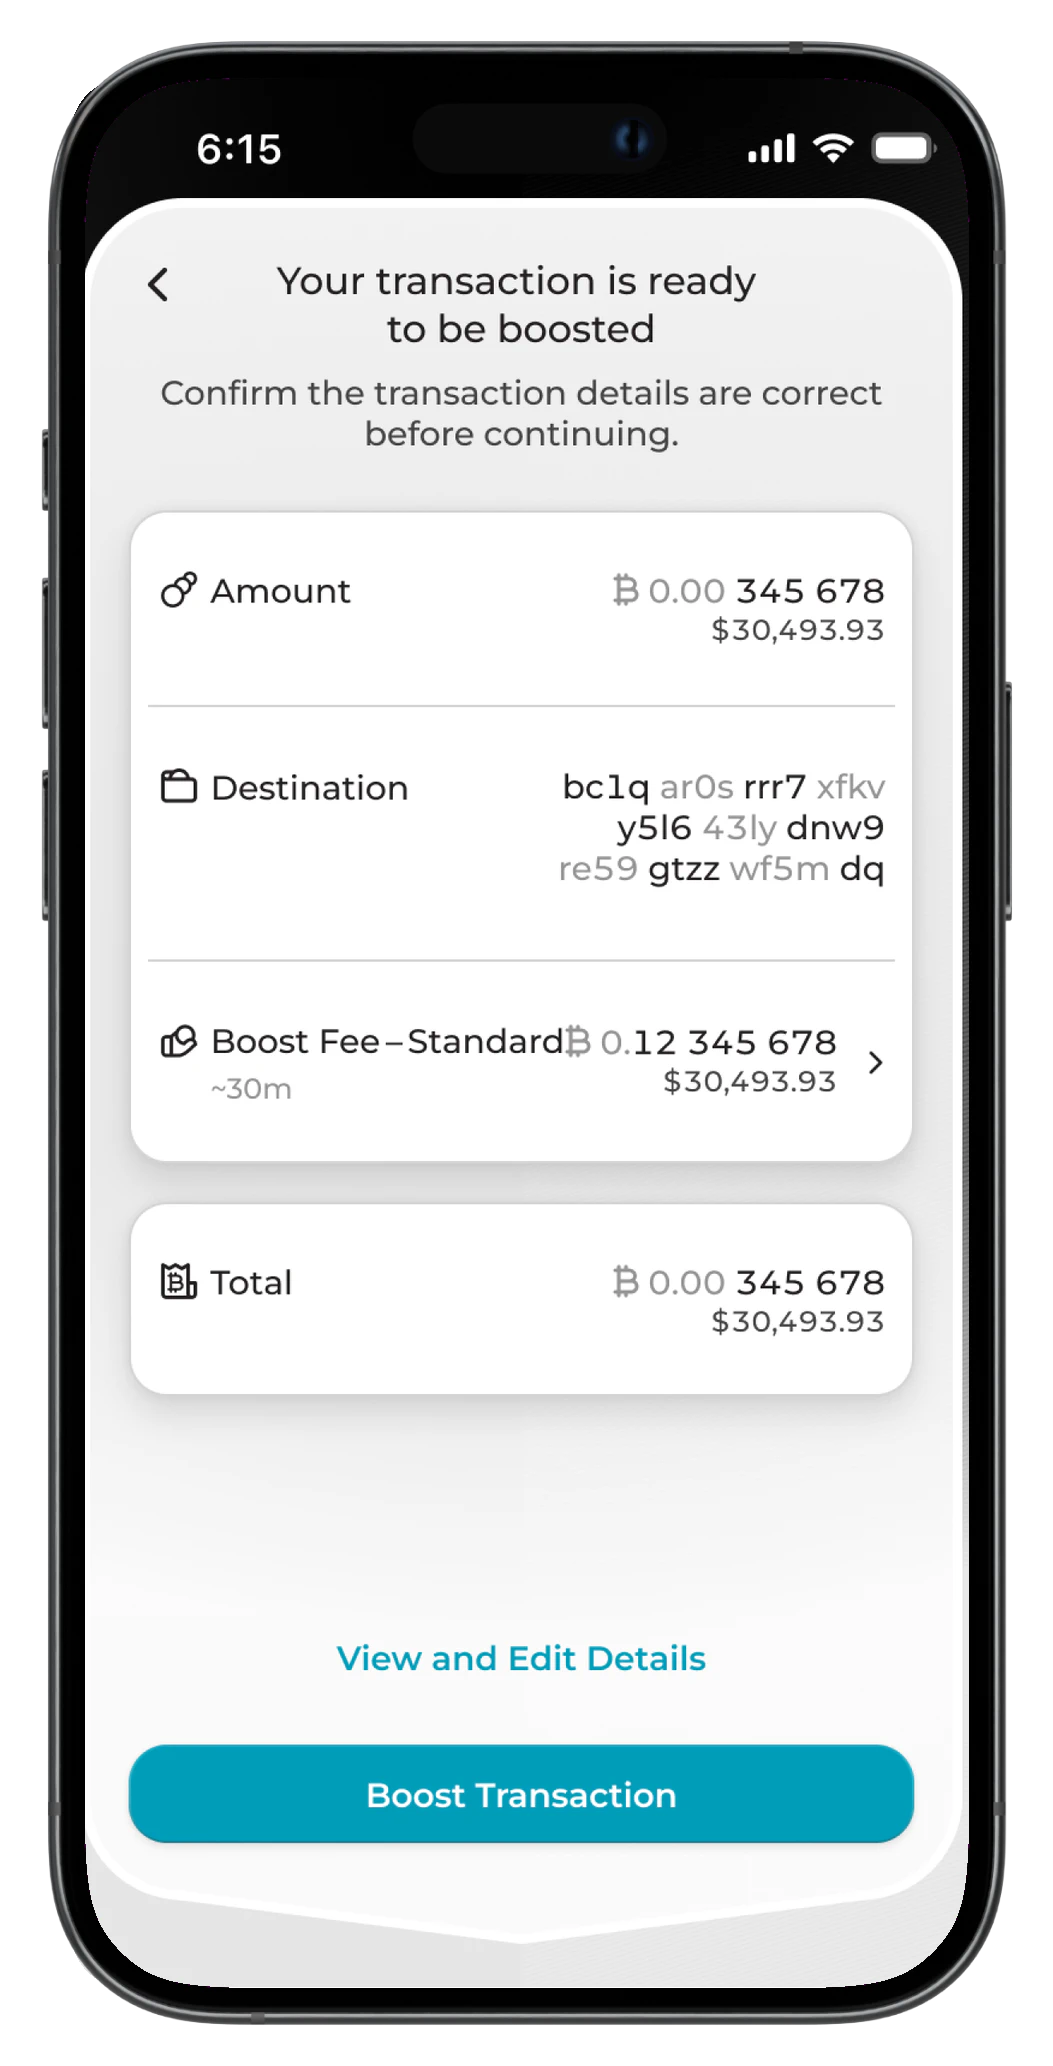
- Tap Boost.
- Select the new increased fee rate (optionally check mempool.space for the latest and most accurate fee estimates).
- Tap Boost Transaction. If boosting from an Envoy Mobile Wallet account, the new transaction containing the higher fee will now be broadcast to the Bitcoin network.
- If boosting from a Passport account, Envoy will now display the new unsigned transaction via QR codes for you to sign using Passport via the usual method.
- Once Envoy has read the signed transaction QR codes from Passport, the new transaction containing the higher fee will now be broadcast to the Bitcoin network.
Transactions can be boosted multiple times if required. This can be useful in a scenario where you have boosted with a marginal fee increase but network fees continue to rise.
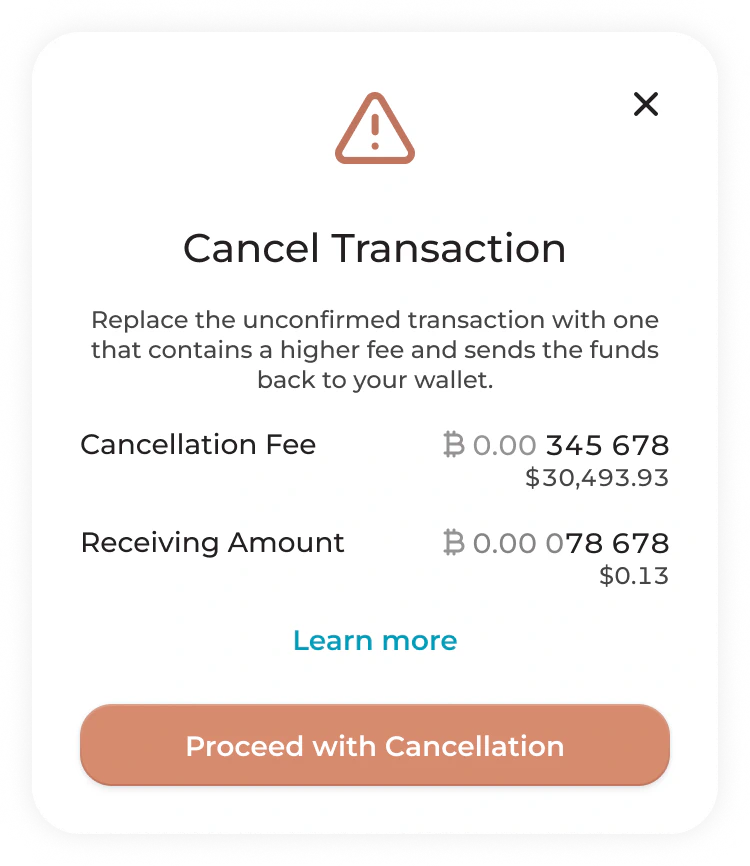
Cancel a Transaction
If you have a sent transaction that is currently sitting in the Bitcoin transaction queue (the mempool) and would like to cancel the send entirely, you can do so by using the cancel transaction feature in Envoy. Under the hood what's actually happening is that 'Transaction A', where Alice is paying Bob, is being replaced by a 'Transaction B', where Alice changes the destination of the transaction to one of her own addresses. Transaction B must always include a higher fee than Transaction A.
- Tap on the pending transaction from the Account Details screen.
- Tap Cancel Transaction. (Envoy then automatically creates a new transaction that changes the recipient address to one from your own wallet and includes a higher fee.)
- Review the cancel transaction details and confirm by tapping Proceed with Cancellation. If boosting from an Envoy Mobile Wallet account, the new transaction containing the higher fee will now be broadcast to the Bitcoin network.
- If boosting from a Passport account, Envoy will now display the new unsigned transaction via QR codes for you to sign using Passport via the usual method.
- Once Envoy has read the signed transaction QR codes from Passport, the new transaction containing the higher fee will now be broadcast to the Bitcoin network.
Canceling a transaction is a "best-effort" scenario and cannot be guaranteed. This is because a miner could include the initial transaction into a block even after both are broadcast.
Rescan Account
If your account balance or transaction history doesn't look right, or if you've just connected an existing account and are missing older history, you can trigger a manual rescan.
- Open the account and tap the three-dot menu at the top right.
- Tap Rescan Account.
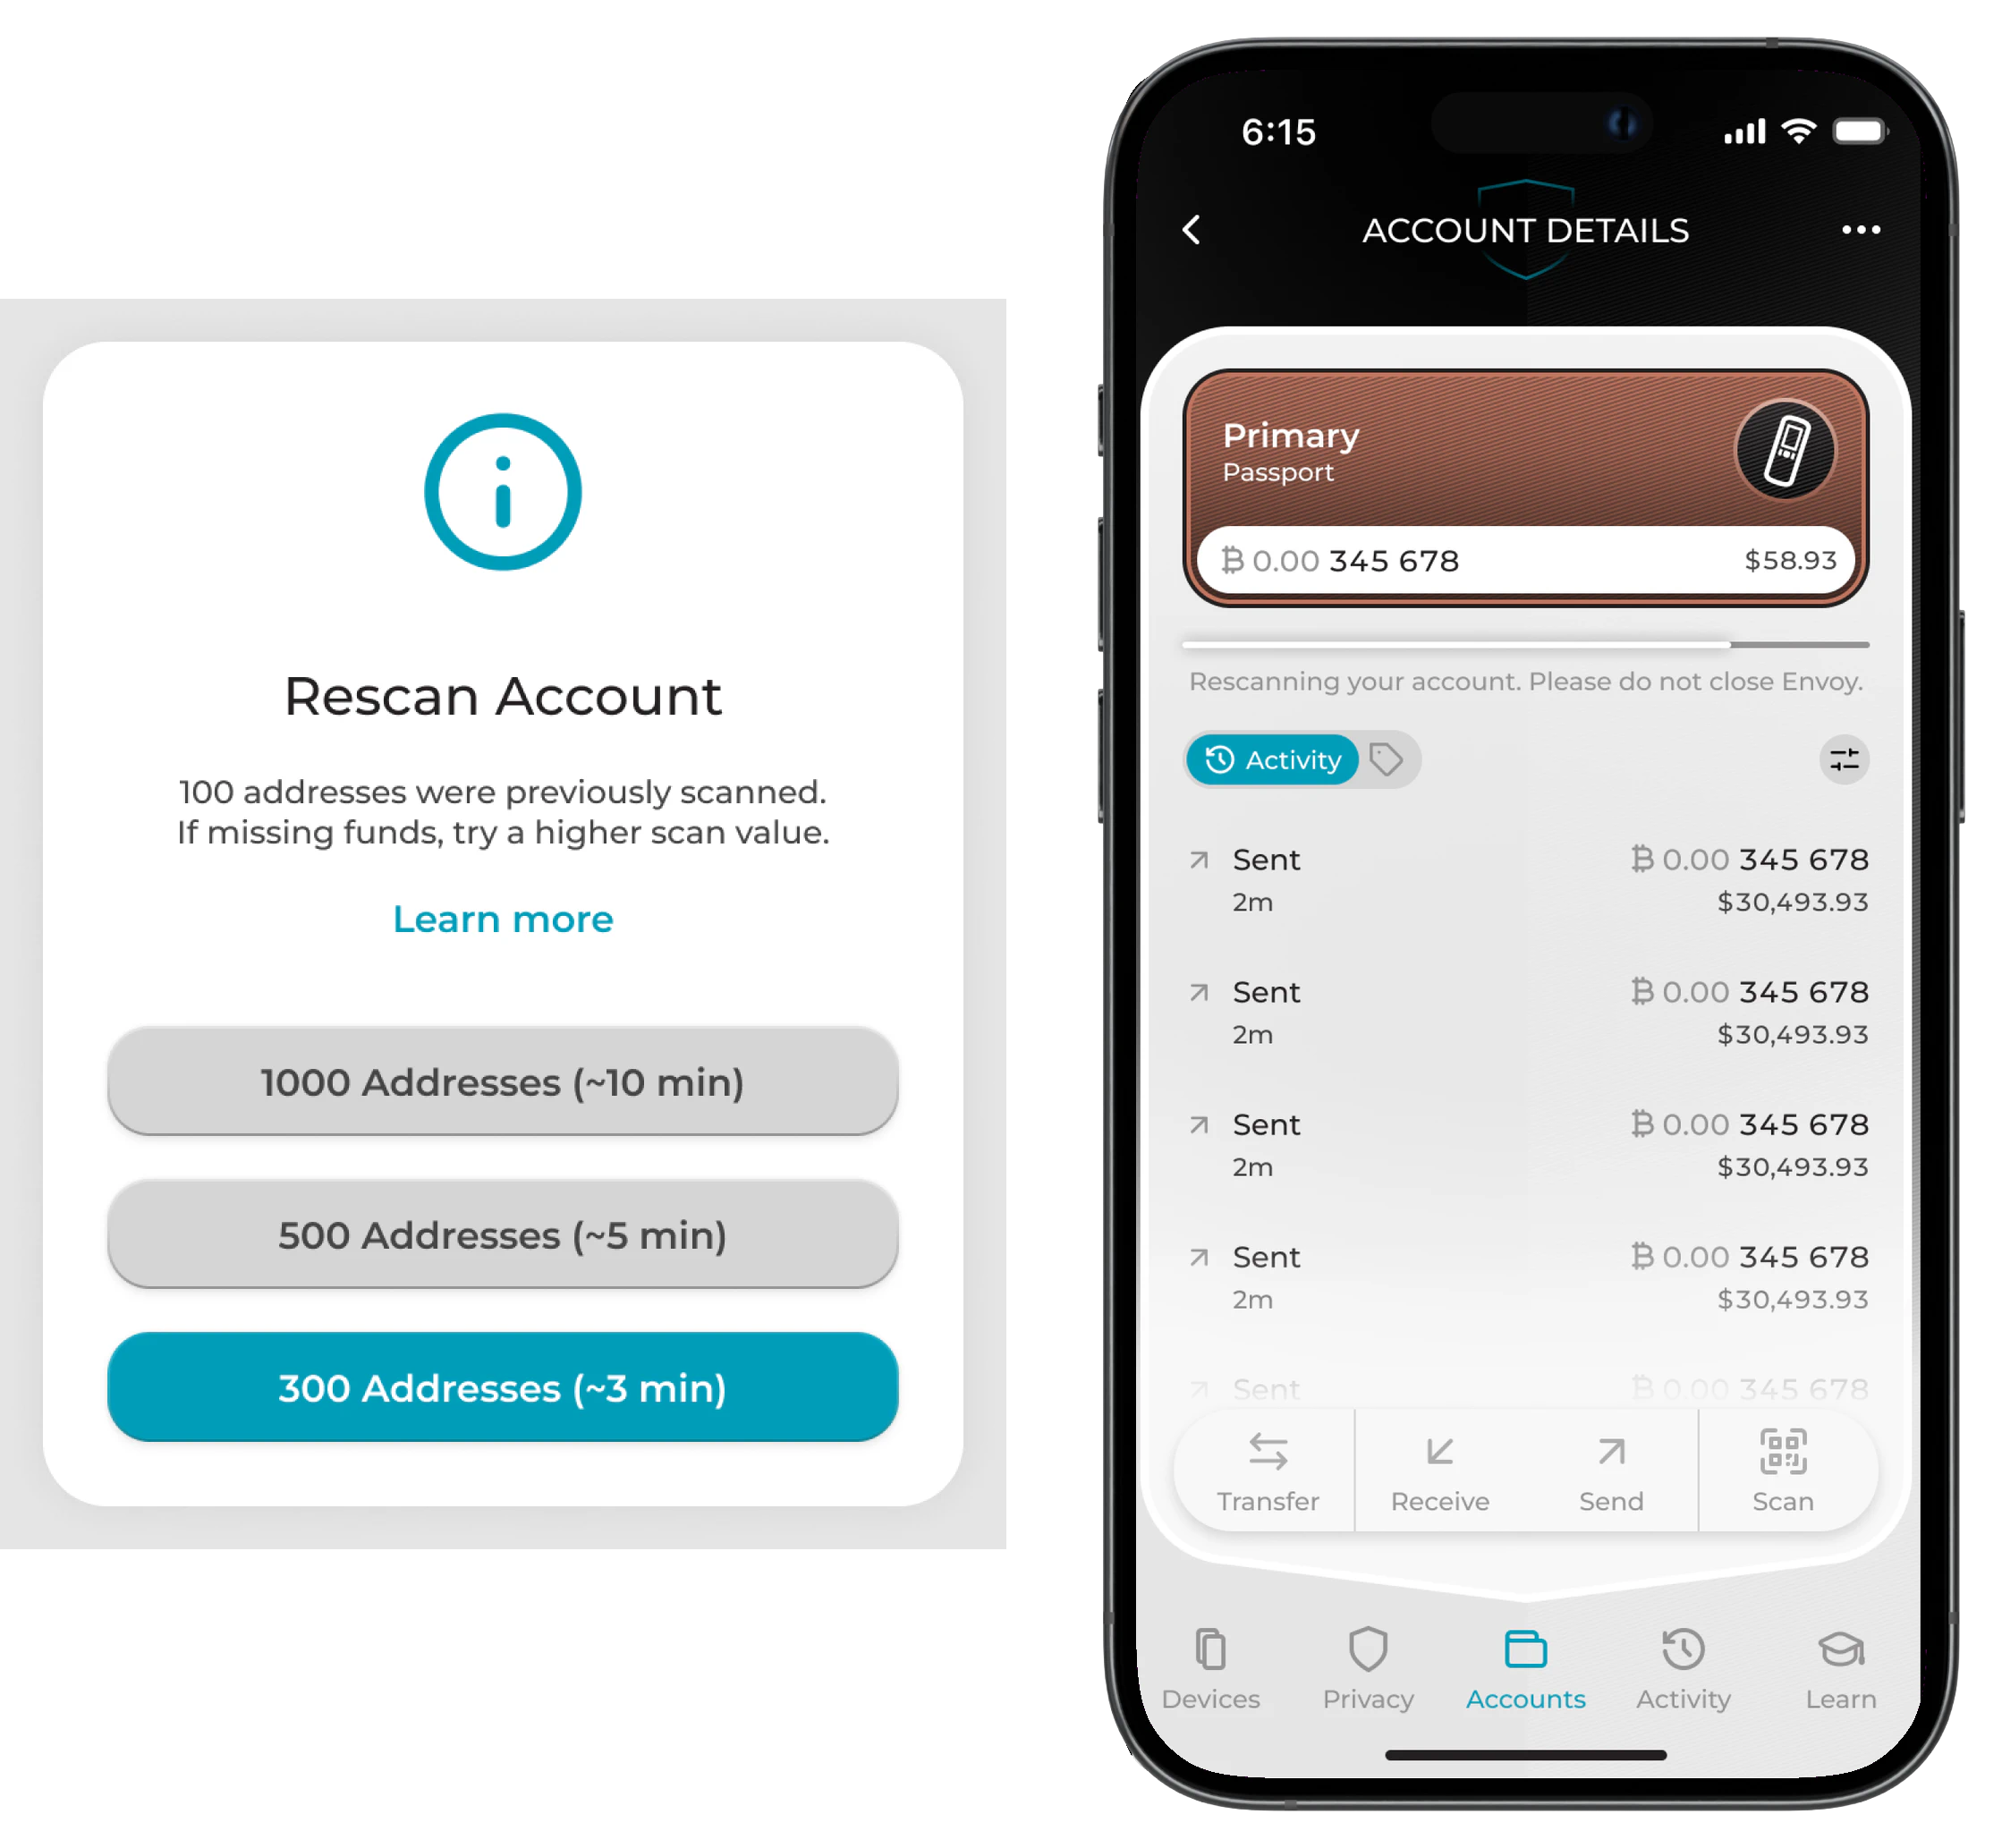
- Choose the scan depth: 300 Addresses (~3 min), 500 Addresses (~5 min), or 1000 Addresses (~10 min). If you've already tried a rescan and funds are still missing, pick a higher value.
Envoy re-queries the blockchain for every address up to the chosen depth. A progress banner sits above your transaction list while the rescan runs, and Envoy will ask you not to close the app until it finishes.
A rescan is a read-only operation. Your funds and outgoing transactions stay safe throughout the process, and you can keep using other accounts while it runs.